
With the designs pretty well set yet always subject to
change it’s time to start making some sawdust.
My plan is to make the bowls out of one piece whenever I can because I
want to eliminate, hide or minimize any glue joints. However, that’s not always possible given the
thickness of material I have and what’s available here. In some instances, the joints can be hidden
behind the decorative bands or inlays. In others I will have to rely on careful
grain matching to make them as inconspicuous as possible. This means that the bottom layer in the
turning block where the 4-jaw attaches needs to be sacrificial to preserve as
much of the bowl material as possible.
Since I wanted something more substantial than a softwood, I raided my
scrap box pulling out all sorts of different sizes and types of hardwood. They then got sorted into common lengths and
thickness and glued up to get the various widths required. Here they are all glued and clamped
together. In the background you can see
some of the material selected for the bowls.
Since I didn’t spend a lot of time making sure all the
joints were exactly flush during the glue up there was more variation than
normal but it’s not a problem. That’s
because it’s more time effective to just run the glued up the blanks through
the thickness sander to bring all the joints flat and level. To speed the process the normal finer grit,
wrap in the sander gets removed and a coarse 60 grit wrap is installed. For those that don’t know 60 grit is like a
playground sand. Below is a photo of a
six-inch ruler with 220 grit paper above it and 60 grit below.
Once sanded here is what the blanks look like with how
many and what size bowls get cut from each written on them.
The first set of blanks to be made are out of
walnut. The top photo is a rough sawn
plank almost 4” thick that’s a little cupped, warped and twisted. I cut down the tree about 45 years ago, had
it sawed into planks and it has been drying ever since. First step is to cut it into a couple of more
manageable sections. From there it gets
loaded into my Planer Sled, leveled then run through the surface planer to flatten
(bottom photo).
The cleaned-up planks are shown in the top photo. The part to the right of the white line in
the top plank is what will be used to make the bowl blanks. That’s shown in the bottom photo with the
oversized templates for the bowl blank shown.
Working on the cherry blanks are next. Pulling out my thick cherry slab left over
from the Maloof Rocker project and using the bowl templates I marked the size
piece needed then cut it out on the bandsaw.
Because the layers of contrasting woods in the bottom photo are not
inlays but go all the way through the piece, I will need to define the thickness of
the layers then use that to determine the thickness of the cherry blank
layers. 
The first step in making the feature layers for the
cherry bowls is to rip the Maple and Katalox that make up the feature layers
into thin strips. First is the maple and
here is the setup for ripping the blank on the bandsaw into four pieces just a
little over 1/8” thick. Process is to
rip a piece off then run the remaining thick piece through the thickness sander
until all the bandsaw marks are gone and the blank has a smooth face. Another piece gets ripped off and the
sequence gets repeated.
The same process is repeated with the Katalox except the
pieces being ripped are thinner at 3/32” thick. When sanded smooth this gives
pieces just under 1/16” thick at .058” shown at the top with the maple sheets
in the lower left. Next is to stack the
cherry, katalox and maple to see if the layers look in proportion. They didn’t, the maple looked too thick so I
ran it through the thickness sander shaving off about 1/100 of an inch then
restacking the pieces and evaluating to see what it looked like. The lower right photo is the result with the
maple piece at .084” thick giving me a total layer thickness of .2 inches.
Because the piece of katalox is not wide enough to make
the layers multiple pieces need to be edge glued to get the required width. With them being so thin I was worried about
splintering when run through the table saw.
To prevent that from happening they get taped down to a sacrificial
backer board per the left photo and cut to width. Gluing thin pieces presents its own
challenges since when trying to clamp the pieces just buckle. That’s solved by taking the three pieces
needed and setting one tight to a backer clamped to the non-stick surface
laminated particle board shown in the top right photo. In the bottom right photo, a second backer is
lightly clamped down leaving a little space between the katalox and the second
backer.
After a very thin bead of glue is applied to the edges of
the katalox the pieces are set between the backer boards and lightly clamped
together. Since one of the backer pieces
is also lightly clamped in place it is movable.
Last is to add another piece of laminated particle board,
clamp it down snuggly to hold the katalox pieces flat then tighten the clamps
that were lightly clamped in the previous step and leave it for the glue to
cure until the next day.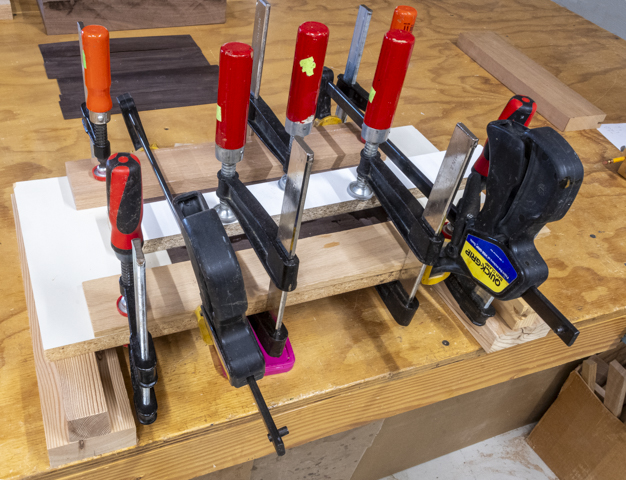
When the piece is unclamped the joints, all looked good
but there had been some glue squeeze out from the vertical clamping. You can see the shine of the glue in the left
photo. It’s pretty easy to remove using
a card scraper followed by a little sanding.
The right photo shows the majority done except for a little at the
bottom between the clamps which will get done when I reverse the piece.
Next Up – Making Thin Feature Layer & Gluing up the
Blanks
No comments:
Post a Comment