
After making the Frank Lloyd Style light and the
Dining/Game Table projects I decided I did not want to do another major project just now. I also wanted to do things that I had not
done before and were maybe a little different.
It has been awhile since I had done something on the lathe so I went
that direction. Well mostly,
anyway. There are three different
projects I have planned that I will be working on and depending on how they go maybe a fourth.
To start, about 30 years ago I had tried to turn a wood
ball for my then young son to play with.
The result was not a nice true sphere but something that looked more
like a very deformed egg. Although the
results were not what I had imagined I thought that he would like to play with
it anyway. What I quickly learned was
that it is not a good idea to give a 2-year-old a 3” solid oak “ball” to play
with inside the house as it quickly became a flying projectile. Fast forward 30+ years where my skills and
knowledge on the lathe had improved so I decided to give it another try.
In getting started the first thing I needed to do is to
glue up some blanks for the balls and for a couple of jigs that I will need to
make. Here are the blanks glued and
clamped together and no I do not think I used too many clamps. 😊The
blank for two of the test balls is on the left.
The two pieces on the right are for the jigs.

Once the glue cured I could mark circles on the jig
blanks then rough cut them roundish on the bandsaw. The cut does not have to be precise as its
just to make the turning to a true round piece easier. It’s a lot easier to not have to turn away
the corners.

Here on the left are the two blanks for the balls. On the right are the rough-cut blanks for the
jigs. Don’t worry about the big chunk
out of the far right blank as it will be turned away as I make the jig.

Next, I marked the center of the ball blanks using my
center-finder then punched a small dimple at the lines intersection

With the center marked I set the drive center in the
dimple and gave it a good whack with my old mallet. The “X” on the blank in the lower left is a
reference mark. I have a similar mark on
the drive center. This allows me to take
the piece off the lathe the put it back on in exactly the same place.

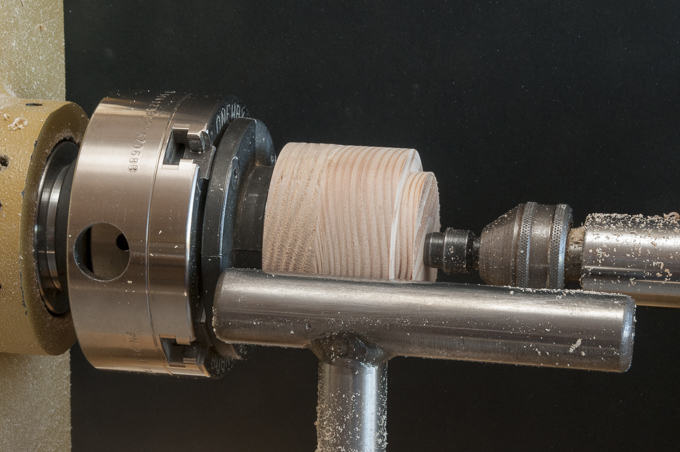
Here the block blank is set in the lathe ready to
go. I will rough it out using the
roughing gouge shown.

When I turn the lathe on the area sticking out beyond
what will be a smooth cylinder is semi-transparent. If you look at the left end you can see what
looks solid is the size of the smooth cylinder I will end up with. Everything outside of that line has to be
removed.

Here about half of the excess has been removed and the
semi-transparent area is much smaller.

When you get close the spinning blank looks solid. At this point all I needed to do was trim up
the left side as it is a little larger than the rest of the cylinder.

Stopping the lathe confirms I have a nice true cylinder
to work with. At this point I took the
blank off the lathe turned the other one down to the same size and set both of
them aside to work on the jigs.

 This is a cross section of the jig I am going to
make. Both of them are identical so they
are interchangeable however, for maximum consistency I will probably not switch
them around. One gets attached to the
live center mounted in the tail stock and one gets clamped in the scroll chuck
mounted on the headstock.
This is a cross section of the jig I am going to
make. Both of them are identical so they
are interchangeable however, for maximum consistency I will probably not switch
them around. One gets attached to the
live center mounted in the tail stock and one gets clamped in the scroll chuck
mounted on the headstock.
There are a number of steps in making the jig and they
need to be done in a specific order so here goes. First the rough turned blank is butted up
against the scroll chuck on the head stock (left side) then the point of the
live center mounted in the tail stock (right side) is set in the dimple done
earlier. The live center is then cranked
down to apply pressure and hold the blank tight to the scroll chuck. I can now start the lathe and turn the blank
round. With that done a notch is cut on
the tail stock end as shown. This
provides a place for the chuck to grab in the next step.
The blank is flipped end for end and using the notch cut
above it is securely mounted in the in the scroll chuck.

A 5/8” drill is mounted in a Jacob’s chuck set in
the tail stock is used to drill a 1¾” deep hole in the jig. Once I have blown out the wood chips from the
hole I use a ¾” x 10 tap to cut threads in it.
That configuration matches the threading on the live center that goes in
the tail stock. This allows the jig to
be screwed onto the live center. Don’t
worry if things don’t quite make sense just yet, they will.

Next, a shallow recess is cut in the jig using a Fostner
bit. This style of bit gives me a nice
flat bottom in the recess. The recess provides
a reference surface in the jig that butts up to a matching shoulder on the live
center.

The last step on this end of the jig is to cut another
notch so the piece can be flipped end for end again and securely mounted in the
chuck.

With jig in its production location I add numbers to it
that match the jaw numbers on the chuck.
This will allow me to take it off the lathe the put it back on in
exactly the same place. I can now turn
the jig to its final cone shape and add the curved recess on the end. This recess will be what holds the ball to be
in place when I do the final turning.

All I have to do now it duplicate the process to make another one. Here both
are done and installed on the lathe.

Next Up – Turning & Finishing the Balls