Router Plane

Monday, March 25, 2019

2 Piece Turned Bowl - #4 Inside Finishing & Making a Live Center Cone


For the finish I am going to use a multi-layer approach using dye, a gel stain and lacquer for the final top-coat.  However, before I apply anything, I need to mask off the flat part of the rim where both halves will be glued together as bare wood is needed to make a good glue joint.  Blue painter tape is applied in strips to cover the band then a sharp knife is used to cut the tape where the dished-out area meets the glue band.  The left photo below shows the tape applied but not cut while the right side shows the completed top.  The same process is used for the bottom piece.


Next is to mix up a little dye for my base.  I have a storage drawer with samples of the various finishes from different projects including ones the did not end up being used.  They all have instructions on the back for what was used and in what order.  All I have to do is pick the finish wanted and follow the instructions.  For this piece here is my sample block and the instructions.  I think this is from a hall cabinet I made for my son. 

When I mix the dye, I use denatured alcohol as a solvent instead of water so as not to raise the grain. Here is what I use to make up a batch.  Since there is not a lot of area to dye, I only mixed up a Tablespoon.

This is what the finished surfaces look like once the dye mixture had dried.  I probably only used about ¾ of the Tablespoon I had mixed up so it does not take a lot.  One note if you really flood the surface and put too much on then as it dries the excess can bleed out of the pores which leaves a blotchy surface.  If that happens all is not lost just wet a paper towel with alcohol and rub out the surface.  The alcohol dissolves the dye and evens everything out. 

Before putting the gel stain on I want to seal the dye.  In other pieces I have used a coat of shellac as a sealer but in this case decided to try a thin coat of lacquer which is made up by thinning the lacquer by about 50%.  Here is the setup ready to spray.

It did not take more than a couple of minutes to give both halves a coat of the thinned lacquer and in 15 minutes it was dry to the touch.  That said they will be left to cure overnight as it’s still a little cool in the shop here.

The next day I rubbed a dark walnut gel stain into the open pores darkening them but because of the coat of lacquer the stain did not darken the lighter smooth area.  The photo below shows what it looks like.  Compared against the “before” image you can’t see much but in person the pores are darker and have more contrast than before.  

After drying overnight it’s time to put a few coats of lacquer on for the final finish.  The nice thing about spraying lacquer is that at this time of year the finish goes dust-free in maybe 10 minutes or less and you can apply coats every couple of hours.  Here is the result with the tape removed after I sprayed on four coats lightly sanding with 220 grit paper between the second and third coats.  The final coat was left to cure for a couple of days then wet sanded using a foam backed piece with a grit of 8,000.  That gets rid of any little dust nibs giving a very smooth surface.

I have given quite a bit of thought as to how mount the piece to the lathe after gluing the two halves together.  Originally the plan was to use a smooth cone inserted into the top hole to spin the piece and have a live center in the tailstock with a flat plate set in a recess in the foot which would act as a stabilizer.  While it made some sense, I was concerned about how well using the cone would work.  There would not be much surface area contact between the cone and the edge of the hole plus both surfaces would be really smooth.  What that boils down to is there would not be very much friction available to spin the bowl.  What changed my mind was when I unclamped the bottom half of the bowl from the large jaws.  Since the clamping faces are smooth and their arc closely matches the arc of the foot there was virtually no damage to the oak.  That meant gently clamping the foot in the large jaws and using a soft wood cone in the top hole acting as a stabilizer now sounded like a better idea.  Now I just needed to make cone.

One of my live centers has a threaded end which allows me to mount to it whatever shape I need, in this case the cone.  The material the cone is made from needs to have one end that is relatively soft so as to not damage the top hole while the opposite end needs to be harder so it can be threaded to match the threaded end on the live center.  The solution is to glue a piece of softwood in this case a scrap of 2x4 to a piece of oak.  The oak came from a cutoff from the bowl blank.  Here you can see what that looks like.
 
Once the glue cured the block was rough cut round, mounted between centers and turned to a circle.  That was mounted in the chuck using the medium jaws and two holes were drilled.  First, a shallow one that will act as a registration surface up against the base of the live center to keep the axis true.  The second hole shown here and just completed is sized so I can cut threads that match the threaded end in the live center.  

Next is to cut the threads with a tap.  This is the setup and while it looks a little Rube Goldbergish it works.  Here’s how, the wood block with the clamp has a hole drilled about half way through that fits the end of the tap and holds it in place.  A smaller hole centered in the first one goes the rest of the way through and has the point of the live center run into it.  That means when I align the tap in the hole to be threaded with the piece of wood in the chuck, the tap and the live center are all aligned with the center axis of lathe and I will get a set of threads centered on that axis.  All well and good but you ask, “What’s the clamp on the block of wood for?”  Well, I need one hand to turn the chuck, one hand to apply pressure to the tailstock to keep the live center tight to wood as the tap gets pulled into the hole while cutting the threads and one hand to hold the block from turning.  Total is one more hand than I have.  Using the clamp keeps the block from turning as its bar is between the lathe bed ways.  

Final bit of work is to screw the wood piece onto the live center, add a small bolt through it locking the end in place to keep it from spinning and turn it the desired profile. 

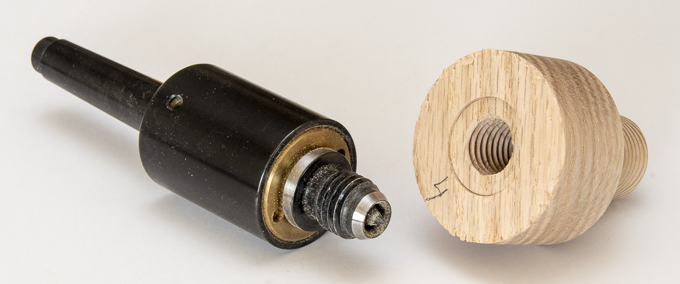
Taking the live center off the lathe and removing the turned cone you can see how it goes together.  The number "4" on the oak matches the #4 chuck jaw so if I ever need to remount it I can put it back in the chuck in the same place as before.

Next up – Testing a Turquoise Inlay

Monday, March 18, 2019

2 Piece Turned Bowl - #3 Completing Phase 1 Turning


Turning the top half follows just about the same process as the bottom half.  However, in looking at the previous post I think there were some intermediate steps in turning the inside face of the bowl that I should have included.  Having a nearly identical piece gives me that opportunity to fill in that gap in the process.

I am going to pick up after turning the outer face and right after mounting the blank using the large jaws on the chuck.  Here it is ready for me to start turning or dishing out what will be the inner surface of the bowl.  The 2½” drilled hole used to hold the blank in the chuck using the intermediate size jaws to turn the outside face of the bottom is clearly visible.


Leaving a flat surface about 5/8” wide for gluing the two halves together I started turning away the inside of the top.  My goal here is to mirror the outside curve leaving a wall thickness of about 3/8”.  If you are really, really good you can probably gauge the thickness by feeling both sides.  Me, I rely on a gauge to get that constant thickness.  I have three different ones but here is what was used on this bowl.

Rather than take off material in layers all the way across the face from edge to center I work to a finished depth from the outside in.  That’s because as material is removed you decrease structural integrity which makes the piece less stiff which can allow the piece vibrate via harmonic chatter giving you a turned surface with all kinds of hills, valleys, ridges and even spirals.  Below are two photos showing how I worked my way toward the center roughly a third at a time.

Below on the left you can see that when I get right at the center, I leave a little nub.  The top of this nub is the bottom of original drilled 2½” hole.  It acts as a reference so I can tell how far I have dished down into the blank. Once satisfied with where the turned surface is, I take the nub off and finish sand the surface as shown in the right photo.  Don’t worry about the little hole in the center it’s going to go away soon.

To make sure the glue band at the edge is square with the bowl axis I start by marking it up with a pencil. Next, using a straight board that has some sandpaper glued to one end I hold the bare wood up against the right edge and use the sandpaper end to remove any irregularities and flatten the band.  When done I have a good glue surface square with the bowls axis.  Well, almost square as there is a tiny bit of taper toward the inside since there is only sandpaper on one side.  That’s not a problem because I want the outer edge tight and can live with a hairline crack on the inside.  If I wanted it truly square a second piece of sandpaper would need to be added to the opposite end of the board.

The last step on the top for now is to drill the center hole.  Here you can see where the Fostner bit has just started to break through the other side.  It will be finished when I flip the blank over, remount it on a different set of jaws and finish turning the top’s outside.


With both the top and bottom blanks finish turned on the inside and mostly turned on the outside below are the two halves in the same orientation as they will be when glued together.  On the left is the top while on the right is the bottom.


Setting the top on the bottom looks like this.  The bottom needs have final shaping done to the foot and the top needs to have the foot completely removed.  Also, the outer edge is a little fat so once the halves are glued together that will have to be refined.  Speaking of the edge I am thinking about doing a turquoise inlay band where the two halves come together.  No decision on that but I am considering it.


Now it’s time to switch out the large jaws on the scroll chuck and go to the extra-large jaws.  Once that’s done the bottom blank is mounted and the finish turning done to the foot.  The work here included making the foot about a half an inch smaller in diameter, cleaning up the inside of the foot to remove the hole I had drilled earlier and adding a shallow recess to delineate the rim the piece will set on when done.  The left image shows what the foot looked like earlier, right after I had drilled that hole and the right shows the finished bottom.


Next up is the top going though a similar process with a slightly different result as there is no need for any of the foot to remain.  Left photo is top mounted in the extra-large jaws before I started turning and the right photo is when the turning is completed.


Stacking the top and bottom halves together like they will be when done looks like this.  In looking at the profile I can see the top curve needs some more help.  It is not as smooth as I would like.  If you look about an inch in from the outside edge there is a little bump that needs to be smoothed out.  I am not too worried as once the two halves are glued together, I will need to finish the edge and its transition.

This completes the Phase 1 turning which is as far as I can go for now.  Next is to stain and finish the completed inside faces of both halves.  No way that can be done later through the small opening in the top half.

Next up – Inside Finishing & Making a Live Center Cone

Monday, March 11, 2019

2 Piece Turned Bowl - #2 Turning the Bottom Half


With the Fostner bit modified and tuned up I can start using it.  At 2 ½” in diameter it is pretty good sized and stamped on the shank is a note that says, “480 Max. RPM.”  That means the first step is to rearrange the belts in my drill press to get at or below the  maximum recommended speed.  I sure don’t want to have it going to fast, overheat and ruin the cutting-edge hardness.


With the speed turned down I chucked the newly tuned up bit in the drill press and made a test hole in a scrap piece.  Everything went well and after making the test I used a fine tip marker to draw a line on the bit at the desired cutting depth.  Next is to carefully center the bit on what will be the inside of the  bottom of the bowl then drill down to my depth line.  Below shows the bit bottomed out in its hole and then pulled out.  The pulled-out image clearly shows my depth mark.

Turning to the lathe I mounted the scroll chuck using medium jaws, closed them down and was ready to clamp the blank  in place.  For this operation the chuck jaws will fit inside the hole and as they are expanded the serrated faces will bite into the drilled hole holding the blank in place.

Here is what the blank looks like with it securely clamped in place by the scroll chuck .
Next a live center is installed in the tail stock and ran up against the face of the blank.  I probably could have skipped this step and started turning but having the live center applying a little pressure to the blank to help push it against the chuck jaws will help hold it in  place and give me a little additional piece of mind.  Once I had a bowl in progress break loose climb up my arm then go flying across the room.  Let me tell you once is more than enough.


The turning could now start in earnest.  First step is to true up the outside edge of the blank then flatten the face toward the live center.  With that done I marked out a 4¼” circle for the “foot” of the finished piece.  It will also act as an attachment point when the blank is flipped so the inside can be turned.  From there I can start thinning the outer edge to create a gentle curve from the edge to the foot.  Below shows the nearly finished arc and the foot.  Since I do not want to lose much in the way of thickness and only want a small profile the foot is not too tall, only about 3/16”.  The foot is not done and will not be finished until near the end.  Those with sharp eyes will note the change to the live center from a flat pressure plate to one with a cup and point.

Moving to the inside face of the blank I trued up about an inch in from the outer edge.  This makes this  face parallel to the just turned bottom of the bowl and will work as a reference face later on.

Last bit of work is to make a small 15/16” diameter recess in the center of the foot for the flat plate insert in the live center.  I need this or at least think I will need it when I do the final bit of turning after both halves are glued together.  Naturally I don’t have a Fostner that size.  My choices were 7/8” and  1”.  Because I think I want a snug fit the 1” was too big and therefore not suitable.  That left me with using the 7/8” bit to make a shallow hole, left photo below.  A little delicate work with the parting tool gave me the additional 1/32” radius cut.  The below right photo shows the flat plate held in place with just a friction fit.

Switching out the jaws on the scroll chuck is next.  The jaws now on it are my medium sized set and I needed to go to the large diameter set to grab the 4¼” foot that had just been turned.  This is what  that set looks like on the chuck and ready to go.  Note that the inner face which is what I will be using is smooth unlike the ribbed set I had on before.  The smooth jaw faces should dramatically reduce the marring of the gripped surface.  That’s not really a problem with the ribbed set as the entire 2½” mounting hole will shortly be completely removed.

The photo below shows the chuck with its large jaws clamped on the outside of the blank using the  4¼” foot. 

Moving in to a close up of chuck’s jaws and how it is clamped onto the foot.  If you look closely you can see that the jaws are tapered  on both the inside and outside faces.  This taper provides a more secure grip and reduces the chance that the blank will come lose.  Remember the thickness of this foot is only about 3/16” which is not a lot.


About an hour later the majority of the shaping is done and all that is left of the 2½” drilled hole is a little  nub that will be soon removed.  The narrow flat face along the outer rim is the mating surface between the two halves where they will be glued together.


After more refinement of the interior face I finally have matched its curve to the curve of the outside face giving me a consistent wall thickness of a little under  3/8”.  A little sanding and this half can be set aside for a while so I can get started on the top half, next post.


Next up – Completing Phase 1 Turning

Monday, March 4, 2019

2 Piece Turned Bowl - #1 The Blanks & a Snag


This blog series is going to cover another lathe project.  I plan on making a large diameter hollow form.   Typically, you turn a solid block of wood round then working from one end hollow out the center.  So, if you want a small opening at the top then the removal of all the material from the inside has to come out of that small hole.  However, that’s not the way I plan on doing this project.

The short sequence for the way I am going to do it is to:
  1. Take two pieces, a top and bottom then on the lathe rough turn the outside of each one.
  2. Next, turn the inside part of the top half and bottom half.
  3. Stain and finish the inside of each half.
  4. Glue the two halves together.
  5. Final turn the outside then finish it.

There are a lot more steps than this but it’s a good overview.

I had done a small-scale prototype some time ago so had an approximate design done.  With that in mind I start by selecting the material.   When I built the combination Dining/Gaming table for my son I had some 6/4 or just under 1½” rough sawn red oak cutoffs.  They had been laying around for the better part of a couple of years and were roughly the right size for the project.  Here are the three pieces I started with.  Not so good looking and a couple were cupped really badly with just a little twist to complicate things.  Oh yes, the ends were split and cracked too.

Below is a photo of the best-looking piece which will be used for the top half with the prototype setting on it.

To get the bottom half I needed to recut, flatten and glue these two ugly boards together.


Taking the left-hand piece, I marked out where I needed to make the cut to get the majority of the cup removed.  Fortunately, the cupping was not even across the board but much more sever towards one side.  Cutting to an approximate length also helped get rid of some of the twist and the end splits too.  Here you can see how much it helped in removing the cup.  Also, if you take a look at either edge of the cut-out piece you can see where the surface has been smoothed out for about an inch.  That is where I used a hand plane to take out the twist so there is a flat surface when it gets run through the thickness sander to flatten.  Since the pieces are so rough and cupped, I used a 36-grit belt.  Not quite as rough as a gravel road but pretty close.

Here are the pieces now just over 1 3/16” thick flattened, squared up and marked with the bowl blank diameter.  The two pieces on the right are matched so the grain flows from one to another and should be nearly invisible when glued up.

The glue up is pretty simple as shown here just one joint with four clamps to keep everything aligned.


Once the glue had cured, I checked for flatness made a couple of small adjustments and redrew the bowl blanks on each piece.


To speed the process of turning the blanks round I used the bandsaw to cut the blanks close to final size.

The next step is to drill a 2 ½” diameter hole on the inside of the blank for mounting in the scroll chuck.  That is not an arbitrary number it is based on matching the arc of the chuck’s jaws to a specific diameter circle.  That way you get maximum surface contact between the jaws and the piece of wood which makes the mounting more secure.  Having a 1 ¼” thick, 11 ½” diameter piece of oak come flying off the lathe at me is not my idea of a good time.  Anyway, when I went to get the drill bit, boy was I surprised as my set did not have one that size.  Closest was a 2 3/8” one which is too small for the oak blank to even mount on the chuck.  I know I tried it with a piece of scrap.  Much to my disappointment a Fostner bit that size was not available locally so I ordered one on-line which ground the project to a halt until the bit arrived.


About a week or so later thanks to the internet and Amazon the new 2 ½” bit arrived.  This is what it looked like after cleaning the protective oil off all ready to use, or not. 

After inspecting the bit, I found it needed some modification before it was usable for my purpose.  There are two things that need to be done.  First, in the photo below you can see the center point is pretty good size.  It is about 5/16” above the cutting edge on either side which for most applications is OK but here since the bottom of the drilled hole is going to be pretty close to the bottom of the bowl it needed to be shortened.  I sure did not want to have it come through the bottom and needed to be able to later turn the divot it leaves out.  This may not make a lot of sense now but it will later on.  Second, the long horizontal cutting edges need to be cleaned up so the little chips and nicks are gone then sharpened as right now they leave a little to be desired.

This is after about an hour of grinding, hand filing and honing.  The center point is 1/8” shorter and the long cutting edges have been honed using a diamond file.  There are still a few nicks on the leading cutting edge but it is way better and a whole lot sharper.

With the bit ready I can finally start making some shavings.

Next up – Turning the Bottom Half