Router Plane

Monday, February 29, 2016

Shaker Oval Box – #5 Installing Bottom & Top, Filling Gaps

With the bottom fitted the next step is finish sand it and the inside of the box body followed by installing the bottom. 

There are a couple of ways to install the bottom I chose to use wooden pegs.  No glue, just a series of pegs roughly 2” apart.   First, is to mark the peg locations.  I suppose you could carefully measure the perimeter and mark out the spacing but I think in this case it’s an aesthetic decision as to what looks right rather than what is perfectly measured out.   My starting point was the peg that goes adjacent to the body tail.  I needed to have room to cut and smooth that peg flush with the body.   It was followed by the one to its left then the one on the center of the opposite side with the rest spaced to look right.  With the locations set I marked them on the body for drilling.
Pegs Located


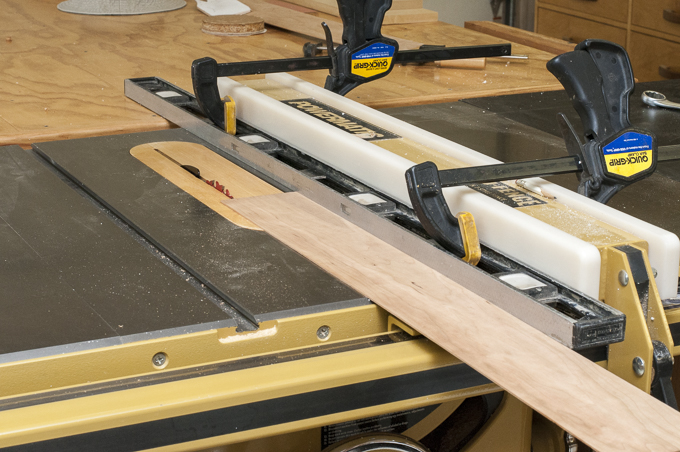
The base is 5/16” thick and I wanted to make sure I had the pegs centered and a consistent distance from the bottom.  Both requirements suggest a jig.  What I came up with is pretty simple, it’s a piece of MDF clamped to the shorter fence on my drill press.  Using a scrap piece of the bottom I adjusted the fence so the bit was centered and ready to go.
Peg Drilling Jig Setup

For the pegs I suppose I could have made my own but ready-made hardwood pegs just the right size are readily available, they are called toothpicks.  My plan is to use wood toothpicks cut in half using a pair of wire cutters.  The ones I will use are 5/64” in diameter we also had some that were a little thicker but they were dyed and waxed, not what I had in mind. 
A Supply of "Pegs"

The bit is 1/16” which gives me a 1/64” interference fit.  Rather than hold the piece securely and run the chuck up and down as is normally done I will leave the chuck fixed in position and move the piece.
Drilling the Peg Holes

Here is how the sequence work.  First is to drill the hole.
Peg Hole Drilled

Second is to hammer the half toothpick in.
Peg Hammered in Place

Third is using a wire cutter nip the toothpick off about 1/8” from the box body.  I want to leave a little stub because when using the wire cutter it crushes the fibers and I want to have an undisturbed peg end when I am done.
Peg Rough Cut to Length

Here is what the box looks like with all the pegs installed but not yet smoothed.
Installed Pegs Ready for Final Fitting

To do the bulk of the work in bringing the peg flush with the body I use a Dremel tool with a 120 grit sanding drum.  To grind, I brace the Dremel tool and the box against myself for maximum stability and control then gently and carefully grind off most of the peg.

After getting as close as I dare to the box body with the Dremel tool I finish bringing the peg flush by hand with some 120 and 220 grit sandpaper.
Completed Peg Installation

The top is made out of curly cherry fitted and installed following the same procedure as the bottom; tracing the shape of the top band onto the blank, rough cutting it out on the bandsaw, fitting with the disk sander and pegging it in place.  Having practice on fitting the bottom made the fit tighter, one reason for fitting the bottom first. 

In the last post I mentioned that I ended up with a few gaps where the bottom and the sides meet.  Those gaps while small bothered me.  I wanted to do something to make them less noticeable but the idea of adding putty or using sanding dust and glue as a filler just does not give the result I want.   Giving it some thought it occurred to me that using the fine sanding sawdust and mixing it with the lacquer as a binder might work.   Using the dust from the piece means that as the wood ages the filler color will match the piece.  Using the same lacquer as I will use to finish the piece means any change in finish color will also match.   In addition, because I am using lacquer when I apply the finish coats they will melt together and in essence become a single coat.  Well, at least that’s the theory.  
Small Gaps Between Bottom and Band
After mixing some sanding dust with a few drops of lacquer to make a thick paste I used a small putty knife to force the mix into the gap leaving it just proud of finished surface.  Letting it dry overnight I sanded the area smooth and was happy with the results.  The gaps still show up as slightly darker lines but that’s because they have in essence already been finished.  My expectation is that when I apply the lacquer to the whole piece everything will match.  
Fixed Gaps 

The only thing remaining before applying the finish is to do the final sanding of the outside.  I sometimes think that every once and awhile the fates decide to give me a little jab just to be ornery and this was one of those times.  After completing the final sanding I put the lid on and was using compressed air to blow off the sanding dust when the air blast got under the lid blowing it off the box across the workbench crashing it onto the concrete floor.  As I saw the lid flying away headed toward the floor I remember thinking that this is not going to end well.  Retrieving the top off the floor I found that it had landed on the edge of the band resulting in a hairline crack where the band met the lid.  Needless to say I was not at all happy.  Fortunately using thin cyanoacrylate (super glue) the capillary action of the wood pulled the glue into the crack stabilizing it.  This is what the crack looked like before any repair attempt.

Crack in Lid Band Before Repair

With the sanding done I was ready to put the finish on these two boxes.  
Boxes Ready for Finishing


Next Up – Finishing

Monday, February 22, 2016

Shaker Oval Box – #4 Soaking Box, Bending, Tacking & Fitting Bottom

After giving it some thought on what to do in order to get something, 4” X 30” X 2” deep for soaking I ended up building a waterproof insulated box.  It is made out of 3/16“ plywood underlayment reinforced with ½” cedar strips lined with ¾” Styrofoam, all scraps from other projects.  The Styrofoam is friction fit into the box and fastened to the plywood with caulk.  I had a partially used tube of roofing sealant that I liberally applied to all the joints and where the foam met the plywood edges.  I thought that would seal the joints but was still concerned about everything being waterproof.  A partially used gallon can of elastomeric roof coating seemed like the thing to use so I gave the inside 4 thick coats.  After drying for a few days I tested it by filling the pan/box with water and letting it set overnight, no leaks at all.  My only concern is how it will react to being filled with boiling water which I will find out when I use it.  However, because I live at 4,200' water boils at 204 degrees so it's not quite as hot as at lower elevations.
Completed Soaking Box

Cherry Soaked and Ready to bend
With everything in place to actually make the box I started in the kitchen by bringing 2 quarts of water to a boil then taking it out to the shop and pouring it into the soaking pan.  Next was to add the cherry pieces to be bent, a weight to hold them under water and last some Styrofoam pieces on top to help hold the heat in.  A careful check revealed no leaks or other problems.

After soaking for about 10 minutes I took the cover off and went to pull the first piece out burning my fingertips.  The Styrofoam insulation certainly kept the water hot. Using a small screwdriver to pop each piece out solved that problem.  The photos below show the process starting with taking the wood out of the soaking pan, bending it, making a reference mark for alignment when I tack it together and alignment to that mark with the form removed.  When the piece is bent I need to hold it together and not let the tails go because I was worried that if I did they would spring up and split the band where they come together.
Bending the Body of the Box

Now it’s on to installing the tacks using the clinch anvil.  Those little tacks were the dickens to get in place. 
Copper Tacks
First I have one hand holding the bent piece together and aligned on the clinch anvil while keeping the tails down.   The other hand puts the tacks in the predrilled holes then hammers them into place driving them through the overlapped layer onto the anvil where they bend over and clinch holding things tightly together.  I am left handed so of course I used my left hand to hold everything together and align the piece on the anvil.  That left my right hand to install the tacks and hammer them into place.  Maybe not the best situation particularly since the picture shows how close my fingers are to the tacks.  The tacks did get hammered in place but then the tips of my left hand got whacked a few times too.  Next time I will be doing the holding with my right hand and hammering with my left hand.

Hammering the Tacks in Place

With the tacks all in place the plugs are added to make sure the bent piece dries to match the shape of the form.
Bent, Tacked & Plugged Body ready for Drying

Once I had the body done I could bend and tack the band for the lid.  Rather than being bent around the form it is bent around the just completed body.  Other than that the process is the same.
Bending the Lid Band

Here with both the body and the lid are formed they just need to sit and dry out for a few days.


After drying out I removed the plugs and inspected both the body and the lid bands.  There were a couple of tacks that had not been driven completely flush so using a hammer and the anvil I hammered them flat, an easy fix.  Here is what the tacks look like from the inside.  You can see how they have been bent over clinching things together when they came through the wood and hit the anvil.
Clinched Tacks

However, when I looked closely at the end of the tails I noticed that while drying they had straightened out a little bit and were standing away from the body. 
Tail Standing out from Top Band
Not a big problem but it looked like a place where something could catch and break the tip of the tail off.  I decided to fix by using a small thin snap bladed utility knife to slide a single drop of glue under the tail then clamp it in place.

A few hours later I took the clamp off and now the end of the tail conforms to the rest of the curve.
Fixed Problem with Tail

Checking Moisture Content in Cedar Botttom
The next step is to cut and install the bottom.  For these two boxes I will use white cedar.  I had purchased some green ½” thick by 5½“ wide cedar dog-eared fencing planks for a future project some 6 months ago.  When selecting I spent time carefully sorting through the stack to get quarter sawn clear pieces, probably 1 in 20 met my requirements.  At that time their moisture content was near 30% so they were in no way dry or ready to be used, they even felt wet when touched.  I stickered the group, let them sit and now when I check the moisture content it’s around 5% which is just fine.

These boards are fairly rough so after cutting the length I needed the next step is to sand them smooth and flat.  There was just a little cup but the thickness sander took that out.  When flattened and smoothed they end up about 7/16” thick.  As per my usual practice I let the piece sit for a couple days to see if it was stable, it was.  For the #3 box the board is wide enough to get the bottom out of a single piece,  However, for the #4 box I have to glue two pieces together.

Gluing up Blank for Large Box Bottom

A little care in matching the grain gives me a blank where the joint in nearly invisible.


The only thing remaining in the preparation was to mill the boards down to the finished thickness of 5/16” which I did using the thickness sander.  Now I could place the body on the blank and carefully trace around inside it.
Body and Traced Outline for Bottom

With the shape outlined next is to cut the blank on the bandsaw.  This is just a rough cut staying about a sixteenth inch away from the line.
Rough Bandsawn Cedar Bottom

To precisely fit the bottom to the body I use the disk sander.  Because I want a slight taper to the edge I adjust the sander table a half a degree out of square.
Disk Sander Set for .5 Degree Angle

Taking my time on the disk sander I get a snug fit with only a couple points that have any gap and those are only a few hundredths of an inch wide.  Interestingly enough the few gaps that show up on the bottom do not go all they through to show up on the inside of the box.


Next Up – Installing Bottom & Top, Filling the Gaps

Monday, February 15, 2016

Shaker Oval Box – #3 Cutting Tails, Tapering, Anvil & Soaking Pan

Now that I had the band cut to width I could start on cutting the tails.  I started by clamping the band and template to the workbench then using my “drill” I marked where all the tacks would go.  It’s pretty simple, clamp the drill using locking pliers, insert in tack hole and tap with a hammer to mark. 
Marking Tack Locations

The first time I made the body band I went from marking the holes to cutting out the tails to drilling the holes on the drill press.  There was a problem with this sequence since the holes are not drilled but the nail makes a hole into the wood by spreading the wood fibers versus a drill removing material to make a hole.  That process worked on all the holes except for the ones at the very end of the tails.  The wood is so narrow there that my home made drill acted like a wedge and split each one when I drilled it.  I was not happy but could fix it with some waterproof glue.  I had to use waterproof glue since these pieces are going to be soaked in hot water in preparation for bending.  Adjusting the sequence to marking the holes, drilling them and then cutting the tails worked just fine.

Drilling Tack Pilot Holes

Since the band is only 1/16” thick can cut them using a utility knife with a sharp blade.  Borrowing a practice used in the kitchen to keep a keen edge I use a sharpening steel in this case the tool I use to put a hook on my scraper.  Honing the blade frequently while making the cuts really helps keep a good edge.

I had thought about using the template to draw the outline then follow the line freehand but a better process is to use the template as a guide for my knife.  Here a shot of me carefully using the template to guide the knife. 

Starting Cut for Tails

A light first pass sets the cut in it’s proper place.  Several more passes are made each one gradually cutting deeper until the piece pops free.  Some light sanding to clean up the cut edge and this end is ready.
Cut Tails, Template & Waste

With the tails cut I sanded the faces smooth.  Even though I had changed the sandpaper in the thickness sander to 220 grit for the final pass there was still some sanding grooves that needed to be removed by hand sanding.  Here is a before and after shot of the band for the lid.  For scale just remember the holes in the band are less than 5 hundredths of an inch across.
Before & After Final Sanding

On the other end I need to add a taper over a distance equal to the length between the first row of tacks and the end of the tails.  This taper provides a smooth transition on the inside of the box and lid.  
Setup for Making Taper

The easiest way to make the taper is on a belt sander or it would be if I had one, unfortunately I do not.  I tried my disk sander and that turned out awful.  From there I then went on to try a variety of tools including different hand planes and a spokeshave none of which worked.   The piece of cherry I was working with had the grain was running the wrong direction to plane so no luck there. 
Tools That Did Not Work


I finally ended up using a rasp for the bulk of the material removal followed up with sandpaper.  The sandpaper is from my random orbital sander which uses a hook and loop (Velcro) for attachment.  I took a piece of MDF the same size as the sander then applied the self-stick hook half to make a sanding block.  This way I had a nice flat fairly hard surface to use for sanding.
Items Used to Make Taper

Here is a side shot of the piece marked and clamped in place ready for me to taper.  For this size box, a number 4 the taper will go from zero at the end to the full 1/16“ over the 2¾“ length.
Edge View of Area to be Tapered

Process is to start with the rasp to take off most of the material.  As I get fairly close to being done I will chalk the surface so that I can easily see how far my cut has progress along the taper length.  Keeping an eye on the taper distance and the end thickness I can make adjustments to my cutting as needed.  

When I get close to being done I switch to the sanding block and a fairly coarse paper to remove the rasp marks then working through finer grits ending up with 220 grit to finish the taper.
Completed Taper

The boxes are held together with copper tacks that for added holding ability are clinched on the backside.  To make this work I needed to put together a simple anvil that will bend and clinch the tacks as they are driven in.   The solution is to take a length of plywood then bolt a 9” long by 1” diameter piece of galvanized pipe to it and screw that on a length of plywood so I can clamp the whole assembly to the workbench.

Anvil for Clinching Tacks

By now you would think I have everything to actually build the body of the box:
  • A form to wrap the body around
  • Plugs to keep the body’s shape right
  • A drill to bore the holes for the tacks
  • Templates for the tails on the end of the pieces
  • Copper tacks and the anvil for clinching them
  • Cherry 1/16” thick for the body the right length and width with tails cut and holes on one end for the tacks with a taper on the other end.

Well there is one more thing I need and that’s a pan to hold the boiling water so I can soak the cherry bands so they will be flexible enough to wrap around the form without splitting.  I don’t know about most people but we have a distinct lack of available pans 4” wide, 30” long and 2” deep for that purpose.  Even if we did I suspect that my wife would take a dim view of me using a kitchen pan to soak wood.  You can buy a copper pan for $140 or a galvanized steel one for $48 but as I said before I don’t plan on going into production of these boxes.  As such I did not want to invest in specialized equipment unless absolutely necessary so I needed to look for another solution. 


Next Up – Soaking Box, Bending, Tacking & Fitting Bottom

Monday, February 8, 2016

Shaker Oval Box – #2 Making Templates and a “Drill”

Tail Pattern with Tack Locations

With the banding blanks made I needed to make two templates for each size box.  One for the body band and one for the lid band.  From the drawing I did in SketchUp I printed out a full scale sheet showing just the ends.

Next was to glue them to some thin plywood, cut them to proper width and start cutting curves with a fine tooth coping saw.  I tried gluing the paper to the plywood precut to the exact width needed and found that it’s pretty easy for the pattern to shift a bit.  For me it ended up easier to glue the pattern onto a slightly oversize piece of plywood then cut it to the final width.

Coping Saw Used for Cutting Tails & Files Used for Shaping

The outside arcs are easy to smooth out and take down to the line, I just used the oscillating drum sander.


However, the interior arcs are not near as easy.  They required all sorts of different size and shape files plus sandpaper to smooth out the cut and bring the edge right down to the line.  Once I was all done I traced the pattern onto a sheet of paper, flipped the pattern over and traced the pattern a second time over the first pass.  If everything is symmetrical the tracings will line up if not, then some work needs to be done.  I was lucky and the pattern only needed a little cleanup to match.

Completed Pattern #4 Box

With the patterns cut out I just needed one more step to complete them.  I had to drill holes where the copper tacks go.  These tacks, not glue are what hold the body and lid together.  They are really quite small, right at 3/16” long with a head only about 1/16” across.  I am afraid that when it comes time to put them in the finger shown here could be in for some mashing.
Copper Tacks Used to Fasten Boxes Together

Because the tacks are fairly small the pilot hole for them is only about 3/64”.  I don’t have a drill bit that small and if I did I could not put it in my drill because the smallest bit the chuck can hold is 1/16”.  I could get that size bit for my Dremel tool but it comes in a set that duplicates what I already have except for two bits plus I would have to buy a chuck for the Dremel tool to hold the bit since I do not have one.   

Because the material is so thin and the hole so small I chose to approach the problem from a slightly different perspective.  Since I am not going into production building these boxes I decided to make a substitute for the bit starting with a nail that was large enough I could mount it in the chuck I had.  Here is what I ended up with and the nail I started with.
"Drill" & Nail Blank

It’s a relatively simple process to make the “bit” although on a small scale.  I take the nail in this case a hardened panel nail cut off the head and put it in a chuck mounted in the lathe.


With the nail securely mounted I took a fine file and started working the diameter down from about 1/16” to my goal of .046” measuring with the digital caliper as I go.
Completed "Drill"

Drilling Locating Holes with Drill Press
With my “bit” done I chucked it up in the drill press and drilled the locating holes in the templates.  I have to say the holes are not really drilled but more like the nail spins a hole into the wood spreading the wood fibers versus a drill that removes material to make a hole.

Now it’s back to working on the thin wood pieces for the body and the top.  The blanks had set for a few days and there was no sign of warping, twisting, or cupping so I was good to proceed.  I changed the belt in the thickness sander from the 120 grit I used to flatten the pieces to 220 grit for a smoother surface then ran them through removing just enough to get them down to the final thickness of just a smidge over 1/16”.

Measuring Body Blank for Thickness

The next step is to cut the pieces to width on the table saw.  I use a narrow kerf rip blade for sawing to reduce the cutting force on the pieces.  I was concerned that with them being so thin if I used a regular width blade I might have a problem with chip out or worse.   Because there is a slight gap between the bottom of the rip fence and the table saw top the thin blank could slide under the fence.  To get around this I need to add a secondary fence that fits tight to the table top.  My solution is to clamp a four-foot level to the fence.  With that in place I could safely rip the pieces to the final desired width.

Table Saw Setup for Ripping Pieces to Width


Next Up – Cutting Tails, Tapering, Anvil & the Soaking Box