
Out came my airbrush to apply the lacquer. This is pretty typical of the setup I
use. At this point I have given the
boxes their first two coats and am ready to apply the third coat. The airbrush (minus the lacquer bottle) is on
the right side in a stand with the regulator to its immediate left. My air compressor is in another room and
provides air to multiple points in the shop.
In the background you can see the red tipped airbrush bottles, one for
the lacquer mix and one for thinner plus an extra in the cardboard box. To the right of them are two larger 8 ounce
containers that have unthinned lacquer and thinner. They are filled as needed from gallon cans
and allow me ease of use not to mention lessen the chance of making a mess
trying to pour from a gallon can into the small airbrush bottle.
 |
| Air Brush Setup |
After applying a total of 4 coats of lacquer as outlined above and letting the parts cure for 5 days I sanded them with
8,000 grit wet sandpaper to remove any dust nibs or other bits from the finish
and these two boxes were done. Also, if
you look close, the small gaps between the lid and the band have all but
disappeared.
 |
| Completed Set of Boxes |
Here is a closer view of the lid where it cracked upon
landing on the floor. It ended up not
being almost invisible and the glue made it solid.

If you remember I ended up with five 1/16" thick blanks out of the
original piece of cherry. In making the
first two boxes I used 2½ of the blanks.
That left me with enough material to make a second set. For this set I decided to change the top and
bottom material. The bottom is going to
be made out of cherry matching the sides and the top will be a piece of
birdseye maple. The construction process
for these boxes is the same as the first two so no reason to go through the
details again. However, the finishing is
different. To get the birdseyes in the
maple to pop requires a 3 step process done before I spray on the lacquer. Since I will be unable to do this initial work on the
maple face that is inside the box once it is installed in the lid band I need
to do that side before it gets pegged in place.
 The first step is to make a mix using 3 drops of Dark
Vintage Maple dye mixed with 1 tablespoon of denatured alcohol. I could mix the dye with water but the water
raises the grain and that is not what I wanted.
The alcohol does not raise grain but dries faster which can cause lap
lines if you are not careful. On a piece
like this small it’s not a problem.
The first step is to make a mix using 3 drops of Dark
Vintage Maple dye mixed with 1 tablespoon of denatured alcohol. I could mix the dye with water but the water
raises the grain and that is not what I wanted.
The alcohol does not raise grain but dries faster which can cause lap
lines if you are not careful. On a piece
like this small it’s not a problem.
The dye and alcohol solution is evenly applied with a
small piece of cloth. Here the left
piece is plain and the right side has been given the first coat of dye.
 |
| Not Dyed (Left), 1 Coat Dye (Right) |
The second step is using 220 and 320 grit sandpaper I
sand most of the dye off the maple leaving the “eyes” darker. Here the left piece has first coat of dye and
the right side has been sanded.
 |
| 1 Coat Dye (Left), Sanded (Right) |
The last step is to apply a second coat of the dye
solution which will give added emphasis to the eyes and will warm up the rest
of maple followed by a very light sanding. Here the left piece is sanded
and the right side has been given a second coat of dye. At this point the surface still looks a
little flat but when the lacquer is applied the eyes will pop out and the
surface will get some depth.
 |
| Sanded (Left), Second Coat of Dye (Right) |
I can now install the tops into the lid bands and complete
the woodworking as before. With that
done I go through the dying and sanding process of the exposed top just like
the interior. Following final sanding
and blowing the dust off, this time being careful not to blow the top off I am
ready to spray the lacquer.
 |
| Birdseye Maple Tops in Place |
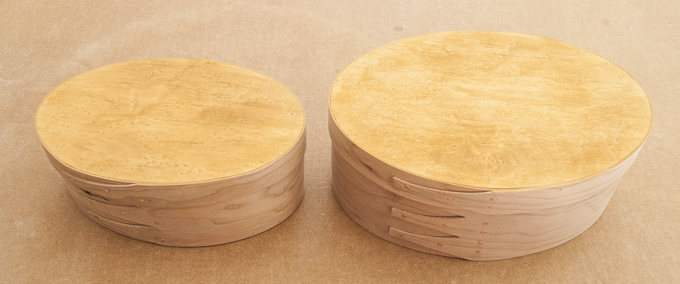
The lacquer finish goes on using the same process as the
first two boxes. The difference being
the effect the birdseye maple top gives to the completed pieces. Here with a couple of coats of lacquer
applied you can see the depth and definition the finish process adds to the
maple.
 |
| Lacquered Birdseye Top |
With all the lacquer applied, cured and the finish rubbed
out the second set of boxes are complete.
 |
| Completed Boxes |
With this project complete the next one for me is going
to be far less fun. It is the replacement
of the nearly 20 year old cheap, failing, leaking, drafty aluminum windows in
the house here.