
Now the in-progress blackwood insert needs to have the roughly 1” wide profile turned. Below in the drawing at the top the red arrow points to the needed profile shown in white so it’s easier to see. The bottom photo is of the template that will be used to check my turning. One change from the drawing is rather than have an angular ridge I changed it to a bead. Process for making the template is the same as the previous.
Mounting the insert on the 4-jaw chuck in the lathe requires a 1 1/8” diameter hole. This is smaller than the mounting hole on the other side because if I drilled a 2 ½” hole like the other side I would have ended up with a good-sized hole in the center. This is due to the larger center point in the 2 ½” drill and the relatively thin section between the two holes. The resulting hole would make it hard to use the live center in the tail stock to stabilize and center the insert. The photos below show the size difference between the two sets of jaws.
Below in the left photo the hole for the small jaws has been drilled and the right photo shows the blank flipped and mounted on the smaller jaws. You can see how much difference there is between the mounting holes.
Turning the profile to match the template is next. First step is to cut a notch to the finished depth of the profile which is marked by the two red arrows shown in the left photo. Turning the profile consists of working from the inside out cutting away a little at a time then checking it against the template. The right photo shows the finished profile. In that photo the red arrow shows the approximate location of the inside face of the insert. Later on, everything inside of the red arrow will get cut away.
Dying the oak insert black with India Ink is next. This needs to be done before insert gets glued in so I get a good clean demarcation line between it and the turquoise inlay. I am pretty sure that I could not dye the oak after it’s installed without getting some on the turquoise. The ink gets rubbed into the oak and all of its pores using a small cloth. Even being careful there are some specks that invariably show up once the ink is dry as white spots which is the undyed oak pores. It’s not a big problem as a small fine brush is used to spot fix them. The center does not have ink applied since everything from the red arrow inward will be cut away later on.
Turning a mirror image of the cherry body profile on the second side is next but first a mounting hole gets drilled in the finished body face so it can be mounted facing the chuck. Once lightly mounted the center reference hole is used to square the piece to the lathe’s axis, then the chuck is tightened and the turning can start.
Process for turning the second face is the same as the already completed face although making a mirror matching face can make one want to pull their hair out. Free hand turning a single face is pretty easy but when you try and match it things become a lot harder which is why I spent so much time turning the first face to the template. The left photo shows the profile finish turned and the right photo shows an edge on view that shows how the two profiles match. The mirrored face is actually closer than shown because the camera setup is a little off to the left causing some distortion. 
The rest of the work for this face; adding the turquoise inlay and cutting the recess for the oak insert is almost the same as the first side. The one exception is that it does not need the 2 ½” diameter mounting hole on this side for reverse mounting.
The oak insert is made the same way as the first one for the other side. The left photo shows the second insert fitted into the body. The right photo is a closer look at how the insert ends up with no gap where it meets the turquoise. The pencil line is a reference for adding a radius to that edge.
The fine fitting of the oak insert requires sharp tools and a very light touch since the difference between being too tight to being too loose is only a couple hundredths of an inch. An example of the shavings that come off the turning tool when doing this is below. The top photo gives some scale of the shaving while the bottom photo is a closer view. 
With the back of the insert sized to fit, the blank can be flipped and using the template turned to match the first insert’s profile. Below the left photo is the first side and the right photo is the second just completed insert.
Once the second insert gets its India Ink black coloring the two inserts can be glued in place. Here are the pieces in the order they will go into the clamps starting with the plywood disk on the far left followed by the insert, the body the second insert and ending with the plywood disk. The plywood disks are being used as a buffer between the clamps and the insert so the India Ink won’t get scratched or marred by the clamps. 
Here are the first couple of steps in the glue up. The photo on the left shows the protective plywood disk down and the insert with a band of glue around the inside face (red arrows). The right photo has the body set in place with the grain running the same direction as the insert.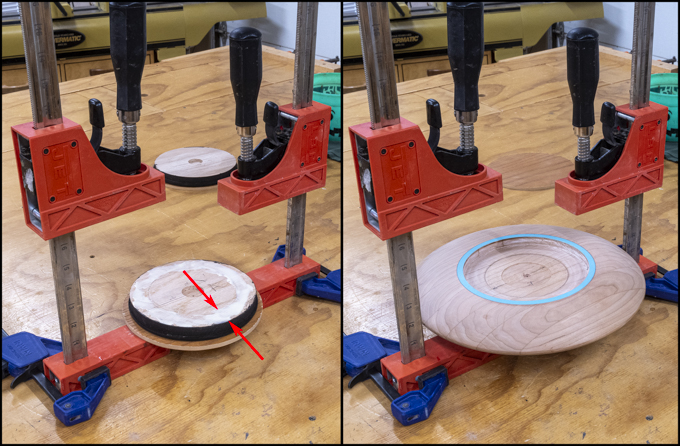
The last steps are to apply glue to the second insert, set it into place shown in the left photo then set the plywood disk in place and add the clamps shown in the right photo.
After an overnight cure the clamps, plywood disks and glued body are removed with this result. Because the glue was applied only to the inner face of the disk and not to its edges, I didn’t have to worry about any glue squeeze out messing up the clean edge between the dyed insert and the turquoise band.
Next Up – Starting the Base & Cutting the Body in Half


