Since the existing reference point is off just a little, I need to relocate it. If it was way off, I could just drill a new hole but it’s so close if I try and drill it at the correct location the drill bit would just bend to follow the existing hole. My way around that is to plug the existing hole then drill a new hole in the right place. This starts by drill in a much larger hole than needed for the plug with a short stiff Fostner bit followed by drilling a medium size pilot larger than the center point of the brad point drill used for the final hole the plug will be glued into. What’s shown in the left photo is the final plug hole drilled using the brad point drill. This drill is used because with the medium size pilot hole the spurs at the edge of the bit guide it rather than the center point which now just spins in midair. The right photo shows the plug cutter bit being used to make the plug. 
The top left photo has the plug just set into place. The tail stock with a flat center is then used to press the plug the rest of the way in shown in the top right photo. The bottom left photo is after the Fostner bit has drilled the face of the plug down flush with the bottom of the first drilled large hole and the bottom right photo is after the new reference hold has been drilled. Not shown was using the point of the live center in the tail stock to make a dimple for the new reference hole.
These two photos show how the live center will fit into the new reference hole which is 1/64” smaller than the pointed tip (red arrow) for a tight fit.
With a new reference hole drilled the 2 ½” mounting recess for the 4-jaw chuck is drilled finishing this bit of repair work. 
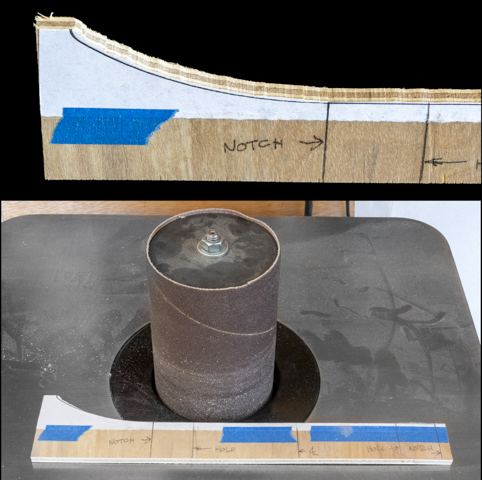
Before starting to turn the body of the piece I printed out a full scale section of about ¾ of it then glued that to a thin piece of plywood. That’s shown in the top photo. Using the bandsaw the half pattern gets cut out.
Cleaning up the bandsawn edge is next which as you can see in the top photo is pretty rough. This starts with a large diameter sanding drum shown the bottom photo. It’s used for most of the piece but as one gets closer to the left end the diameter of the drum is bigger than the arc of the pattern so I have to shift to a smaller drum.
Consecutively smaller drums are used with the last little bit done using a small round file. The final smoothing and fairing of the pattern is done with sandpaper. The bottom photo shows the finished pattern edge.
Turning the face curve on the body is next but to help me in getting close to the finished profile some dimensions get added to the template. They are ½” apart and give me the depth of the material that needs to be removed. To use I lay out lines ½” apart on the face of the blank then cut a slot just a little short of the listed dimension. The top drawing below shows the distances and the bottom has them cut into the blank.
When the blank gets turned down to the bottom of the reference slots the form starts to take shape as shown in the two photos below. The shape shown is really just roughed out but most of the material is now removed and from here on it’s working with the template to get the profile right.
Once the profile gets 99% done the final shaping is made to the curved surface so it flows smoothly without any high or low spots using sandpaper. The first of the two sides is now done and ready for the turquoise inlay to be added. 
Before I could start on the inlay, I got an email from a friend who asked if I was interested in some extra wood in the form of four 3-inch square maple bed rails that are about 100 years old he no longer had any use for. Since it’s hard for me to turn down free material like that a visit to his shop got scheduled. When I got there, he had some other planks most of which are rough sawn and a couple of inches or better thick all for the taking. They include the maple bed rails plus a good amount of walnut, some chinkapin, big leaf maple, white oak and some very old rosewood planks. They all did fit in the car with the seats down but it was a pretty full load and is really appreciated. 
Getting back to the project adding the turquoise inlay is next. This starts by cutting a recess using a narrow parting tool. The recess is a little over 1/16” deep and a little over ¼” wide with the red arrows indicating its edges. As discussed before since I knew that the body turning was going to be taken in and out of the lathe and had to be in almost prefect registration for the various parts to fit together. With the profile turned and the inlay recess added it now seemed like as good a time as any to see how well the remounting reference hole worked. Fortunately, the planning and relocated reference hole worked as planned when remounted in the lathe everything was centered and the blank ran true.
Next Up – #4 Turquoise Inlay & Oak Insert Part 1

No comments:
Post a Comment