Router Plane

Monday, September 12, 2022

Master Bath Remodeling - #5 Moving the Cabinets

As mentioned at the end of the last post there are two big cabinets to be moved into the remodeled bath area.  These cabinets are 79” tall, 18” deep and 38 ¾” wide.  Because of the hallways width and two 90 degree turns the cabinets have to be moved upright plus it’s just me and my wife moving them.  The height is the only dimension I have to worry about as the minimum distance between the door threshold and the parting stop at the top is 80 1/8” giving me 1 1/8” to work with.  Now this is not as bad as it sounds because I designed the top of the cabinet to be removable which gives me another 1¼ or 2 3/8” total.  To facilitate the move, I built a low-boy style dolly which is designed to be as close to the floor as possible.  Below the drawing shows the design.  The long supports are 1 1/8” thick and are set so their bottom is ¾” above the floor to clear the thresholds.  If everything works out right there will be ½” clearance under the door frame. 

Because we can’t just pick up the cabinet and slide the dolly under it the loading process takes a little time.  It starts by tilting the cabinet toward the back so ¾” spacers can be put under the front legs then the cabinet is tilted forward and ¾” spacers are put under the back legs.  The process is repeated twice more first with sliding the long supports in place followed by adding ½” spacers under them.  Next the end cross pieces are set in place and 3” long screws run through them into the long supports.  As the screws get run in, they pull the long supports up until they are tight to the bottom of the crosspieces lifting the cabinet up the last ¼”.  The whole process does take a little time but allows a great deal of control in getting the cabinet safely up on the dolly.  The photo on the left shows the cabinet loaded up on the dolly and the right a closer view of it setting on it.

Because all the dolly castors freely rotate in all directions it’s easy to move the cabinet & dolly out of storage room, through the garage and down both hallways turning corners as needed.  Going over the four thresholds takes the most time but aren’t really hard.  Cedar shims provide a gentle ramp up and down over them.  The white cloth around the cabinet is to make sure the door does not accidently swing open.

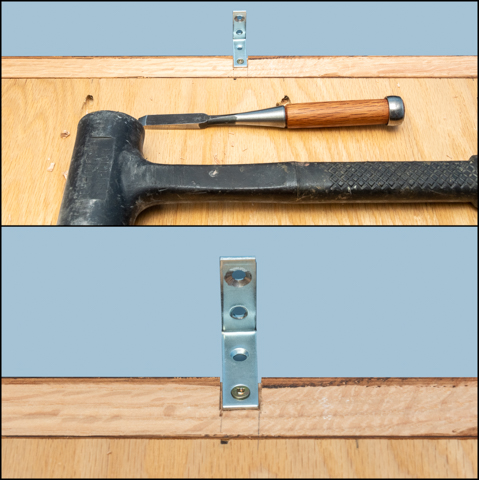
Once the cabinet is in the bath it gets taken off the dolly the same way it was put on except in reverse.  Because the cabinets are tall and have large doors but are not really deep, I was concerned that they might present a tipping hazard.  To resolve that concern a steel angle brace gets attached to the sub-top of the cabinet and securely attached to the wall before the finished top is put back on.  The braces do require a small notch to be cut in the sub-top so the top will lay flat.  These photos show how that looks.  From here the cabinets are set in their final location, leveled and screwed to the wall.
After that’s been done to both of the cabinets the finished tops are put back on and they are ready to be used.  I can say for sure that the storage space will be way more useful than the huge garden tub. 

Last bit of information on the project is cost.  Since I did all the labor the only cost was for materials which totaled less than $270.  This includes the bag of cement, tile including some extra, thinset, grout, plumbing supplies, drywall and the brackets to attach the cabinets to the wall.  I had drywall joint compound and the paint so those costs are not included.  Also, not included was the plumber's work to replace the failed main shutoff valve as that was not really a part of the remodeling.


Monday, September 5, 2022

Master Bath Remodeling - #4 Completing Floor, Wall & Baseboard Tile

After all the new tiles have been applied to the floor and wall there are still the four salvaged bullnose tiles to be set in place.  Before that can be done, they need to be cleaned up by removing the existing thinset from their backs.  That’s done with an angle grinder loaded with a 50-grit abrasive disk.  Here about two-thirds of a tile back is cleaned up.

Laying the cleaned-up bullnose tile is next.  To make the two bottom tiles fit in with the existing size progression of the two top tiles where the top one is shorter than the existing second one, I made the tiles longer as they get closer to the floor with the bottom tile being a full length one.  To do this the bottom tile is set in place using the same method as the rest of the wall tiles.  The remaining gap is measured, a tile cut to fit and it is added.  Note that the bottom tile does not look like it’s back edge lines up with the floor tile but it does.   That’s because the wall tile is raised off the floor for a grout joint and the angle the photo was taken makes it look that way.

Here is the other end of the area done with the same sized tiles.  There is not a corner tile to match up against but instead the vertical edge of the existing tile is followed.  Also, on the left the outlet ended up pretty well centered on the tile joint.

Now with all the tile in the tub area set grouting can begin.  After mixing the grout a float is used to pack the grout into the joints between the tiles.  Once half a dozen or so tiles are grouted the excess is wiped off with a sponge then using the sponge the remaining grout in the joints is formed.  That’s followed by using fresh water to clean off the tiles to remove all the grout off them.  Last pass is with clean water followed by drying with a towel to completely clean them up.  The area being grouted is dependent on how quick the grout sets.  Here in the desert where it’s so dry it’s pretty quick.  After the walls the floor is done.

Here is the tub area with all the tile work done.  In this photo you can see how all the grout lines are centered and are continuous from the floor up the walls.  There is one thing that still needs to be taken care of though.  The grab bar left over from the tub needs to be removed.

Taking the grab bar off should have been straight forward, just removing the six screws holding it in.  That worked for five of them but one would not budge and the impact driver rounded the Phillips head out leaving no way to get a good grip on the screw.  To remove it I ended up drilling out the screw with progressively larger bits until the head came off.  With that done the divots and holes left from the screws and grab bar mounting plates get filled with wood filler.  When that dried it was sanded smooth and a layer of drywall compound applied to match the existing skip trowel or knockdown finish.  Here is what the two places looked like with that done and ready to paint.

Fortunately, I had a small amount of the original paint to use.  To get a good match a couple of coats are put on with a small foam roller feathered out a foot or so beyond the patch.  A roller is used instead of a brush to eliminate any brush marks which would identify the area as a patch.  Here are photos of the tub before and after the area is done.

Besides the work in the tub area, we wanted to remove the wood baseboard shown in the top photo in the whole bath area and replace it with tile since some had been water damaged.  After removing the existing wood baseboard new tile pieces are cut the desired height and applied to the wall using the same thinset and grouting method as done on the wall in the tub area.  With that done a spacer is used to draw a line parallel to the top of the new tile baseboard and painters tape applied to the wall at that line.  The space between the tape and the top of the tile gets grouted at a 45-degree angle matching the rest of the tile baseboard in the house.

Here is what the grouting process looks like in progress.  The float is held at about a 45-degree angle packing the grout in place.  Next, the float is held at the same angle with the bottom of the float on the edge of the tile and the top of the float set at the bottom of the painter’s tape.  The float is then pulled horizontally the length of the baseboard striking a smooth beveled grout bed.

This is what the grout looks like after being struck off.  It is left this way for a while until it firms up.  While waiting the face of the tile is cleaned up with a sponge and clean water.

Once the grout has firmed up the tape is removed leaving a nice straight sharply defined edge.  Next, the grout shape is refined as needed removing any inconsistencies using a damp sponge.  Last is using a clean sponge any grout on the wall or tile face gets removed with the tile face getting dried using a clean towel.  Early on I was a little concerned about doing the grout bevel as it was something new but it turned out very well and after I figured out how to do it not hard at all. 

This finishes up the actual remodeling but there are two cabinets I made in 2019 that need to be moved into the space for storage and that is going to be interesting as they are pretty good size and fairly heavy.

Next Up – Moving the Cabinets