Router Plane

Thursday, September 24, 2015

Open Segmented Bowl – Various Solutions & The Finish

The hole in the bottom of the bowl was like the Sword of Damocles over my head and over the next few days I came up with various solutions:
  1. Burn the piece and start over (first thought).
  2. Leave it as is (yuck).
  3. Turn a flat plug the same size as the recess about ¼” thick and glue it in place, still an obvious attempt at a patch (slightly better).
  4. Turn a decorative piece out of cherry or a contrasting wood that would be inserted into the hole and would extend up through the center toward the top as an accent to play off the openings between the segments (better yet).
  5. Add some type of light inside that would highlight the open weave nature of the piece (best).

Battery Powered  LED Light
Having settled on adding a light to the piece I just needed a way to make it happen without looking like a patch.  I wanted something that put out just a little light, preferably toward the yellow end of the spectrum and would be inconspicuous. The smallest incandescent I know of would be too large and would require a power cord, something I wanted to stay away from.  After thinking about different light sources I hit on using an LED light.  The color would be right, it would be small, not put out much heat and could be powered by a battery.  A little research turned up all kinds of LED tea lights that were powered by a button batteries, would run 120 hours on the battery and had the light color I was looking for.  On a hunch I went to the local dollar store and there they had just what I was looking for at 2 for a dollar.

Light Holder Drawing
With the light in hand I could work on a way to mount it in the bowl.  I really did not want the entire fixture to show since it is white and shiny and would stand out like a sore thumb.   My solution is to make a holder like this that would fit inside the bowl and hide the sides of the light while leaving the white top exposed to aid in light reflectivity.  The holder will be made out of cherry to match the rest of the bowl.

The sequence is straightforward but does have a few steps.  I pulled out one of the thick chair scraps of cherry, drew a 2½” circle on it, cut it out on the bandsaw, mounted it between centers on the lathe and turned it to the drawing shape.  With that done I chucked up a 1½“ drill bit in the drill press and bored a hole down from the top into the piece until the center point of the drill just came through the bottom.  From there I flipped it over and drilled in from the bottom.  That way I had a clean cut entering the wood from the top and bottom and no blown out edges that could have happened when the bit exited the bottom.  One other thing, if you look below the holder there is a piece of folded over sandpaper.  This provides enough grip between the holder and the table that as long as you are careful in drilling the bit won't grab the piece and spin it.  If the bit grabs the holder it could get exciting and as before, not in a good way.
Drilling Out LED Light Holder

With the hole done it was back to the lathe to clean up the drilled hole and provide a slight taper to match the taper of the sides of the tea light.

There was one problem when I went back to mount the holder 
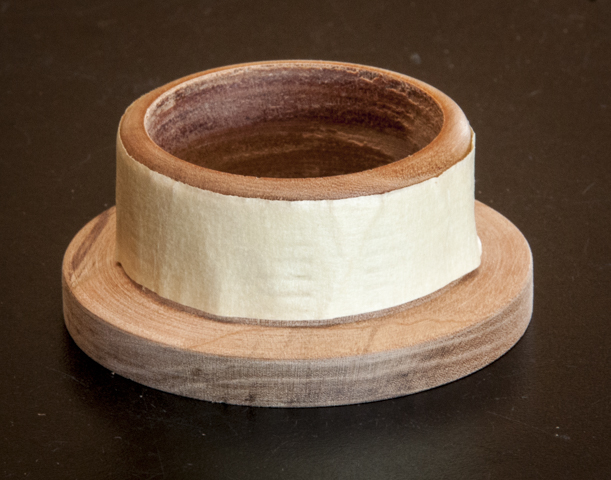
in the lathe.  The jaws of the scroll chuck are ribbed to assist in holding the piece you are turning in place.  If I had put the holder back in and torqued the jaws down they would have marred my nice smooth finish.  Also, if I got carried away with tightening the jaws I could have possibly crushed the holder.  I got around this by wrapping 6 layers of masking tape around the outside of the holder and just snugging the jaws down.  If you look close at the photos you can see where the jaws left dents in the tape.  When I removed the tape it had done its job and there were no marks on the holder
Nearly Complete Holder
A final test fit of the tea light into the holder was good, the taper and the somewhat rough interior surface held it in place perfectly.

Completed Holder with Light Installed

Now I could install the holder in the bowl, a little glue to secure it and it was done.


There is one more step before applying a finish to the bowl.  I need to go through and check every joint to see if I had missed any glue squeeze out and if so get rid of it.  I would like to say that due to my masterful woodworking skills everything was perfect, but that would be a fib.  There are 72 openings between the segments and 4 joints at each opening.  That totals 288 connection points and out of them I had a very few that needed some help.  Using a variety of tools, mostly a chisel, a very fine file and some sandpaper glued to a stick I did the required cleanup.

The bowl has a lot of different surfaces to put a finish on.   The exterior is not hard, the interior is a little tougher because the only access is an inch and a half opening at the top and bottom.   Then there are all the openings between segments I talked about above and they can be a pain to finish.  I decided to use a Danish Oil Finish because I can apply it with a cloth and a cotton swab to get in all the nooks and crannies.  It also gives me a fairly long time to work on the details to make sure I don’t have problems.  Here is the basic setup I used to apply the finish.  The chisel is in case I find a glue spot I need to take care of.  There is compressed air to blow off any dust, some flannel shirt scraps and cotton swabs to apply the finish and a small container to work out of.  I use the small container for the finish because if there is a way for me to knock over a can of finish and make a mess I will find it. 

Finishing Setup

After 3 coats rubbed down between each one this is the final piece.  The Danish oil gives a nice muted surface and I liked the way it highlights the cherry grain.

Bowl with Light Installed

How does it look lit up?  Well with the light on I think it really resembles a candle lit interior.  At least that’s my story and I’m sticking to it. J

Bowl with Light On


I did not keep track of the time I spend on this project but I believe that the building of the jigs took almost as long as gluing all the segments in place and doing the turning.  Now that I have the jigs any additional pieces will certainly take less time to build.  The question becomes do I build them with or without the light?

What's the next project?  Well, I have been contacted by a friend to take a look at building him a custom made snare drum.  That's something I have never built so it's a possibility....


Thursday, September 17, 2015

Open Segmented Bowl – Finishing the Bottom, Top & a Problem

Now that the halves were glued together and the segment shaping was almost done I could start working on the top and bottom.  First step is to cut off the mounting block from the bottom and drill a recess about 3/8” deep.  This will be used to mount the piece on a set of expanding jaws attached to the scroll chuck.  I need to be careful of my depth, I don’t want to drill too deep and drill through the bottom leaving a hole where there should be a solid bottom.  That would be a very bad thing.
Drilling the Inset for Mounting on Scroll Chuck
With the mounting recess drilled for the expanding jaws I just had to remove a little bit of material from the bottom of the recess to get rid of the drill’s center point and create a nice curved surface.  The base is 5/8” thick, the recess is just under 3/8” deep so I could cut about 1/8” in and still have more than 1/8” of solid wood.  All good planning however, I had forgotten that when turning the inside of the bowl I also turned a slight, just over 1/8” deep arc on the bottom to provide a smooth transition between the first row of segments and the solid base.   If you subtract all of the drilling and turning numbers from the base thickness you end up with a negative 1/8”.  This is better known as a hole.  Consequently, as I was making nearly the last pass on the bottom I cut through it and now had a hole in the base that was supposed to be solid. 

No tools flew across the room but copious bad words did.  After a bit of venting I went back to the piece and cleaned up the ragged paper thin edges around the hole by enlarging it until I got enough thickness for what was left of the bottom to be durable.  Final result is a 1½” diameter hole where I should have had a solid bottom.  Last was to clean up rough sides the drill left and do some minor sanding.   At this point I don’t know what I am going to do I just know that I am not happy with what I have.  Before I retired I worked with a person who said that there are no problems, just opportunities.   Well, I had one heck of a problem opportunity here so I decided to let it sit and see if I could come up with a solution that I liked. 
Hole Where there Should be a Solid Bottom

Next day, no solution so I changed the jaws on the scroll chuck, flipped the piece around, mounted the bowl and cut off the mounting block from the top.  I then removed the piece from the lathe and set it down so I could look at the general shape.  I needed to see the how it looked setting vertically on a surface.  It does look different than when it’s mounted sideways in the lathe .
Initial Review of Bowl Shape

Putting it back on the lathe I flattened the top edge and ran a live center into the hole I had drilled in the top to help with stability.  If you look carefully at the bottom of
the bowl there is the number 3 penciled in along with a line.  That line is a reference mark set on the centerline of jaw number 3 in the scroll chuck.  The idea being that when I take the bowl off the lathe I can reset it exactly where it came off .  This should help with keeping the bowl aligned.

Here I am looking at the top of the bowl before I started on the final shaping .

After doing some shaping I had what I thought was a pretty good profile so I pulled the piece off to take a look.  Better but still not quite right .
Bowl 90% of Finished Shape

More turning and refinement until I had the top to a point where I was happy .  I just needed to do some final sanding.  If you look back at the original design this is slightly different.  Like I said in the beginning my design is not “final” but will evolve as I work on the piece.

Next is to work on refining the bottom part of the bowl.  This should have been done right after I had finished drilling and cleaning up the inset.  However, that did not go so well and I got distracted at that time never getting back to completing the final shaping of the base.   Now with the bowl mounted in the chuck I don’t have room to get my tools in at the base to do any turning.

The fix is to create a true Rube Goldberg setup by mounting the drill bit I used to drill the recess in a chuck and use that to drive the bowl.  Only problem is that after I cleaned up the drilled recess it is now a little larger than the drill bit and is a sloppy fit.  Wrapping 3 layers of masking tape around the bit took up the slack and solved that problem .  I could now finish the shaping of the bottom part of the bowl.

With the last of the bowl turning done I did some finish sanding and the bowl was ready for me to apply a finish except for that #@!L*% hole in the bottom .
Shaping Completed

Next Up – Various Solutions & The Finish


Thursday, September 10, 2015

Open Segmented Bowl – The Top Half & Lathe Turning

With the bottom half of the bowl glued up it’s time to do the top half.  Here all the jigs are set ready to start gluing on the segments.  Note that the top half of the bowl is held in place using a scroll chuck rather than the typical face plate used for the bottom half.  In this setup the scroll chuck's the outer black jaws are adjustable and when tightly closed clamp the piece in place.
Ready to Add Segments
The same process is used to measure, cut and glue the segments in place as used on the bottom half of the bowl.  Here two of the layers are glued in place and I am ready to start on the third and last row. 


Once all three layers are glued up I now have rough blanks for both the top and bottom.  These are ready to mount on the lathe and begin turning. 

I started the rough turning by mounting the bottom half back on the lathe.  Looking at the blank I thought it looked like a giant cheese grater powered by a 2 horsepower motor ready to shred whatever it came in contact with, for instance my fingers.  So with a face shield on and standing to one side out of the way of possible flying pieces I started the lathe up.  Gradually increasing the speed up to about 500 revolutions per minute I paused to check for vibration and to see if it would hold together or fly apart.  Since there was no vibration and no pieces flying around I cranked up the speed a little at a time more and more until I got to just under 1,400 revolutions per minute.  Still no vibrations and once stopped I saw no visible problems at a speed well beyond what I would be turning. 

With that test I was ready to actually start the shaping.  I set up the tool rest, spun the lathe up to just under a 1,000 revolutions per minute then with a newly sharpened spindle gouge gingerly started to shape the outside of the bowl.  I will say that in the back of my mind I was thinking that the only thing holding this together was a bunch of itty-bitty glue joints.   The good news is that everything worked perfectly, the gouge cut away thin wispy shavings with no drama and no excitement leaving a nice smooth surface.  Once I had the outside knocked down to a preliminary shape I moved to the inside.  This is a photo of the inside turning in-progress.  You can see the shavings coming off the tool and being held by centripetal force against the inside face of the bowl.  I would have liked to have frozen the motion of bowl but now I was turning at slightly over 1,000 revolutions per minute and even with the photo taken at 1/4,000th of a second the bowl still shows some movement.

Turning Inside of Bowl Top

With the lathe stopped and all the shavings blown off the overall rough shape both inside and outside starts to become apparent.

The last step on the bottom half prior to fitting is to take a piece of sandpaper on a flat board and use it to sand a square mating surface.  This is the glue surface that will match up with the top half and the two halves need to fit tightly together.

Comparing the bottom half piece I just finished rough turning to the unturned top half gives an idea of how much difference there is between the two.

The glued-up top blank is now mounted on the lathe and the same process of turning I did on the bottom half is gone through with it.  With both halves roughly turned I mated the bottom half up with the top half to see how they fit together.  Here, circled in red you can see that the piece on the right which is the bottom has a little larger inside and outside diameter than the piece on the left which is the top.   The fix is to take a little more material off the inside of the top (left piece) to increase the inside diameter so that it matches the bottom.  I will also trim the outside diameter of the bottom (right piece) down so it is closer to the top.  If bottom ends up a bit larger that’s not a problem because once both halves are glued up I will do the outside finish shaping. 
Test Fit for Mating Top & Bottom Halves of Bowl

Once I have exactly matched the interior diameter of the two halves I drilled out the center of the top half which will be the opening at the top of the bowl.
 
Here the hole is drilled out, the interior is finish sanded and I just need to round over the hard edge at the hole in the top.  Nearly all of the interior final work needs to be done now as when the two halves are glued up there is only a 1½” hole at the top for access.   The bottom needs to be completely finished as the base is solid and there will be no access there.


With all the work done on the inside of both the top and the bottom I am ready to glue them together.  The numbered pencil lines across the glue joint are my reference marks to make sure the two halves are lined up dead on when I glue them together.


After letting the glue cure overnight I blended the two halves together and finished turning the segmented part of the piece to its final shape.
Segmented Part of Bowl Finish Turned


Next Up – Finishing the Bottom, Top & a Problem

Thursday, September 3, 2015

Open Segmented Bowl – Gluing the Segments

The assembly of the segments is where all the careful, accurate construction of the jigs comes together.  This is a fairly small bowl, it is only 4” tall and 6” wide but still has 74 individual pieces in it so if you are not careful there is plenty of room for error.  Here I have the 12 pieces cut and numbered for layer 1.
Layer 1 Segments Ready to go

First I mounted the three jigs to the lathe and made sure the Index Wheel is aligned to the top of the Alignment Guide and clamped in place.  Now everything is ready to go except for one last setup measurement.
Lathe Jigs Set in Place

I need to set the stop on the top aluminum angle to the proper radius.  It’s back to my cut list sheet where for layer 1 the dimension is 2.903”.

Using my digital calipers I set the stop at 2.903” or according to the photo 2.9035”.  Being .0005 inches off falls in the splitting hairs category so I am calling that good.  Next is to make sure the stop is at 90 degrees to the base aluminum angle and clamp it in place.
Setting the Stop Block

Now I can start the glue-up.  I take the piece numbered 1, apply glue to the back, set it on the aluminum angle, rub it back and forth against the base maybe an eighth of an inch each way a few times, adjust it in position snugly against the stop then hold it with my fingers in place pressing firmly towards the base for a minute.

First Segment in Place

Now that the piece in place I have to clean up any glue squeeze out from where the long edge of the segment meets the base.  The area circled in red shows where the glue needs to be cleaned up on the top side.  The similar bottom joint needs to be cleaned up also. 

I tried several different things to clean the glue off with; a wood chisel, an X-Acto knife, a dowel pointed in a pencil sharpener, small pieces of wood of different shapes and none of these worked very well for me.  The steel tools were all too hard and left scratches at the joint while the wood was too soft.  
Glue Scraper
What worked the best was a small piece of the plastic left over from the alignment guide cut narrow enough to fit between the segments.  When filed to a skew edge it cut away the glue and did not scratch the cherry.  Mind you there are a couple of things to consider.  First, the glue squeeze-out needs to be kept to a minimum so you are not trying to remove big blobs and second there is a window of opportunity to get the glue removed while it is rubbery.  Let it go too long it cures and the only resort to remove is with sharp steel tools.

With the glue removed segment number 2 can be added.  The sequence is to advance the Index Wheel by 30 degrees, clamp it in place, glue the piece on and clean up any squeeze-out just like with piece 1.
Two of 12 Segments in Place 

Do the whole process 10 more times and presto one layer glued up with only 5 more layers to go.
Layer 1 Adding Segments

Now on to layer number 2.   First go to the cut sheet and check out the requirements for layer 2.

Same sequence of events, rip enough blanks at the 1.012” width then set up the jig on the table saw for an Outer Face Length of 1.068” and cut 13 pieces.
Layer 2 Segments

With the pieces cut I need to set the Radius for layer 2, checking the cut sheet it’s 3.074”.  Out comes the digital caliper so I can set stop at the correct distance 90 degrees to the base aluminum angle and clamp it in place.

Layer 2, Setting Stop Block
Now I can slide the jig up close to the first row, set one of the pieces in place and check to see if everything looks good.
Starting Layer Two Glue-up

Here is how I have things set up for gluing the segments on.  The segments to be glued are on the jig in the order I will use them.  Next to the Gluing Jig I have a scrap piece of countertop that has a snap off trim knife, a wet cloth, my glue syringe and the plastic glue removal tool.  

I tried all sorts of methods to apply the glue starting with straight out of the bottle but I did not have enough control that way.  I also tried using a wood sliver, an artist’s brush and a metal pallet knife.  They all applied the glue OK but the problem was with the glue.  I had squeezed out a dab of glue to pull from but with the low humidity here it skinned over in just a few minutes and became unusable.  The glue syringe works very well since only the tip is exposed to the air.  Loading it up with 1cc of glue gives me more than enough to do a full layer.

Where to Apply Glue to Segment
Before actually applying the glue I took a test piece the same size as the actual piece and drew the glue line limits on it.  The entire glue surface of the piece is between the outer edge and the line.  Any glue squeezed out beyond these lines needs to be removed.   Using the test piece as a visual guide I carefully applied the glue so by eyeball it looks to be just shy of the test piece lines.  I also swiped my finger down the outside to remove a thin strip at the edge.  When rubbed into place the glue will cover the area but the squeeze-out will be minimal.

Repeat the glue-up sequence 12 times and layer 2 is done.
Joint with Glue Cleanup Needed
If you look carefully at the last segment I glued on you will see where there is just a little glue squeeze-out that has to be removed.  Having just a little to remove is OK as it confirms I have full coverage on the joint.  One just has to remember that there are 4 edges to remove the glue from; the one shown, its counterpart now setting on the aluminum angle and the two edges under the piece.  It’s easy to miss the two underneath leaving you with hardened glue to remove – been there, done that, no fun.

The third layer glue-up is a repeat of the second layer, so no need to go into details.  With the third layer glued up the bottom half can removed from the lathe and set aside until later.
Glued up Bottom Half of  Bowl 


Next Up – The Top Half & Lathe Turning