Now that the halves were glued together and the segment
shaping was almost done I could start working on the top and bottom. First step is to cut off the mounting block
from the bottom and drill a recess about 3/8” deep. This will be used to mount the piece on a set
of expanding jaws attached to the scroll chuck.
I need to be careful of my depth, I don’t want to drill too deep and
drill through the bottom leaving a hole where there should be a solid bottom. That would be a very bad thing.
 |
| Drilling the Inset for Mounting on Scroll Chuck |
No tools flew across the room but copious bad words
did. After a bit of venting I went back
to the piece and cleaned up the ragged paper thin edges around the hole by
enlarging it until I got enough thickness for what was left of the bottom to be
durable. Final result is a 1½” diameter
hole where I should have had a solid bottom.
Last was to clean up rough sides the drill left and do some minor
sanding. At this point I don’t know
what I am going to do I just know that I am not happy with what I have. Before I retired I worked with a person who
said that there are no problems, just opportunities. Well, I had one heck of a problem opportunity here so I decided to let it
sit and see if I could come up with a solution that I liked.
 |
| Hole Where there Should be a Solid Bottom |
Next day, no solution so I changed the jaws on the scroll
chuck, flipped the piece around, mounted the bowl and cut off the mounting
block from the top. I then removed the piece
from the lathe and set it down so I could look at the general shape. I needed to see the how it looked setting
vertically on a surface. It does look
different than when it’s mounted sideways in the lathe .
 |
| Initial Review of Bowl Shape |
Putting it back on the lathe I flattened the top edge and
ran a live center into the hole I had drilled in the top to help
with stability. If you look carefully at
the bottom of
the bowl there is the number 3 penciled in along with a line. That line is a reference mark set on the centerline of jaw number 3 in the scroll chuck. The idea being that when I take the bowl off the lathe I can reset it exactly where it came off . This should help with keeping the bowl aligned.
the bowl there is the number 3 penciled in along with a line. That line is a reference mark set on the centerline of jaw number 3 in the scroll chuck. The idea being that when I take the bowl off the lathe I can reset it exactly where it came off . This should help with keeping the bowl aligned.
Here I am looking at the top of the bowl before I started on
the final shaping .
 |
| Bowl 90% of Finished Shape |
More turning and refinement until I had the top to a point
where I was happy . I just needed to do
some final sanding. If you look back at
the original design this is slightly different.
Like I said in the beginning my design is not “final” but will evolve as
I work on the piece.
Next is to work on refining the bottom part of the
bowl. This should have been done right
after I had finished drilling and cleaning up the inset. However, that did not go so well and I got
distracted at that time never getting back to completing the final shaping of the base. Now with the bowl mounted in the chuck I
don’t have room to get my tools in at the base to do any turning.
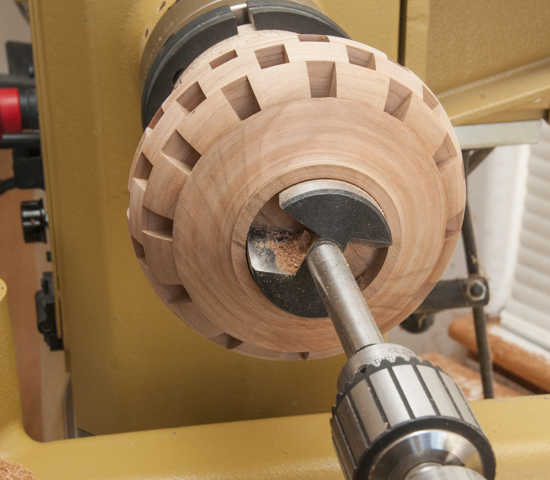
The fix is to create a true Rube Goldberg setup by mounting the drill bit I used to drill the recess in a chuck and use that to drive the bowl. Only problem is that after I cleaned up the drilled recess it is now a little larger than the drill bit and is a sloppy fit. Wrapping 3 layers of masking tape around the bit took up the slack and solved that problem . I could now finish the shaping of the bottom part of the bowl.
With the last of the bowl turning done I did some finish
sanding and the bowl was ready for me to apply a finish except for that #@!L*%
hole in the bottom .
 |
| Shaping Completed |
Next Up – Various Solutions & The Finish


No comments:
Post a Comment