Router Plane

Monday, December 31, 2018

Kitchen Spatula & Chopping Block - #5 Gluing & More Gluing


The maple bed joints are the ones that run continuously from end to end in the chopping block.  In the rendering below you can see what I mean.  The unusual thing about these pieces is the grain runs from top to bottom rather than side to side like you would normally see.

To make these panels I have to glue four of the ripped maple pieces together.  Since the material is just a hair over 1/8” thick it makes clamping the pieces together during glue up a bit more challenging.  Here’s the process, first I wrapped a flat piece of plywood in polyethylene plastic to keep the pieces from gluing themselves to it.  That’s because Type III TIghtbond (waterproof) glue won’t adhere to polyethylene.  This is what that looks like with the first of four pieces roughly in place.


This first piece goes down hung over the right edge of the panel about ¼”.  There are clamps close to each end of the maple piece to keep it flat when I tighten the clamps that will run the long dimension. 


Three more pieces are added, glued at the butt joint and clamped down.  When all four pieces are in place, I add a couple of light aluminum bar clamps to squeeze the joints between each of the sections tightly together.  Because they are so thin without the clamps at the edges of the individual panels, they would certainly buckle as I apply lengthwise clamping pressure.  The assembly sets overnight then the clamps are taken off and the whole process is repeated four more times to give me the five panels I need.  When all the panels are glued up the thickness sander is used to clean up any misalignment in the butt joints and bring the panel to 1/8” thick to match the head mortar joint pieces.  They are then set aside until needed which will be a bit later.

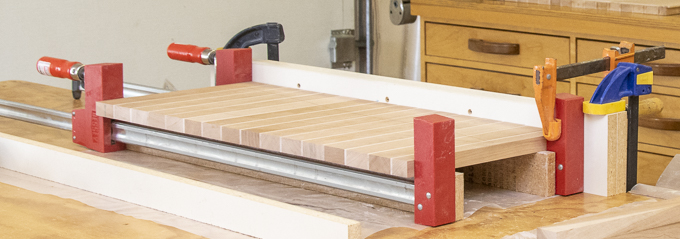
Now at long last enough parts and pieces are done so the major gluing can start.  Here is the clamping setup and the all the pieces needed to make up the first sub assembly.  To keep the spacers from getting glued to the maple or cherry pieces they are faced with plastic laminate or covered with packing tape.

This is the test clamp for the first sub-assembly: cherry then maple then cherry then maple then… well, you get the idea.  There are 31 pieces, sixteen cherry and fifteen maple that need to have glue applied, set in the clamps in the proper order, aligned, clamped and made sure all the faces are flush.  Not so bad but I need to get it done in about 7 or 8 minutes.

The process gets broken down into four phases.  Three of them are more or less in a controlled panic while the fourth is a little less stressful.  First, is to temporarily clamp all the cherry pieced together and apply the glue.  I just pour it on then use a credit card to spread it out.  In this case glue will be applied to both sides of the cherry pieces so I do not have to spread it out on the thin maple strips.  Here is what that looks like and it takes two minutes.

Next is to assemble all the pieces in the right order, cherry – maple – cherry – maple, etc. making sure I have the two different sized end pieces on each end and not in the middle.  This takes another three minutes, so five gone so far.

Now that all the pieces are in order, I have to make sure they are flush in the long dimension which the white bar does.  All I have to do here is pull it toward me and the pieces all being the same length get aligned.  Next is to check and make sure everything is flush on the top.  When that’s done, I can tighten the clamps making sure that nothing moves out of alignment.  Invariably as the clamps are tightened things move around and the pieces have to be realigned.  Must have something to do with 31 surfaces covered with slippery glue. Two more minutes go by so that’s 7 and I am pretty much done.  The last phase is cleanup which gives me the chance to confirm that all is square and aligned.

Once one side is cleaned up, I can flip the piece and do the other side, wipe down the clamps and set the sub-assembly aside to cure overnight.  With it out of the way I can clean up the accessory pieces which takes me 5 or 6 minutes so I can do the same thing tomorrow and for the three days after that to make five matched sub-assembly sets.

As much as I worked to keep all the pieces flush with each other inevitably there were some that required a little correction.  The first step in the cleanup process is to run the pieces through the thickness sander to flatten the piece.  For reference I mark the surfaces with pencil lines.  When they are gone the piece is flat.  Here is what one looks like in-process.  As you can see some of the pencil lines remain so I have a bit to go.
 
Next up – Milling Sub-Assemblies & More Gluing

Monday, December 24, 2018

Kitchen Spatula & Chopping Block - #4 Ripping the Maple Thin Strips


With the “brick” blanks cut and ready to go next up is the “mortar” that will go between each one of them.  I am using maple and start the same way as was done with the cherry.  First, cut to length then run through the thickness sander to match the thickness of all the pieces.  Next, rip them to width which is about 1/32” over my finished thickness of 1/8”.  Typically, I set the table saw fence to the width needed and cut however many strips needed like was done with the cherry pieces.  However, with these being so thin I am not comfortable in trying to cut them that way.  It puts my fingers WAY to close to the spinning blade and all sorts of things can go very wrong very fast.  I could use a push block but don’t like to rip less than ¼” with one.   My solution is to bring out a jig that lets me rip pieces to consistent width while keeping my fingers out of harms way.  The photo below shows the jig.  There is a runner that goes into the miter slot that has an arm with a brass screw run into its end.  
 
To set take a measurement from the outside tooth on the blade to the brass screw then run the screw in or out until the width matches what is needed.  In this case it’s 5/32”.  A test cut is made to verify the setting and if it is off minor adjustments are made until it is just right.  Below is a photo of the final setting.  Now before starting production I will remove the jig to eliminate any possibility of the board binding during the cut.  Once the piece is cut, I will need to set the jig back in place, position my blank next to the brass screw and run the fence up to the blank until it just touches it.  In order for the ripped pieces to all be the same size the fence pressure against the blank which is against the brass screw needs to be the same.  Because there are several blanks the same width, I can set the fence once and rip a strip of off each before having to reset the fence. 

Over time from various projects I have collected a fair amount of thin stock and now seemed like a good time to use some of it.  Here is the table saw setup used to rip the 13/16” wide blanks out of the thin stock.

After cutting what seemed like a zillion pieces but really was only about 85 including a few extras I ran them through the thickness sander to remove the saw blade cuts and get rid of any thickness variance.  A dial caliper is used to check the thickness to get it right at 1/8”.  Below is the finished stack of what will become the “head” mortar joints in my brick wall.

Because of the way the cherry bricks are put together in a sub-assembly I could rip the above head pieces from a roughly 13/16” thick blank and have the grain running in the right direction.  In order for the finished chopping block to be stable and not split as a result of the expansion and contraction due to humidity changes all the grain must run the same direction.  What that means is the bed mortar joint can’t be done the same way as the head joints.  I have to glue up a 26” wide piece then cross cut it into pieces the same width as the chopping block is thick.  Just trust me on this, if it does not quite make sense now it will when the time comes start gluing all the pieces together.

In order to get what is needed there are two options.  First, I could glue up a board 26” wide by 11 ½” long by 13/16” thick, cut that into roughly 2” wide blanks then rip the blanks into the 3/16” thick pieces and finally thickness sand the 25 of them required down to the 1/8” thickness needed for my mortar joint.  The other option which I went with is to cut the boards 11 ½” long, rip down to 3/16” thick pieces on the bandsaw, thickness sand them smooth to just a bit over 1/8” thick, glue them up to get the 26” wide piece, thickness sand the five 26”x 11 ½” pieces to the 1/8” thickness and finally crosscut them to size.  I thought this way would involve a lot less time on the bandsaw.  Anyway, here is the bandsaw setup for cutting the roughly 8’ wide by 3/16” thick pieces.

The bandsaw does a pretty good job of slicing tall boards into thinner ones but the resulting surface does need help.  This is what the cut looks like right off the saw.  To smooth out and bring all the thin sawn pieces to a consistent thickness it’s back to the thickness sander.  After that I measure, mark and cut the four pieces, I need to glue together to get the 26” wide piece.  

Here are all the various parts ready to start the gluing up process.  The light-colored pieces on the far left are the maple head joints.  To the right of them the short cherry stack will be used as the starting and ending piece in the first panel glue-up round.  The next and largest stack is also cherry and will be used for the body of each panel.  On the far right is a stack of 1/8” thick maple pieces which will be used for the bed joints.  They get glued up and crosscut into pieces the same width as the cherry pieces in the large stack which is where I will start in the next entry.

Next up – Gluing & More Gluing

Monday, December 17, 2018

Kitchen Spatula & Chopping Block - #3 Background & Making “Bricks”


I do a fair amount of cooking and almost all the slicing, dicing and chopping when my wife and I cook in the kitchen.  Currently I have a 26” square hard maple face grain chopping block that is right at 1¼” thick.  It has been in constant use for the better part of 10 years.  I treat it with mineral oil on a regular basis and it is in good shape with a lot of life still in it.  Here is what it looks like after being oiled up.  Not bad but I want to replace it.


Well, you ask what’s the matter with it and the answer is really nothing major.  So why the replacement?  There are a couple of reasons.  I like the length but it could be a little narrower to give a bit more space on the far side of the island.  That and I wanted an end grain block rather than a face grain one.  It is one of those things that fall in the “nice to have” category rather than the “need to have” and I have the time now to make one. 

That said I did not want the typical end grain chopping block made out of a bunch of maple blocks aligned so the end grain faces up glued together like a checkerboard.  If I was going to make one, I wanted it to have some character and be a little out of the ordinary.  Staying with the idea of blocks I decided that rather than square blocks I would use rectangular ones put together like a brick wall.  Going with the brick wall motif I decided to add thin strips between them that would represent the mortar in a brick wall.  I wanted the cutting board made out of wood that was not porous like oak, not soft like pine or poplar.  In the end I decided to use cherry thinking the red color would be reminiscent of bricks and hard maple for the mortar.  I have a fair amount of 13/16” thick cherry so decided to go with ¾” thick blocks which would give me 1/16” for milling.  Using 1/8” for the mortar seemed like a good idea so using SketchUp I put together a drawing of what I have in mind.  Here is the drawing and if I don’t change my mind before I get done it’s going to have 799 pieces. The dimensions are a little small but the length is 25 1/8", the width 21 3/4" and the thickness is 2".


Calculating the amount of material needed to make this project gave me a surprise in that it’s going to require quite a pile of wood.  Going through my material inventory gave me this stack.  It should be really close unless I run into some surprises as the cutting gets going.  For reference the long pieces are about 8’ long.


Because all of the cherry boards had only one fairly good edge plus some twist and a little cup, I decided to start out by cutting to rough length getting rid of splits, cracks, knots and any other defects.  With that done I ripped off the bad edge giving me parallel edges.  Next is to rotate the board 180 degrees and recut the first edge giving me a relatively square and pretty parallel set of edges to work from.  Here you can see how the material broke down.  I ended up with good groups of similar sized pieces plus a handful of odd sized ones.  The three paper tabs are notes to myself showing the estimate of how many finished pieces will be obtained out of each stack.  On the left is a group of odd sized boards marked with chalk listing what they are planned being cut into.  I will give them a day or so to sit and see if they are stable before going on.

Next is to rip all these rough-cut pieces down to slightly oversized blanks.  I started by switching out the combination blade normally kept on the table saw to a rip blade and in this case a thin kerf rip blade.  Below is a photo showing the difference between my combination blade and a rip blade. 

I have two different thicknesses of rip blades, a regular one and a thin kerf one.  Because I was ripping several blanks out of each of the wide boards, I wanted to minimize the amount of material turned into sawdust and maybe squeeze another piece out of the board.  Below shows the difference between regular and thin kerf blades.  It's about 1/32" thinner which may not sound like much but over all the pieces being cut it adds up in excess of 2½".

After spending what seemed like forever running boards through the saw here is my stack of 85 oversized blanks.  They are a constant width but the thickness varies.  Cutting the wide boards down in width helps reduce the measurable cupping and twist in each board.  It’s still there but if I cut a board into six pieces the scope of the problems gets divided by six.

Next is to accomplish three things, remove the cup, twist and get all of the pieces to a constant thickness.  That is done by running them through the thickness sander.  They are short enough that the sanding drum with remove the twist and cup while bringing them all to a constant thickness.

With all the pieces the same thickness I headed back to the table saw to take a skim cut from one side to square it up to the newly flattened parallel faces and then rip the opposite edge square, just a hair wide and parallel to the opposite side.  With that done it’s back to the sander for a couple of passes to remove the saw cutting marks.  Here is that process in progress. 

Last step with these pieces is to sort through all of them looking for any problems that have shown up while getting them to this stage.  I had cut a few extras and indeed did have some with internal checks or other problems that got them rejected.  Here is the final stack of “brick” pieces plus one of the bad ones. 

Next up – Ripping the Maple Thin Strips

Monday, December 10, 2018

Kitchen Spatula & Chopping Block - #2 Gluing, Shaping & Finishing


Before epoxying the other half of the handle in place I need to flatten the cured epoxy out so there are no points higher than the wood handle.  To do that I clamped a piece of 120 grit sandpaper to my flat table saw extension and carefully sanded away all the excess epoxy until I was left with a smooth flat surface ready to glue the other half on.  The top photo shows the flattening in progress and bottom one shows the end result.

Gluing the second half on follows the same process as the first side except I do not have to put a piece of plastic between the glue and the clamps.  Here is what it looks like clamped together.  Note the little triangle just right of center on the handle.  I use this to make sure the parts are aligned and oriented correctly.  Why you ask, did I glue up the handle in two steps rather than going ahead and gluing it all up at once.  I could have but was concerned about having to align three pieces without one of them getting out of position.  I thought that taking it one step at a time reduced the chance of one or more of the pieces getting out of whack.


The next day I took off the clamps and was ready to go from the clunky handle shown here to one that fit comfortably in my hand.

First, I cut the assembly to rough length then laid out the curve on each side with a French curve.  For those that do not know what a French curve is here is a photo.  You can use various parts of it to make all sort of curves and transitions between them.  Doing one is easy making a mirror image is a little more involved.  In order to make sure the curves matched I made some reference marks on the French curve so when I marked the second side it was a true mirror image. 

With the curve marked I used the drum sander to remove material and bring it to shape.  I stopped frequently to see how it felt and to confirm that both sides were a mirror of each other.  Not surprisingly as I fashioned the piece and held it the curves I had laid out got changed a little.  Not a lot but never the less what I ended up with was not exactly what I had originally drawn.  That’s not a surprise as I frequently change details as the project evolves.


Once the handle felt right in my hand, I sanded it pretty smooth then using a 1/8” radius roundover bit in my router I radiused the outside edges.  Couple of things here, first I used a holder to keep my fingers away from the router bit when making the cut and second when actually making the cut you really need to be extremely careful and not let the bit get into the stainless-steel spatula.  Getting your fingers tangled up with the router bit or hitting the spatula blade while making the cut will not end well for either your fingers or the spatula.

Once the hard edges have been softened by routing it’s time to do the final sanding.  For this piece I worked my way up through the grits going finer and finer until I had sanded all the way to 400 grit.  Here is what that looks like ready to finish.

I considered a few different finishes for this project; lacquer, oil-based polyurethane and Danish Oil.  Each has their advantages and disadvantages.  Ultimately, I decided against both the film finishes - lacquer and polyurethane.  My reasoning was that because they are a surface applied film that through normal wear and tear at some time in the future I will have to refinish the piece.  Lacquer can be removed via the use of lacquer thinner but polyurethane is a much harder finish to remove.   A penetrating oil like the Danish Oil finish it easily renewed by a thoroughly cleaning and then reapplying another coat or two of the oil.

Below, the top photo shows the setup for applying the finish.  I wrapped the blade with painter’s tape to keep any finish off it.  The bottom photo shows what the first coat looked like while it was soaking in.  My process is to liberally apply the oil, let it set for about 15 minutes then wipe on more making sure to cover any areas where all the oil had soaked in.  After letting it set for another 10 or 15 minutes, I wipe whatever was left on the surface off.  Next is to check back every 5 minutes or so for the next 15-20 minutes to wipe off any oil that has bled back out of the wood.  If you don’t do that the finish that “bleeds” out can create a bit of a gummy mess to deal with when you go to add the next coat.  I let it set overnight to cure before repeating the process for the next coat. 
After applying three more coats of finish I let it sit for about a week to cure then using a buffing wheel loaded with Carnauba wax buffed it to add a little extra protection.  To add the wax, I use a buffing wheel mounted on the lathe.  Here is that work in progress. 

With the wax applied, the project was finished and here is what it looks like.  

Yep, 92 cents of wood and $200 labor to fix a $5 kitchen spatula.  No doubt not the most cost-effective way to solve the problem as just buying a new spatula would have been a lot easier.  However, I had a small piece of the mesquite wood and wanted to see how it would turn out.  Besides I like the way the Mesquite looks and feels to me versus a plastic handled item.

Next up – The Chopping Block, Background & Making “Bricks”

Monday, December 3, 2018

Kitchen Spatula & Chopping Block - #1 The Beginning


This blog entry series is going to cover two projects, replacing a tattered, split wood handle on a small spatula or condiment spreader which is a short project.  However, the second one is a little more involved which is making a brick pattern end grain chopping block out of cherry and hard maple.

The spatula is one of a pair that we have had forever whose handle had separated from the blade and was cracked.  Not the best scenario for cleanliness.  Here is what it looked like before I started.


First step was to find the right piece of wood to make the new handle.  A piece like this only requires a small piece of wood which opens the possibility of using an exotic wood.  Going through what I had on hand I came across the following candidates:
·         Red oak - it has too open a grain for this purpose.
·         White oak – grain is not as open but not quite the color I wanted.
·         Cherry – one of my favorite woods but I wanted something a little denser and harder.
·         Hard, curly and birds eye maple – all are too light in color, I am afraid of them getting stained.
·         Walnut – here again I wanted something a little denser and harder.
·         Wenge – good and hard but at least for me it seems prone to splintering.
·         Katalox – hard, dense, dark almost black in color.  Great as an accent but not much character as a single piece.
·         Leopardwood – hard, great flecking like quarter sawn oak, but those flecks can be problematic as they can flake or split off when working.
·         Texas ebony – hard, dense dark almost black wood.  My piece has a greenish tinge and has not much grain or real interest.
·         Ebony – like Texas ebony it is a hard, dense black wood with no real figure.  The piece I have almost looks like a piece of black plastic.
·         Purpleheart – when cut it looks purple but after a while it can turn brown.
·         Cocobolo – nice hard, dense slightly oily material.  I like working with it and the grain looks great, this was a top contender.
·         Mesquite – hard, dense, stable very rot resistant wood with a nice warm color and good-looking grain.  This is the wood I decided to use.

With the material selected I sorted through my store of small pieces set aside from when I made a pair of mallets in an earlier blog entry.


Here is the piece I decided on using, it has a nice interesting grain and color.


With the new handle material selected I began by removing the old handle.  The two halves were held on by a couple of brass rivets.  They were easily removed by drilling them out.  Here you can see the setup on the drill press ready to go.

I started by cutting a very small notch on one side of the blank for the stainless-steel blade to fit in.  You could cut a notch half the thickness in each of the two handle halves but the blade is only about 1/32” thick so I decided to just cut a notch that thick on one side.  I used a router to make the cut for a couple of reasons.  First, because with the router lift in the router table very, very tiny adjustments can be made to the cut depth.  Second, by using a router bit I end up with an absolutely flat bottom in the notch which means the blade will set flat in the notch with no gaps.  Here you can see the setup and while it is almost invisible the cut has been made and I am ready to go on to the next step.  The miter fence with the plywood keeps the cut square with the blank so the center of the blade is in line with the center of the blade.

Next is to rip the blank in half on the table saw to give me my two halves of the handle.  This photo shows the blade set in the notch on one half with the top half next to it.  Note that the faces that will get glued together are what were the top and notched bottom of the blank.  The recently cut faces will make up the exposed top and bottom of the handle.  If I had wanted to make the grain match up better I would have cut the piece in half before making the notch and reassembled the pieces along the cut.

I beveled the end of the handle that will be next to the blade at 45 degrees using the disk sander and a fence adjusted to give me the right angle.  The little inset photo on the right is a close-up o f the sanding disk and the end of the handle.

Rather than reattach the new handles with rivets I chose to epoxy them in place.  It was fairly simple in that I mixed up some black 2-part epoxy, applied it to one side of the handle, set the blade in place, laid down a piece of 6 mil polyethylene film then clamped it all together.  Last thing before setting it aside to cure was to make sure the blade was square and in line with the handle.

The next day I unclamped the assembly and peeled the plastic film off.  Since the epoxy does not bond with the polyethylene it acts very well as a barrier to the clamps.  As you can see in the photo below the blade is well embedded in the epoxy.  Since the holes in the blade are filled in, I think it will be thoroughly locked in place.

Next up – Gluing, Shaping & Finishing