Router Plane

Monday, January 26, 2015

Maloof Rocker - Getting & Rough Cutting Chair Wood

While waiting for the bit to arrive I worked on building a couple more of the jigs needed for construction.   This one is for making the reference cut to the back leg where it attaches to the seat so both legs are raked at the same angle.

The major milestone was a day trip with a neighbor to Albuquerque to pick up the wood I will use to build the chair.   We stopped at two places, Albuquerque Exotic Hardwoods where I was like a kid in a candy store and ended up buying a piece of Katalox (Swartzia cubensis) to be used for the feature strips in the rockers and the plugs.  I looks a lot like Wenge but the piece I got is darker and is supposed to be a little less oily making it easier to glue.  As a reference Cherry has a Janka Hardness of 950 pounds, White Oak is 1,350 pounds and the Katalox is 3,660 pounds.  Being that hard it will be interesting to see how difficult the material is to work.  Second stop was at Albuquerque Hardwood Lumber Company.  There I picked up the needed planks of rough sawn 8/4 cherry.  When I did my cut list and added a waste factor I found I needed 46.9 board feet of material.  After picking though the stack of material and doing a rough layout of the pieces on the planks the total amount I had selected came out to 46 BF.  Coming that close to my estimate made me happy. 
Rough Sawn Lumber
Once back in the shop I ran the rough sawn pieces through the planer so I could see if there were any flaws not visible while the pieces were rough.  Sure enough a few surprises became visible like knots, a couple of small pits and a crack or two.  I will say, after half a day swinging around planks 2” thick, 10” wide and 10’ long to feed through the planer I was ready to quit.
Surfaced Cherry
 Now that I could see exactly what I had I could start doing the actual layout of parts on the planks.  This is a partial layout of the back slats.
Slat Layout
Once I had a layout drawn out I rough cut the major pieces to length, width and thickness.  Fortunately only a couple of the pieces had any twist or bow that needed to be removed.   

I also checked the moisture content at the fresh cuts and found it to be around 6% indicating they are pretty dry.  The pieces are now set aside to rest and see if they are stable or are going to move.   I am hoping that they stay flat and don't twist or otherwise go wacko on me.

Rough Cut Cherry
I know the process of taking rough sawn lumber to smooth then doing an efficient layout working around flaws, rough cutting to size followed up by making them flat and square does not seem like much but it took me the better part of 3 days.

Once the router bit arrives I will be able to move on with finishing the seat joints on the Mockup.

 Next up – Seat Mockup Part 4, Routing & Glue-up

Monday, January 19, 2015

Maloof Rocker - Seat Mockup Part 3, Leg Joints

Before I get into progress on the mockup I have had a couple of questions.  First, was how long do I spend in the shop a day?  Right now it’s about 3 hours or so a day 6 days a week more or less.  Second question asked about using dowels vs biscuit joints.  This was easy for me to decide because I don’t have a biscuit joiner.  If I had one I probably would have gone with it over the dowels because I could have adjusted its fence and not had to build the 3 degree jig to drill the holes for the dowels.  Also, the biscuits would have allowed some side to side slip for alignment.

5 Degree Jig
The leg joints in the seat are constructed in two steps.  First is a cutout for the leg and second is the routing.  Together they form the seat half of the mortise and tenon joint.  The back leg cutout is first and is not a simple square notch.   Since the back legs splay out, being wider at the top than at the bottom the joint needs a 5 degree angle.  The setup is to align the crosscut fence at 85 degrees.  Well, really the first step is to make a jig so I could repeatedly and accurately set the 85 degree angle between the fence and the blade.   That required me to dig back to my high school geometry class to find the formula to calculate the base of the triangle knowing two sides and an included angle.  That took longer than I care to admit.    

Having cut the jig I used it to set the crosscut fence at the correct angle then set the blade for a 3” deep cut.   Since this cut is from the narrow end of the board I clamped the board to the fence to make sure it stayed in place.  Clamping it in place also let me keep my fingers away from the blade. 

Cutting 5 Degree Angle
The first pass through the saw was to check for proper alignment and as shown here it matched the required angle.  The second cut is right to the layout line. 

First Cut Close to the Line
Finished Cuts
The legs are mirror copies so once I made the cut on the right leg I had to re-set the fence (using the jig) for the left leg and make the same cut.  With both angled cuts made I reset the crosscut fence back square to the blade and cut the other side of the notch.  However, because of the 5 degree cut the block does not come free so there is some minor work with a hand chisel to clean up the joint.

The dado for the front leg joint is pretty simple but, it’s here that I ran into the first small problem.  The plans called for the dado to be 1½” back from the front of the seat while the DVD showed 1¾” back from the front.  Stuck and not knowing how critical this dimension was to the overall geometry and center of balance I looked up the author’s email and sent him a short note asking for clarification.    I really did not expect a reply but the very next day there was a note from Scott explaining what was going on, “The 1 3/4" measurement is as measured from the front of the RAW chunk of wood.  The 1 1/2" measurement (as depicted on the template) is obviously from the front of the template.  There is a slight difference between the raw chunk of wood and the front of the template.”  Needless to say I was impressed that he replied to me and how quick the answer came back.  Back to the shop where I marked the cut, set a stop block and with three passes using a stack set of dados made the cut.   I should explain here that the stop block registered on the back leg notch is used so the dados are exactly the same distance for the left and right side.


Cutting Front Dado


5 Degree Angle Bits
With the cutouts done the second part of the joint, the routing, could be worked on.  The front leg joint uses a straight router bit to make the ¼” wide cut on the top and bottom.  The back legs require a total of three different bits to compete.  Remember the 5 degree cut made on the table saw?  Well, two different bits are needed to make the cut to match that angle.  From the top the 5 degrees needs to slant one way and from the bottom the slant needs to go the opposite.  The square part of the cut can use a regular straight bit.  Here is where I made my first oops.  I knew I had to order the 5 degree angles bits but I had a straight bit that matched the cut width of the special 5 degree bits.  What I did not realize until I was ready to make the cut was that the diameters of the bits all had to coordinate so the interior radius at the corner of the cut would match.  This brought everything to a standstill while I ordered and waited for the appropriate straight bit to arrive.  I did go ahead and make a test set of cuts with the two angled bits on a scrap piece to see how they worked.

5 Degree Cut and Routing


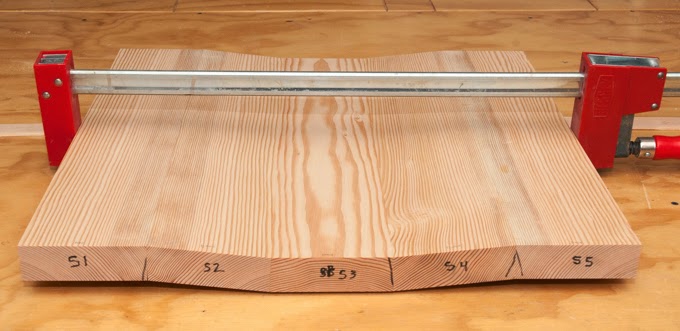
Next up – Getting & Rough Cutting Chair Wood

Monday, January 12, 2015

Maloof Rocker - Seat Mockup Part 2, Bevels & Dowels

After letting the seat blanks set for a few days I checked and they were still flat and square.  This meant that I could start with the final sizing and milling of the blanks. 

First was to mark the bevels on the pieces so I was sure and make the 3 degree cuts angled the right way.  After tilting the table saw blade I made one cut on each board.  
Seat Boards with one Bevel Cut
There are three combinations of angled cuts and straight cuts needed for the seat blank.  This means to get the proper width I had to reset the saw fence for each combination.   For some of the combinations I had to add a board to the table saw fence because it does not sit tight to the top of the table saw surface.  The gap would allow the edge of the bevel cut to ride under the fence and possibly prevent a smooth cut.
Guide Board Tight to Table
It looks worse than it is
I always work in the shop with eye, hearing and dust protection.  However, while making the ripping cuts on the table saw one splinter got away and stuck in my thumb.  It was small and did not even get through the callus.  Just a subtle reminder to me to be careful.

Once the cuts are made the application of a clamp pulls all the pieces and joints together resulting in the rough scooped shape of the seat.
Dry Clamped Seat

 Tracing the template I made for the seat gives me the layout lines I will need for cutting and sculpting the seat later.  However, before gluing up I have to drill holes for the dowels that go between the seat pieces to reinforce them and cut the leg joints. 
Seat Blank with Pattern


After marking the location for the dowels on the top of the seat I used a caliper to mark their location on the edge then followed that up with a punch to give a good place for the drill to start.


Since the seat boards have their edges beveled as 3 degrees I had to build a jig so the holes for the 3/8” by 2” long dowels would be square with the edge of the board and not the face. 
Jig Used with Drill Press for Doweling


Careful measurement in layout paid off when the dowels were test fit into the boards.
Test Fit with Dowels


Next up – Seat Mockup Part 3 Leg Joints

Monday, January 5, 2015

Maloof Rocker - Seat Mockup Part 1, Rough Cutting

Since the seat is sculpted out to make a comfortable place to sit there is quite a bit of material to be removed.  That can be done with hand tools like an adze and a scorp.  However, I am opting to use power tools to speed things up and not go through the learning curve or expense required for good hand tools.   The photos show the two tools I have bought so far.  One is a disk with conical tungsten carbide teeth that mounts on my 4.5” angle grinder.  I tried it out on a piece of scrap and at 10,000 rpm it really removes material fast.  
The other is a tungsten carbide burr that goes in my pneumatic die grinder.  It’s like a beaver on steroids.

Rather than taking a chance of screwing up the actual (expensive) hardwood seat and to gain some experience with the new tools I decided to do a mockup of the seat using common 2x6 construction lumber.  This will allow me to practice doweling the 3 degree joints between the seat pieces, scooping out the seat, cutting the 5 degree joints for the back legs and cutting the angled mortises.

With this in mind, about three weeks ago, before I had started anything on the project I went to Home Depot and sorted through their entire stack of 2X6 studs.  It is a good thing that I only needed two really good ones as that was all I could find.  One must have gotten in there by mistake, it was straight, clear and almost quarter sawn.  After letting them sit and dry I trimmed the ends to get rid of the checking or cracks at the end of the boards then cut 5 pieces to rough length.  
Checked End and Result After Cutting

Next I checked for cupping (yep), twist (one) and bow (some).  
Slight Cup Shown by Light Under Square

Cupping is easy to remove with the thickness sander, the minor bow can be removed from pieces this length (22”) on the table saw.   Twist is not bad if you have a jointer which I don’t so I had to revert back to the old school method of using a hand plane to knock down the high corners and flatten. 

After going through all that I have 5 boards 22” long by 5” wide and 1 7/16” thick all flat and square.  Now to let them set for a few days to see if they stay that way.
Flattened, Square Boards for Seat Mock-Up


Next up – Seat Mockup Part 2 Bevels & Dowels