Assembling the three-layer Katalox-Maple-Katalox stack to
be used in the cherry bowls is next.
Here is the rendering of what that bowl looks like.

With a good edge the piece of katalox gets set on the
base on the left side, a top layer added and the cut is made trimming the
katalox to length. That’s followed by
turning the piece 90 degrees and trimming it to width so the piece is
square. The process is repeated for the
two more katalox layers and the maple layer per bowl. The katalox piece on the right side of the
saw is one of the finished pieces.
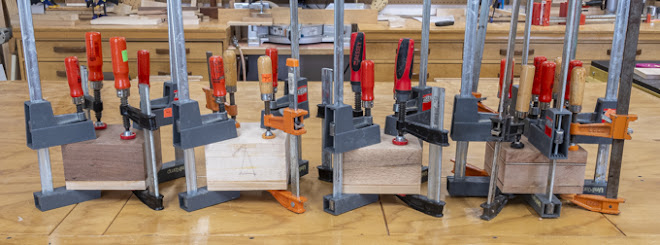
Gluing the three layers together is next. The method is the same as when I glued up the
cedar test block early on. The left
photo shows the cedar test piece where the large red clamps align the edges of
all the layers and the grey ones provide the vertical clamping force to hold
the layers together. The right photo
shows the final clamping of the katalox and maple layers with the glue cleaned
up. A couple of things need to explained
regarding this stack. Only the two
katalox and center maple layer are glued together. The thick top and bottom layers are not glued
on but are there to act as flat platens so the three glued layers stay flat and
true. When glue is applied to the thin
wood layers, they absorb the moisture from the glue causing them to warp. The thick pieces help with aligning the thin
layers when the red clamps are added along with keeping the layers flat while
the glue cures.
After the 3-layer feature piece has cured overnight I
moved on to cutting all the layers of the four different woods for the large
bowl. Only the walnut is thick enough
to make the whole bowl out of one piece.
The maple had three layers, the oak two and the cherry because of the
integral katalox and maple feature layers ended up with seven layers. All of the bowl blanks are made a little tall
and will be trimmed during the turning process on the lathe. The top and bottom cherry layers will be made
oversized and trimmed later but because the center layer is sandwiched between
the feature layers it has to be cut the final size before the stack is glued
together. My drawing say that layer is
1.441” thick for the large bowl so I ripped the 5 ½” square blank down slightly thick on the
bandsaw then using the thickness sander crept up on the required
thickness. As the bottom photo shows
it’s 1½ thousands thick which is thinner than a sheet of paper so that’s OK.
Gluing the stacks together for the walnut, oak and maple
follows the same process as when I glued the prototype cedar bowl. However, trying to glue up all the layers in
the cherry at once gave me a little pause as I was concerned that I could get
outside the glue’s working time before the glue got applied, the layers
stacked, aligned and clamped. To get
around this the glueup will be done in two steps. First the bottom three layers get glued
together and the top two layers get glued together then the whole group is
clamped. Not applying glue between the
center thick piece of cherry and the three-layer feature strip and leaving the
sacrificial base off saves me enough time in glue application, alignment and
cleanup that I am comfortable proceeding.
Here are the walnut, maple, oak and cherry glueups done
and clamped. All have the sacrificial
base except for the cherry. Tomorrow it
will get added along with gluing the two subassemblies of the bowl together.
This photo shows the four large bowl blanks ready to
start the turning process. Assembling
the medium and small bowl blanks follow the same process albeit with smaller
pieces.
All went well making the medium and small bowl blanks
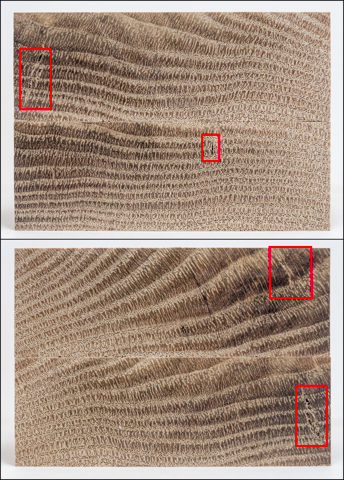
with one exception. When I cut the oak
pieces for the small bowl to size some internal cracks showed up. They are outlined by the red boxes but all
except one are small and are located near the edges. I think that when the square blank is cut
round all those near the edges will be removed.
The last one is really tiny and while not at the edge is in the area
that gets narrowed down toward the base so it may get cut away too. I won’t know for sure until I start working
on it in the lathe. If more show up or
they get bigger when I start turning then it may require making another
blank.
I did have one extra step in making the small cherry
bowl’s middle cherry piece which needs to be .86” thick. After bandsawing it close to thickness it
needed to be run through the thickness sander to get it to the right size and
make the faces parallel. Problem is it’s
too short to run through safely so two rails were glued to either side shown in
the bottom photo. With them in place the
sander reads the assembly as one long piece and could be safely run through the
machine. Once the thickness is achieved
they get cut off.
Here are all twelve of the blanks cut, glued and ready to
start the turning process.
Next Up – Bandsawing Blanks, Centering Blank in Lathe & Turning Outside Face

No comments:
Post a Comment