
To help keep parts in place while I work on them a number
of different things are used including my bench vices, clamps and an aluminum
hold down like the one shown in the photo.
A good one runs $15 to $20. This
hold down is designed to be used with an aluminum “T” track recessed into a
work surface. The photo shows how that
works on my drill press to hold a stop block in place. If the knob and
bolt are switched out to a different type it can also be used with a ¼”-20
treaded insert mounted in a worksurface.
I would like to have a couple more but they are a little
expensive for the frequency that they get used.
You can find plans for them online made from wood but my concern with
those has to do with the grain direction.
The typical plan calls for them to be sawn out of a wood block which
makes the grain run like in the drawing below.
The problem with that has to do with wood’s strength in relation to the
grain direction. A piece of wood is
strongest when the grain runs parallel to the piece’s long dimension as in the
flat piece in the top drawing. The more
it varies from this the easier it is to break when a load is applied. Due to the shape of the hold down you can’t
have grain running the long direction the entire length of the piece if it’s
cut from a solid piece a wood. I suppose
if you could find a chunk of wood that had a natural curve or branch growing
off the trunk then used that area where the grain curves to make the hold down
the grain would follow the piece’s shape.
It’s not unheard of since old wooden sailing ships used parts just like
that as shown in the bottom photo but it's not too practical. 
Another option would be to take a piece of straight
grained wood and steam bend it around a form so the grain follows the
curve. However, since I don’t have the
equipment needed to steam bend my solution to get the grain to flow is to
laminate thin strips of wood together to form the blank needed. Below the top drawing shows the hold down and
the bottom drawing is of the form needed for clamping the strips together while
the glue cures.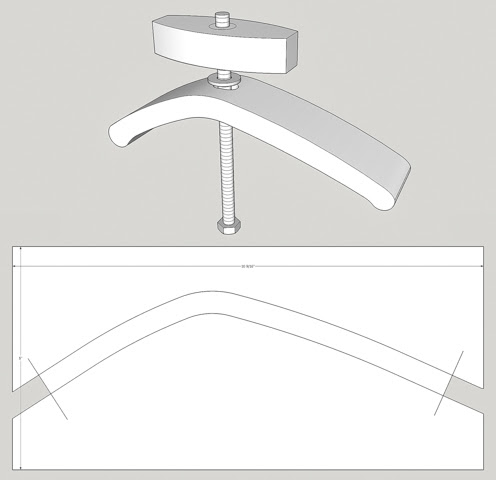
This is a technique I have used before for the arms of a
Civil War Folding Chair (left photo, pre-blog) and for rockers on a Maloof Rocking Chair
(right photo). It works out well
although the glue-up can get a little hectic and messy.
Making the form is the next step. That starts with printing out a full-scale
pattern and gluing it to a flattened scrap of 2x6 that’s thinned down to 1 3/8”
thick. As the pattern won’t fit on a
single piece of paper it’s printed on two sheets and taped together. This is taped to the prepared 2x 6 just at the
top of the pattern. Flanking sheets of
paper are taped to either side of the pattern to mask off the 2x6 to prevent
overspray of the adhesive. That’s all
been done in the top photo. The bottom
photo shows the pattern folded back so the bare wood and the back of the
pattern can be sprayed with adhesive. 
Once sprayed the paper pattern is folded onto the bare
wood, the flanking masking sheets of paper removed and the form is clamped in
the bench vice. Since the bench vice
isn’t deep enough to clamp the whole form a scrap piece of plywood along with
some clamps are added until the adhesive cures.
There will be seven or eight layers making up the hold
down blank so selecting material is next.
Going through my thin scraps several candidates are selected. They are mostly red oak but also include a
couple of walnut and cherry pieces. Not
all this material will be used but it gives me a good selection to work from.
In the end I decided to use seven layers. Six layers are oak with the center one being
a contrasting wood, either walnut or cherry.
To get these pieces the blanks were first cut to rough width then milled to
thickness using the thickness sander and finally cut to a consistent
length. It’s not the final hold down’s
size as the laminated blank is made wide and long.
Taking one of the scrap laminations I tried to just bend
it to shape and that didn’t work too well as the piece cracked. To make the strips a little more pliable I
tried a two-step process. First a wet
cloth is wrapped around the area where the bend is the tightest and let set for
a while. Once wetted a heat gun is used
to heat/steam the bend area to soften the lignin in the wood allowing it to
bend without breaking. Once bent it’s
set between a couple of clamps until it cools.
Going a little deeper into the “why” this works lignin is an organic
polymer found in wood. When heated,
lignin in wood relaxes, becoming soft, flexible and just stretchy enough to
compresses to a point where the wood fibers can be manipulated. When the wood cools it retains its new
shape. The photos below show the bending
process being done and the finished piece in front of the form.
Doing the bending of the actual pieces starts with
marking a line centered at the apex of the bend. Once marked a wet towel folded to a couple of
inches wide is set flat on a waterproof surface, the pencil line is centered on
the towel and a second wet towel set on top of the wood pieces.
This is the setup for the production bending
process. The heat gun set on low is held
in the bench vice to heat the piece for bending. The form with the pattern is in front of me
so the bend can be checked. Heating up
the inside is first followed by outside.
That’s because the outside of the curve is the side most prone to
cracking or splitting so it’s the limiting factor when bending. At the lower left is the jig set up to hold
the pieces shape until they cool.
Here you can see the finished set of laminations needed
for one blank ready to get glued up.
Next Up – Making the Form, Lamination Glue Up &
Shaping
No comments:
Post a Comment