Router Plane

Showing posts with label WoodHoldDown. Show all posts

Monday, November 7, 2022

Wood Hold Down - #3 Making the Knobs & Finishing

Starting on the knobs used to tighten the hold down in place is next.  This begins by taking some thin pieces left over from resawing oak for other projects then gluing up three layers with the grain in the center piece 90 degrees to the face layers, just like plywood.  This will give the knobs some additional strength to resist splitting along the knob’s long dimension.  You can see the three layers in the bottom edge on photo below.  Once glued the plywood block gets divided into three more or less equal width blanks and cut using the bandsaw.

After cutting the knob shape laid out on one it’s back to the bandsaw to cut it out.  In the photo below I have just finished making the last cut on the prototype.  To keep my fingers away from the blade one of the quarter sawn white oak deep reach Cam Action clamps I made is used.

After being rough cut on the bandsaw the large disk sander is used to smooth and shape the edges.  When satisfied with the shape it’s checked to see the part is symmetrical and used to trace the shape on the other two knob blanks.  They are cut out and sanded to final shape just like the prototype.

Using a small drill bit in the drill press a center locating hole is made.  It will be used to mark the centers of the other two knobs and then for centering additional drilling operations.

To transfer the center-point the knob with the hole is stacked on top of another knob then both are clamped together so the edges are aligned and a drill is used to make a shallow hole in the bottom knob.  The same process is used for the third knob.
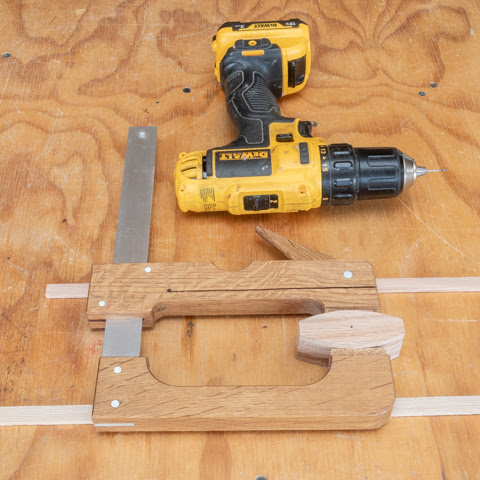
Completing the drilling is a two-step process.  First is to take a flat bottom Fostner bit and drill a hole ¼” deep.  This is for the ¼-20 nut that gets epoxied in there.  The second step is to drill a through hole for bolt access.  Both holes are drilled using the center reference hole drilled earlier.  Below you can see the drill bits and successive steps.

Epoxying the ¼-20 nuts in the recess is next.  This photo shows the nuts in with the epoxy covering them.  It’s a little messy looking but I wanted to make sure the gap between the flats on the nut and the drilled hole were completely filled as well as having the epoxy a little higher than the oak knob’s surface.

As you can imagine the threads in the nut get some epoxy on them.  The easy way to clean the epoxy out is to run a tap through the nut.  The tap follows the existing nut’s threads cutting away all the excess epoxy leaving a nice clean surface.  The top is still a mess and gets taken care of next.

Removing the excess epoxy is done using two sheets of sandpaper clamped to the table saw extension.  The reddish sheet on the left is 120 grit while the yellow sheet is 220 grit.  It does not take much time at all to sand off the excess epoxy leaving a nice flat oak surface.  Last, is to use the hand sanding block at the top which is loaded with 320 grit paper.  The bottom photo shows the finished sanded knob.  It also shows the three layers of oak in the shop made plywood.  One untended consequence of sanding all the surfaces smooth is the edges are pretty sharp.  Believe it or not I have cut myself on this type of edge so they need to be addressed.

There are a few ways to get rid of the sharp edge.  One is to “break” the edge by sanding it to either a chamfer or slightly rounding it.  However, in this case I wanted a softer edge so used a 1/8” radius roundover bit in the router table.  The photo shows the bit, knob and the safety gripper I use to keep my fingers away from that bit spinning at 15,000 or so RPM’s.

Once the routing is done the knobs get a little hand sanding with 220 grit sandpaper to smooth out the routed end grain and do blending as needed.  Below is a side and top view of a completed knob ready for its finish to be applied.  The side view shows a good view of the knob’s three-layer construction.

With the knobs ready for their finish, I can go back to complete the last bit of woodworking on the hold downs.  That's a slot to cut at the top of the arc for the bolt to pass through.  The bolt along with the knob applies pressure to the hold down.   The drill press is used to make the slot starting by clamping the hold down to the drill press’s fence and moving it until the center finder aligns with the slot’s punched center point.  That’s show in the photos below.

Next the center finder is removed and with the drill bit installed a hole drilled.  After that the hold down is slid over so the other end of the slot can be drilled.  A hole between those two is then drilled.  Here the end holes are drilled and I am ready to drill the center hole.

An additional pair of intermediate holes are drilled out then the hold down is slid back and forth with the drill fully through the slot.  This cleans up the inside faces of the slot resulting in the completed slot below.

Last is to break all the sharp edges of the hold down with sand paper.  Here is one of the hold downs with all woodworking done and ready to finish.

The finish consists of three coats of hand rubbed Danish Oil Finish.  I used this type of finish rather than my usual sprayed on lacquer as an oil finish can be rejuvenated down the line as the pieces wear a lot easier than a film finish.   When done this is what the completed hold downs look like.

Here is an example of one of the hold downs in use on a piece to be drilled.  In doing a little testing I think they will work well for light duty clamping.

Monday, October 31, 2022

Wood Hold Down - #2 Making the Form, Lamination Glue Up & Shaping

With the laminations cut and pre-bent next is to cut the form apart using the bandsaw.  This is done freehand getting close to but touching the line.  It may not look like it in the photo but the wings on either side of the sharp center curve are not straight but have a slight curve to them.  I did this because I think they will be stronger but don’t have the engineering to prove it.  Think of an arch supporting a bridge versus a flat surface.  

The outside curves of the form are brought down to the line and smoothed out using the large disk sander.

The inside curves of the other half of the form are brought down to the line and smoothed out using the oscillating drum sander fitted with a coarse sleeve.  The surface really does not need to be smoothed out like it would be for finishing.  That’s because all the surfaces will get a layer of packing tape applied to them giving a smooth non-stick surface to keep from gluing the hold down to the form when it is used.

Gluing the laminations together is next.  No photos of the process because it’s a race against time to get the glue on, the pieces assembled in the form and clamped within the glue’s working time which with the glue I am using is about 5 minutes.  The process is not that complicated but can get messy.  First, a sheet of 6 mil plastic sheeting goes down on the workbench where I will be making the mess.  After that a base piece of wood a little narrower than the form gets wrapped in the same plastic sheeting and set on the guides in the bench vice.  The form gets set on top and it’s ready for the glue-up.

  • The first lamination gets set in the form up against the front part.  
  • Glue is applied to the inside of the next piece and it is set in place next to the first piece.  
  • Repeat spreading glue and setting the laminations in place until all seven layers are in the form.  
  • Align any of the laminations that may be out of line.    
  • Apply a little pressure with the bench vice.  
  • Using a rubber mallet level the layers as needed. 
  • Tighten the bench vice down more making sure the reference lines on the form are lined up adjusting as necessary. 
  • Continue to tighten the bench vice down until really tight keeping an eye on form alignment.
  • Clean up the squeezed-out glue.

It takes a couple of days for the glue to mostly cure within the laminations and on the bottom.  That’s due to the plastic at the bottom preventing air from getting to the glue and the form with its packing tape slowing the cure down.   After the initial overnight set the part is removed from the form and clamped as shown in the photo to hold its shape until the glue fully cures. 

Flattening the edges is next so all the lamination layers are flush.  That starts by drilling two holes in the form for screws that will hold the blank securely in the form while its edges get roughly flattened with a hand plane and finished with the thickness sander.  The two photos below show the setup in the drill press with the clamps needed to hold everything together and square.

Once the holes are drilled the laminated blank and the form are put back together in the vice and the screws, circled in red, get run in clamping the blank square and plumb in the form. 

Now that the blank is securely held in place both faces can be roughly hand planed smooth.  That’s followed by loosening the screws then moving one face flush with the bottom of the form and retightening the screws.  The assembly is then run through the thickness sander until the top edge is smooth.  Next the blank is repositioned so the sanded edge is flush with the form and the other face sanded flat. 

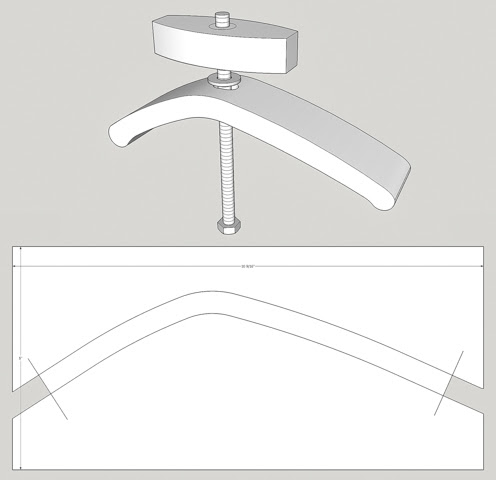
After the edges are flattened, in looking at the blank I thought that because there is a hole for the clamping bolt right at the peak of the curve that could be a potential weak point.  The drawing at the top shows the hole.   Adding a little reinforcement around the hole seemed to be a good idea so a short piece of oak about 1 ½ laminations thick is cut, bent and glued to the underside of the laminated blank shown in the bottom two photos.

After the glue dries both sides of the brace are cut down using a hand plane until it’s almost flush with rest of the blank.  The form and blank are then run through the thickness sander to flush the brace with the blank and make both edges parallel.

Next the end of the brace gets a small fillet sanded in it using a small drum in the oscillating drum sander.  This makes for a smooth transition between the brace and the body of the blank.  In the bottom photo the red arrow points to the finished fillet while the left edge of the brace is before sanding it.

Adding a small block at each of the blank’s ends is next.  They are the contact points for the hold down and top drawing shows what the end result will look like.  The middle photo shows the blocks cut to size and set in place while the bottom photo shows the blocks glued and clamped in place along with the pattern that will be used to layout the end shape.  The blocks are just a smidge taller than the blank and will be brought down flush after the glue dries.

After the glue dries the blocks are brought flush with a hand plane then the curved ends are marked out using the hold down template.  Below are the laid out ends ready to be cut.

The ends get roughed out using the bandsaw.  Final shaping is done with the large disk sander and the oscillating drum sander then hand sanded with 220 grit sandpaper.  The top photo shows the original aluminum hold down while the two bottom photos show a front and back view of the hold downs to this point.  A slot still needs to be cut at the top center of them but that will come later.

Next Up – Making the Knobs & Finishing

Monday, October 24, 2022

Wood Hold Down - #1 The Beginning & Bending Wood

To help keep parts in place while I work on them a number of different things are used including my bench vices, clamps and an aluminum hold down like the one shown in the photo.  A good one runs $15 to $20.  This hold down is designed to be used with an aluminum “T” track recessed into a work surface.  The photo shows how that works on my drill press to hold a stop block in place.  If the knob and bolt are switched out to a different type it can also be used with a ¼”-20 treaded insert mounted in a worksurface.

I would like to have a couple more but they are a little expensive for the frequency that they get used.  You can find plans for them online made from wood but my concern with those has to do with the grain direction.  The typical plan calls for them to be sawn out of a wood block which makes the grain run like in the drawing below.  The problem with that has to do with wood’s strength in relation to the grain direction.  A piece of wood is strongest when the grain runs parallel to the piece’s long dimension as in the flat piece in the top drawing.   The more it varies from this the easier it is to break when a load is applied.  Due to the shape of the hold down you can’t have grain running the long direction the entire length of the piece if it’s cut from a solid piece a wood.  I suppose if you could find a chunk of wood that had a natural curve or branch growing off the trunk then used that area where the grain curves to make the hold down the grain would follow the piece’s shape.  It’s not unheard of since old wooden sailing ships used parts just like that as shown in the bottom photo but it's not too practical.  

Another option would be to take a piece of straight grained wood and steam bend it around a form so the grain follows the curve.  However, since I don’t have the equipment needed to steam bend my solution to get the grain to flow is to laminate thin strips of wood together to form the blank needed.  Below the top drawing shows the hold down and the bottom drawing is of the form needed for clamping the strips together while the glue cures.

This is a technique I have used before for the arms of a Civil War Folding Chair (left photo, pre-blog) and for rockers on a Maloof Rocking Chair (right photo).  It works out well although the glue-up can get a little hectic and messy.

Making the form is the next step.  That starts with printing out a full-scale pattern and gluing it to a flattened scrap of 2x6 that’s thinned down to 1 3/8” thick.  As the pattern won’t fit on a single piece of paper it’s printed on two sheets and taped together.  This is taped to the prepared 2x 6 just at the top of the pattern.  Flanking sheets of paper are taped to either side of the pattern to mask off the 2x6 to prevent overspray of the adhesive.  That’s all been done in the top photo.  The bottom photo shows the pattern folded back so the bare wood and the back of the pattern can be sprayed with adhesive. 

Once sprayed the paper pattern is folded onto the bare wood, the flanking masking sheets of paper removed and the form is clamped in the bench vice.  Since the bench vice isn’t deep enough to clamp the whole form a scrap piece of plywood along with some clamps are added until the adhesive cures.

There will be seven or eight layers making up the hold down blank so selecting material is next.  Going through my thin scraps several candidates are selected.  They are mostly red oak but also include a couple of walnut and cherry pieces.  Not all this material will be used but it gives me a good selection to work from.

In the end I decided to use seven layers.  Six layers are oak with the center one being a contrasting wood, either walnut or cherry.  To get these pieces the blanks were first cut to rough width then milled to thickness using the thickness sander and finally cut to a consistent length.  It’s not the final hold down’s size as the laminated blank is made wide and long.

Taking one of the scrap laminations I tried to just bend it to shape and that didn’t work too well as the piece cracked.  To make the strips a little more pliable I tried a two-step process.  First a wet cloth is wrapped around the area where the bend is the tightest and let set for a while.  Once wetted a heat gun is used to heat/steam the bend area to soften the lignin in the wood allowing it to bend without breaking.  Once bent it’s set between a couple of clamps until it cools.  Going a little deeper into the “why” this works lignin is an organic polymer found in wood.  When heated, lignin in wood relaxes, becoming soft, flexible and just stretchy enough to compresses to a point where the wood fibers can be manipulated.  When the wood cools it retains its new shape.  The photos below show the bending process being done and the finished piece in front of the form.

Doing the bending of the actual pieces starts with marking a line centered at the apex of the bend.  Once marked a wet towel folded to a couple of inches wide is set flat on a waterproof surface, the pencil line is centered on the towel and a second wet towel set on top of the wood pieces.

This is the setup for the production bending process.  The heat gun set on low is held in the bench vice to heat the piece for bending.  The form with the pattern is in front of me so the bend can be checked.  Heating up the inside is first followed by outside.  That’s because the outside of the curve is the side most prone to cracking or splitting so it’s the limiting factor when bending.  At the lower left is the jig set up to hold the pieces shape until they cool.

Here you can see the finished set of laminations needed for one blank ready to get glued up.

Next Up – Making the Form, Lamination Glue Up & Shaping