Making the hardware to attach the adapter to the jointer
is next. At the top I used a couple of
steel splicing plates left over from a previous project that only needed to be
flattened, one mounting hole added and painted.
The bottom gets attached to the jointer’s steel frame base using some
long machine screws that go into some threaded holes on the jointer base I
added. The top photo below shows the
front of the finished adapter along with the mounting hardware. The bottom photo shows the back of the adapter. The black is a piece of foam that will seal
the adapter against the rail’s stand and the shallow recess at the top is for
the chute’s cover.
Here is the adapter mounted on the jointer with the
vacuum hose connected. Along with the jointer came a pair of push blocks that
are used to keep one’s hands away from the cutterhead which spins at 4,800
RPM’s with the knives making 14,400 cuts per minute. To me the push blocks are an essential piece
of safety gear. This is from family
experience as when my dad was young, he slipped and lost a part of one of his
fingers on a jointer. These blocks are
OK but I wanted ones that are a little longer, wider and have larger handles
for more protection.
I decided to make three blocks not because I have three hands
but to make two who’s bases are flat plus one with a stop at the back to grab
the end of the piece to be jointed. No
drawings for these as they are going to be designed on the fly depending on
what materials I have available. Two of
the bases will be made out of ¾” oak plywood 4” wide and 11” long while the
other one also from out of ¾” oak plywood will be bit narrower. The handles will be made from scraps of 2x6 construction lumber salvaged from the Master Bath Remodel. I am using these since they were put in place
in the mid 1990’s and have been drying for well over 25 years so they should be
thoroughly dry and stable. They are
however cupped and twisted. The photo
below shows the cup, twist and cracking pretty well. Since I had a paper cutout of the final
handle, I moved it around on the blanks so they are free of knots, cracks
and splits.
Here the bandsaw has been used to cut off the worst part
of the blank which also helps to reduce the cup although it really does not
help the twist much.
This is what the jointer and shop-vac look like set up
and ready to go. They are plugged into
two different electrical circuits because the jointer needs a 20 amp breaker and
the shop-vac draws 11 amps.
In the top photo looking down on the jointer the handle
blank is set with the to be jointed face up.
Since I am not in a rush to flatten the board, the jointer is set up to
take off only 1/32” per pass. That
amount does not bog the machine down so it’s easier on the equipment, there is
less chance of a catch particularly as there are a couple of knots plus I end
up taking no more off than absolutely needed.
The bottom photo shows the face flat and true. This gives me one reference surface that will
be used to bring the other faces square and parallel to it. In use the jointer worked great, smooth
effortless cuts and the dust collection captured all the chips.
The top photo shows the completed reference face to be
use used to joint an adjoining edge square to it. This is one reason I took the time to make sure
the fence is square with the bed.
Squaring the edge is done by holding the reference face against the
fence and running across the jointer until the surface has been cut along its full length and width. When that’s done,
I have one face and one edge flat and square with each other. The top bottom photo shows the two squared
edges.

With both wide faces straight and parallel plus one edge
straight and square with the faces last is to make the remaining edge straight
and square with the others. That’s done
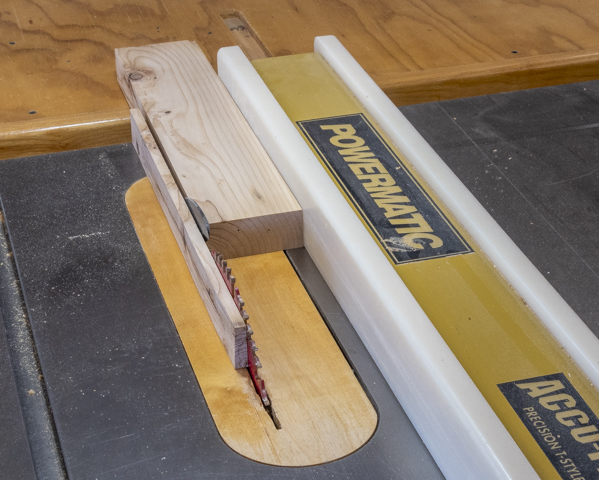
with the tablesaw. Here it’s set to make
a cut closer to the final width needed for the handle.
Ripping the blank to rough thickness on the bandsaw is
next. A marking gauge is used to give me
a line to cut to. A pivot point attached
to a magnetic fence is set up to guide the thickness. Here is the handle blank and the cutoff.
The bandsaw leaves a fair cut but to smooth it out it’s
back to the thickness sander. Here in
the top photo, you can see where I have pencil marked the surface. That along with the bandsawn marks will allow
me to gauge how the flattening is going and when to stop. The bottom photo is of the finished piece. All in all, it’s a little bit of work to take
a piece in as bad a shape as this was and make a flat and square piece of
wood. However, in practice the
individual steps move right along.
Next Up – The Handle, Finishing & Assembly

No comments:
Post a Comment