
This post is a little longer that most because at the end I have included a sequence of operations in case anyone wants to make these.
The final profile can take a variety of shapes. There are however a few items to be kept in
mind when doing the turning. The profile
needs to be able to be grabbed and pulled off the refrigerator as the rare earth magnets have quite a grip. I usually include some sort of ridge at the
top. For example, a smooth cone or half
dome would not give any good place to get a grip. There is a 5/8” deep hole for the screw
mounting in the jig which limits the minimum height. Also, the 5/8” diameter hole ¼” deep for the
magnet cup limits the minimum diameter to about ¾”. Here are a couple of photos of the turned and
sanded blank. To the left of the red
arrow is the jig and to the right is the final turning sanded to 400 grit. Last is to take the turning off the jig and break or
soften the bottom edges as they are quite sharp. One other item, on the left the number 4 on the jig matches the jaw
number on the chuck. That’s so when the
jig goes back into the chuck it’s put in the same place every time.

Below are the first four ready to be finished.

Next is to work with the other laminated block. Rather than do a straight stack I decided to
try some where the blank is cut out at an angle to the grain. Here is the layout with two blanks at 30
degrees off vertical and two more at 45 degrees. It should give a different look than the
others.

This is the setup for cutting the blank for the 30-degree
ones. Once cut I took them to the disk
sander to smooth out the faces.

After the faces are cleaned up the centers were marked so
I could start the turning process. That
process will be the same as the first set.

While rummaging through my stack of lathe stock I came
across a roughly roundish piece that was gifted to me probably 20 years
ago. It’s a dark wood that is really,
really hard and is probably some type of tropical hardwood, no idea what. It seemed like a candidate for a design I had
in mind so it got chucked up in the lathe, trued to a cylinder and parted for
two blanks. That’s what’s shown below.

Unfortunately, once the pieces were parted the ends
looked like there was a split running right down the center. When I checked by trying to pull them apart,
they split right in half. It was a clean
split that looked like the pieces could be glued back together seamlessly. Below is a photo of the two blanks after they
were glued together but before they were put back in the lathe and turned.

Once turned the glue joint was all but invisible so the
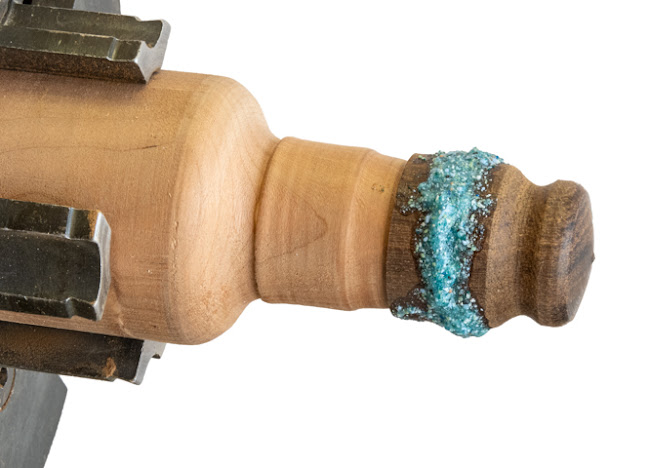
work progressed with the needed drilling and mounting on the jig. The idea for this is once the blank was
turned to its preliminary shape a narrow channel is cut in the blank then filled with a synthetic turquoise inlay.
Here is what that looks like.
Once the inlay thoroughly cures the blank will be turned to final size
and the inlay polished.
After the inlay had cured the final turning could be
done. It all went well with the first
piece with the inlay cutting smoothly but when turning the second one the tool
caught a hard piece in the inlay and popped the ring out. I have to say some rather testy words were
said at the piece. It did make me feel
better but the inlay was still gone. On
the good side the wood was undamaged so the inlay could be replaced. However, before doing that I did just a
little more turning to the inlay’s slot tapering the slot so it was wider at
the bottom than the top. When I redid
the inlay there was no problem in doing the turning so the taper must have
locked the inlay in place. I also
sharpened the lathe tool so that probably had something to do with it too. Here is what that piece looks like ready to
be sprayed with lacquer.

On a whim I took some short pieces of cherry and maple
out of the fire starter stack and glued them up in a block. Once the glue cured the block got down cut
with the bandsaw so the laminated layers would run across the blank at a 60-degree
angle. The top photo shows what the
block looks like after being cut. The
usable blank is in the center and the angled pencil line represents the turning
axis of the blank. The bottom photo are
the completed pieces.

I was getting ready to throw the cutoffs from this piece
away when in looking at them I thought they could be put together is some sort
of pattern. On the left is what it
looked like all glued up and on the right is the finished piece.

The finish for these is going to be lacquer sprayed on
with the airbrush. As I needed some way
to hold them while being sprayed the easiest method is a dowel the
same diameter as the magnet recess (5/8”) screwed to a base. Not having a dowel this size some scrap pine
was turned down on the lathe.

The dowel gets cut into 1” long pieces with the bandsaw
and a pilot hole for the mounting screws drilled in its base using the lathe.


After spraying on the lacquer they were ready
to have the rare earth magnets added.
The top photo below shows the cup and the screw that holds it in place
plus the magnet itself. The bottom left
photo has the cup installed and the right photo is with the magnet in
place. Once the magnet goes into the cup
it’s really, really hard to get it out again.

Below are photos of all 15 completed pieces. It’s more than we need and more than I intended to make but got carried away with variations. Then again, they probably will make a nice small gift.


If anyone wants to make these here is the sequence I
used.
Fridge Magnets Sequence
- Select stock or glue-up layers. Size is dependent on finished size and orientation of grain needed in blanks
- Cut into blanks between 1” to 1¼” square by 1¼” thick. Generally completed pieces finished diameter is between 7/8” and 1 3/16” while height is between 1” and 1 3/16”.
- Mark center of piece on both sides. Use compass to layout completed diameter plus 1/8” or so.
- Rough cut outside line for blank.
- With sharp punch mark centers on both sides
- Use these marks for drive and live centers in lathe then turn round to a consistent diameter
- Put in 4 jaw chuck with drive end facing tale stock and align to lathe center line using drive center
- Drill 5/64” hole 5/8” deep using drill chuck in tailstock (for #6 screw in jig)
- Turn or sand this end square and true
- Drill 5/8” hole using flat bottom Fostner bit (brad point may work) depth of magnetic cup plus just a smidge
- Test fit cup to make sure it does not extend beyond wood base
- Screw end with holes to jig and lightly tighten in 4 jaw chuck, square using drive center in tail stock. Once aligned tighten chuck securely
- Turn to desired shape remembering there is a 5/8” diameter hole in base and screw is 5/8” deep into blank
- Sand to 400
- Remove from jig and break bottom edges
- Apply finish
- Install cup & magnet
No comments:
Post a Comment