
After making the Greene & Green end table along with the sanding blocks there was a fair collection of leftover, short fairly thin scraps. I was getting ready to toss them in the “Designer Kindling” pile when I remembered that my wife has asked for some more refrigerator magnets. Having been married for over 45 years one thing I have learned is that it’s always a good idea to make a project in the shop when asked. First, a short description of these fridge magnets is needed. These aren’t small light weight items that can barely hold up a single sheet of paper. The magnet is a ½” diameter rare earth set in a steel cup that concentrates the magnetic field so it can hold up quite a bit. The finished ones run from 7/8” to 1 1/8” in diameter and from 7/8” to 1 3/16” in height.
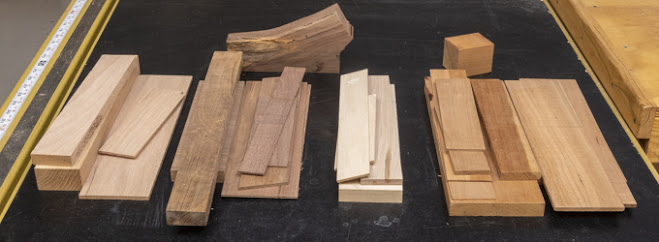
Here’s the pile of small scraps and thin pieces from the
previous two projects plus some that have been setting around. There is mahogany, oak, cherry, maple, walnut
and leopardwood. Now not all of them
will be used but it’s my starting point.
There was also a couple of small blocks large enough to make solid ones
but the rest will be laminated using the thin pieces.
After playing around with different wood species
combinations two stacks were put together.
One stack consists of the following layers: maple, walnut, oak,
mahogany, oak, walnut and maple whose finished size is 1”x 2”x 5½”. The other stack is cherry, oak, cherry, oak
and cherry whose finished size is 1 ¼”x 1 7/8”x 7”. Neither are very large or have a lot of
material in them but should give me several blanks. Below are both of them glued up and clamped.

After the glue cures because all the layers never align
perfectly the glue is cleaned off one long edge and the opposite edge trued up
by taking a skim cut on the table saw.
That edge is then used to true up the first edge. Last, both ends are cut on the chop saw to
clean up any misaligned edges. Here is
what one of the blocks look like.

Taking the other block, I made a cut down the center of
it with the bandsaw since it makes the thinnest kerf then laid out one magnet
blank on either side. The same layout is
done on the opposite side since I need matching center points on both sides of
the blank when it comes time to mount them in the lathe.

Cutting the blanks out on the bandsaw is next. All that really needs to be done is to clip
the corners to make is easier to turn it into a cylinder on the lathe. Before laying out another set the rough
bandsawn edge on the right end of the block gets squared up with the chop saw.

Before mounting the blank on the lathe the center points
on both sides get a little dimple using a sharp punch. They will be used to align the lathe’s drive
and live centers.

Setting the drive center is next. That’s done by putting the point of the drive
center in the just made dimple and giving it a good whack using a wood
mallet. Here is the result.

With the drive center back in the lathe the blank is hand
held against the live center in the tailstock and both are brought up to the
drive center so its point aligns with the previously made set mark in the
blank. The tailstock is locked in place
and pressure applied to the live center holding everything in place.

The rough blank is then turned to a smooth constant
diameter. It can be just brought down to
a smooth cylinder or close to the final size but needs to be larger than the
final size the reason which will get explained in a bit. Here it’s just a smidge over the final size.

The cylindrical blank is removed from the lathe, the
drive center taken off and a 4-jaw chuck put on. With the drive end of the blank pointed
toward the tail stock it’s lightly clamped in the chuck. The tail stock is moved up to the blank end
and the center point in the drive center is set in the indent. That assures the center axis of the blank is
aligned true to the lathe’s axis. The
photo below shows what that looks like.

Using a drill chuck mounted in the tailstock a pilot hole
is drilled 5/8” deep with a 5/64” bit.
It’s for the screw that will hold the blank onto a jig. One last thing to do is with the lathe is
running look and see if this end of blank is square to the lathe centerline
axis. If not, it needs to be squared up
before going on to the next step.

Drilling the recess for the rare earth magnet and its cup
is next. That’s done with a 5/8”
diameter Fostner bit which leaves a flat bottom hole. For the cup/magnet combination a hole just
over ¼” deep is needed. You want the
edge of the steel cup to be just the tiniest bit below the bottom of the blank
so it does not scratch the refrigerator door.
Last step here is to do final sanding to the bottom followed by a test
fit of the magnet cup.

Next the blank gets screwed to the jig which is then
mounted in the 4-jaw chuck. The photo
below shows the jig. At the top is the
screw that will hold the blank on and below that is a ¼” tall 5/8” diameter
round tenon that snugly fits into the magnet recess that was just drilled. The tenon helps center the blank on the
jig. Fine tuning of the centering is done
the same as before using the drive center in the tail stock.

Here you can see why I mentioned that the turned blank
needs to be just a little oversize before drilling. The photo below shows the marks that the
4-jaw chuck leaves when the cylinder was clamped in place so the just completed
drilling could be done. They will be
removed when the piece is brought down to its final shape.

Next Up – Finish Turning, More Variations & Finishing
No comments:
Post a Comment