
With the fence distance set to center the drill on the
joint between the base and upper stack another stop is added. Its location is found using the center
finder to set the left/right location.
Here the stop has been set, the center finder removed and the drill
installed. Not shown in the photo is a
depth stop set so the bit just breaks through into the piece of plywood under
it.

The photo below shows the result, a half circle cut in
the top and base.

The next step is to make the dowels that will get glued
into the base later on. The top photo
shows the dowel and where it will be glued in the base. I will be making the dowels because I want
them to be made out of a matching material and because the need to fit
perfectly where they go. Making them
starts out with a ½” square blank which is about the smallest size that will
fit in my lathe’s chuck and about a foot long.
There is a problem with trying to turn a foot long piece down to a 5/16”
dowel. Turning a piece that long and
narrow is not all that rigid so when turning it can flex and chatter or
generate sympathetic vibrations. Both
prevent a getting a smooth circular dowel.
The fixes available to are to either cut the blank down into shorter
pieces or insert it through the hollow spindle in the lathe headstock. A steady rest can be bought that uses wheels
in frame to put pressure on the blank but I don’t have one. Fortunately, my lathe has a hollow spindle
unfortunately, it’s 5/8” in diameter and you can’t put a ½” square blank though
a 5/8” hole. Almost but not quite. That brings me to the bottom photo which
shows where I rounded the corners of the blank using a 1/8” router bit. That’s all it took to make it fit.

Here is what the blank looks like mounted in the 4-jaw
chuck on the lathe. After mounting I
turned the end to small rounded nub which will get used next. Note how there is not much of the blank
sticking out of the chuck so as to minimize any flexing.

With the nub turned the blank is extended out so it’s
just longer than my shortest tool rest and set into the live center in the tail
stock. This live center has a removable
center pin which when taken out leaves a cup that the nub fits in. With the blank supported at both ends and
being fairly short the chance of having problems during turning is greatly
reduced.

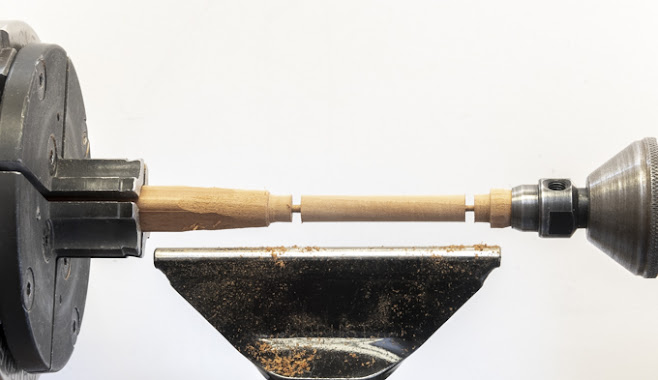
After turning the blank to a rough cylinder, I use a 3/8”
wrench as a guide then using a parting tool shave the cylinder down until the
wrench just slides over it giving me a 3/8” diameter reference point. The same thing is done at each end of the
dowel then the excess is turned down flush.
Now I have a 3/8” constant diameter cylinder and only have to take off a
little more to get to the finished dowel diameter.

Last, a thin parting tool is used to cut the finished
dowel off about 1/8” long. Here that’s
almost done. When parted free a little
sanding cleans up the ends.
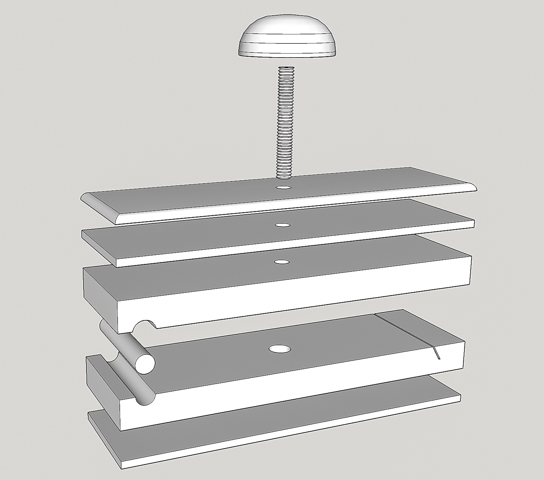
Next are four separate drilling operations for the Knob
and threaded rod that will lock the sandpaper in place. Here is a drawing showing most of the
finished holes.
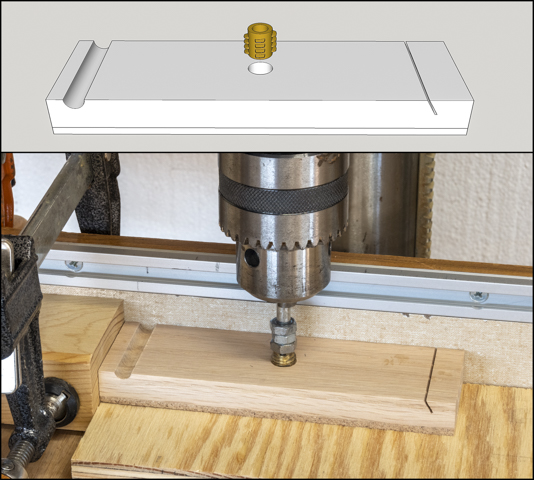
First, with the dowel in place, shown with the arrow at left end of
sanding block, for registration of the base and 3-layer stack the center finder
is used to pinpoint the hole’s location.
As before the fence is set and a stop block is added so the 5/16” hole
gets drilled in the same place in all the sanding blocks. The hole goes only through the 3-layer stack
and just into the base. That’s so the
brad point drill leaves just a tiny dimple in the base which will be use to
locate a different hole later on.

Second, the underside of the top 3-layer stack gets a
1/8” deep counter sink made using a ½” diameter Fostner bit. By carefully making sure the original hole is
centered in the piece I can flip the 3-layer stack over and using the same stop
block/fence setup get a countersink concentric to the original hole. The reason for the countersink will be
covered later.

Third, without moving the stop block/fence setup the base
is set back in its original position. A
10mm bit is installed to drill a hole for the threaded insert. If everything has gone right the tip of the
bit should align exactly with the dimple from the hole drilled in step
one. Before drilling the depth stop
needs to be set so the point of the drill stops right before it goes into the
cork. Good news is the alignment was
right on for all the five bases.

Fourth and last the 10mm hole in the base gets a small
chamfer cut. This is to ease the entry
of the threaded insert as it is installed preventing splintering at the
starting point.

Temporarily installing the threaded insert in the base
is next. The insert (top photo) is made
out of brass and has a wood thread on the outside while the inside has a ¼”-20
machine thread. This allows the threaded
rod that’s part of the knob assembly to be put in and taken out frequently
without stripping out the wood. The
bottom photo shows the insert being installed.
The drill press is used to make sure it starts square and plumb. A critical point is to use your hand to turn
the chuck to install the insert and NOT I repeat NOT turn the drill press on to
screw the insert in. If you do that,
things will go bad in a hurry not ending up well at all! An added bonus is being able to use the stops
already set up to locate the base.
In this closeup the wood threads are visible on
the outside of the insert. The multiple nuts on the
inserting shaft are used to put more friction between the insert and the bottom
nut than between the insert and the base so the insert can be removed. Once run in the insert is removed to be
installed later.

Because the insert it taller than the base I need to
grind it down some. The photo on the
left shows one before grinding and the one on the right after grinding which
will be installed shortly.

Next Up – Installing Insert, Gang Routing & Knobs Part 1
No comments:
Post a Comment