
Cutting the 60-degree angled notch in the base that holds
the sandpaper is next. That’s shown
circled in red on the completed prototype.

To make the cut a laminated MDF and ¼” plywood block
leftover from another jig is cut at a 60-degree angle on its end. This is clamped in the bench vice with the
60-degree cut parallel to the floor so I am working on a horizontal level
surface. It will act as a guide while I
hand saw the slot with a thin Japanese pull saw. Once the cut is laid out the base is clamped to
the guide as shown in the photo below.
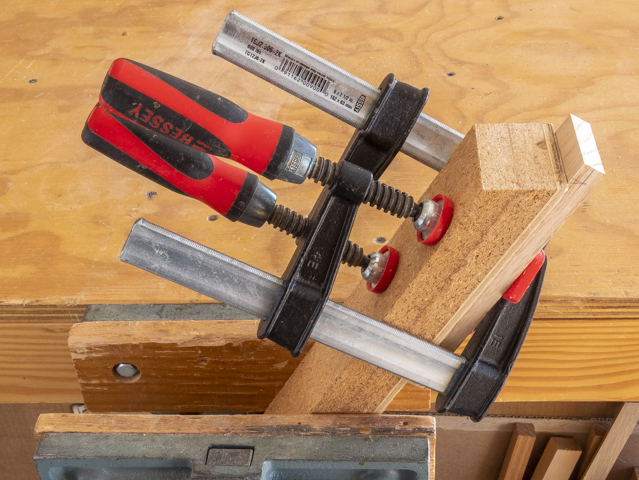
Here is a close-up of how that looks.

With the base clamped in place the Japanese pull saw is
laid flat on the beveled guide. It is
held in place by two of my fingers lightly pressing down on the blade as I saw
cut the slot.

Once the first piece is cut it’s used as a template to
mark the rest of the bases. That’s done
by clamping a framing square to the workbench, setting the template in place
then adding the next piece to be cut adjacent to it and using a square draw a
line where the cut gets made.

To make sure the base is parallel with the angled jig a
scrap is temporarily clamped to the jig to act as a stop, the to be cut base
held tight to it, the pencil line for the slot aligned with the end of the jig
and the base clamped to the jig. Here
that’s all been done. Next the temporary
stop gets unclamped, removed and the cut made.
The saw is on the workbench ready to go.

This closer view shows how the pencil line for the slot
gets lined up with the end of the jig.

Gluing the cork onto the base is next. Below is the stack of the slotted bases and
the stack of cork that has already been cut.
The glue-up process is the same as when the three layer tops were glued
together earlier so I won’t go through that again.

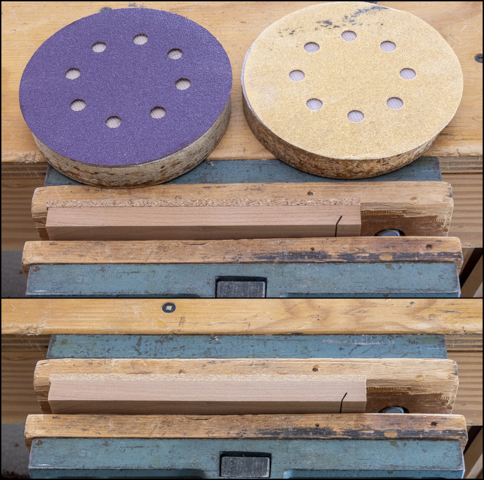
Once the cork/base glue joint has cured overnight the
best long edge of it and the three-layer top part gets sanded with 80 grit
paper and then 120 grit. The top photo shows the 80 and 120 grit sanding disks
with the unsanded cork/base part. The
bottom photo is after sanding. This one
sanded edge is to make sure there is a nice straight smooth edge to work off of
when ripping to the final width. That’s
done on the table saw in two passes. The
first pass is done by placing the good edge up against the fence so the
opposite rough edge gets trimmed making the glued-up layers flush. After all the pieces have had one edge cut
the fence is reset for the final width, the pieces flipped end for end so the
just cut edge is against the fence and the sanded edge gets cut.
With all the pieces cut to width they get trimmed to
their final length. That starts by using
the big disk sander to sand the cork flush with the end that has the slot in
it. A miter fence is used to keep the
end square as shown below. The cork
sands easily so it goes really quick. I
did not use the chop saw because the distance the slot is set back is critical
in making the sandpaper fit in the block and didn’t want to run the risk of
taking too much off.

The final trimming to length is done on the chop
saw. First, all the three-layer top
stack pieces gets one end trimmed up so all three layers are flush. Last, a stop block is set to the final length
and the untrimmed end on all the pieces gets cut. If you look close in the photo below there
are four layers in the stack. That’s
because the bottom layer is a sacrificial piece so I get a better cut edge when
the saw blade exits the part. It’s not a
huge problem with the three-layer piece shown since that edge is going to get
rounded later on. It’s also not to
critical with the cork/base piece since the cork is going to get sanded a
little thinner and that should clean up any problems but it’s better to be safe
than sorry.

Next is to sand the cork on the cork/base pieces down a
little. It’s 3/16” thick and I need to
take it down to 1/8”. To do that it’s a
simple matter of running the pieces through the thickness sander until the base
and cork sandwich is 5/8” thick. With
that done this is what the five sanding blocks look like.

Drilling the 5/16” hole in the base and the upper
three-layer top stack for the dowel is next.
The dowel and the slot are primary parts for clamping the sandpaper to
the base. The drawing below shows the
dowel highlighted.

The hole the dowel goes in needs to be very accurately
located and I don’t trust the split end of a twist drill or the end of a brad point bit to give
me the dead center of the hole. On my
“to-do” list of things to make was a center finder for the drill press and now
seemed like as good a time as any. The
top photo shows what it looks like. It’s
made from a straight 20 penny nail.
Testing is easy, chuck it in the drill press then turn the drill press
on. If it wobbles it’s not
straight. Once a suitable blank is found
the head gets cut off and it gets chucked up in the lathe. The shaft is lightly filed to remove any
irregularities, sanded and polished with steel wool. One end is rounded over and the other gets
filed to a point. When done it’s back to
the drill press to check and see if it runs true (no wobble of the point) which
it did. The bottom photo shows it in the
drill press ready being used.

Here is a close up once the fence has been adjusted so
the center finder’s point is dead center on the joint where the two pieces come
together as evidenced by the little dimple the center finder made on the
joint. Next is to set a stop block so
the center finder is on the pencil line.

Next Up – Drilling Concentric Holes, Turning Dowels & Brass Inserts
No comments:
Post a Comment