First parts to be made are the legs. I started on them because they have quite a
few mortises and it is my procedure to make the mortises first then fit the
tenons that go in them second. I do it
in that order because the mortises are made on the mortising machine which uses
a fixed width chisel/bit combination.
The tenons on the other hand are cut on the table saw making their
finished size adjustable. Anyway, it all
begins by printing out a full-size pattern of the upper part of the leg and
gluing it to a piece of ¼” plywood.
That’s shown below along with the leg blank.
The straight part of the pattern is cut on the table saw
while the curved part is cut with the jig saw using a ground fine tooth
blade. The table saw cut is right at the
finished width while the jig sawn part is cut slightly wide of the line to allow
for a smooth curve and transition into the straight part. Here the straight cut is done and a little
bit of the curved cut has been made with the jig saw.
Next using the oscillating drum sander, the jig sawn cut
is smoothed and blended into the straight table saw cut. I start with a coarse sanding sleeve then use
a fine grit sleeve. That’s followed by
some hand sanding to completely blend things together.
Layout of the curve on the legs along with all the
mortises is next. The legs are not all
the same, there are mirrored pairs. Here
you can see how the they will be arranged.
Note the labels, LF for Left Front, RF for Right Front and so on as to
which one goes where.
Cutting the straight part of the legs comes next and
that’s done on the table saw with a stop to keep me from cutting too far along
the line and getting into the curved area.
While it looks like the cut could be continued that’s deceiving since
the bottom of the blade cuts farther than the exposed part. The blue tape is there to give me a good
place to grab when pulling the leg back out.
After the straight cut it’s over to the bandsaw to rough
out the curve.
Fairing the bandsawn curved edge and the table saw cut
straight section together is next.
That’s done using the same process as when the template was made. The top photo has the finished blended edge
completed on top with the bottom showing what it looks like right off the
bandsaw. The bottom photo is a closer look.
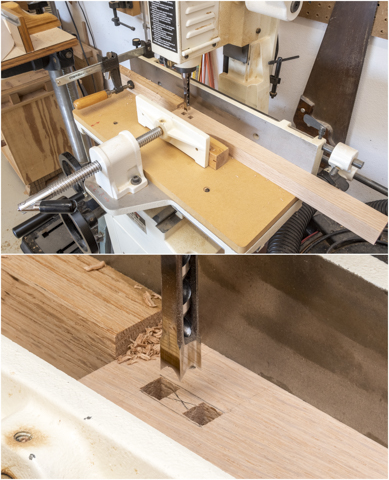
Cutting the mortises in the leg is next. I use a dedicated mortise machine to make them. It uses mortising bits comprised of a square hollow chisel that squares the edges and a special drill bit that leads the hollow chisel cut and removes wood shavings all mounted in a powered head. A long handle gives the mechanical advantage for plunging the cut. In use the piece to have the mortise drilled is clamped to a table that moves front to back and side to side. The side to side movement can be limited with stops for making identical repeating cuts. Depth of cut is controlled with a stop on the head. When my son was young, I bet him that I could drill square holes. He didn’t believe me and thought it was impossible. When I took him into the shop and made a couple the look on his face was priceless.
Here is what the setup looks like with the ends
done. They are cut first so there is
even lateral pressure on all sides of the bit.
If one side is open the bit could drift throwing the mortise out of square.
This is what the finished mortise looks like.
Since the legs are mirrored pairs two different setups
are required. This is what the second
setup looks like. All the measurements
and process are the same just reversed. 
For the next set of mortises the layout starts on a test
piece using a dial caliper and marking knife.
Because a knife mark is hard for me to clearly see on light wood like
oak chalk is rubbed into the cuts making them readily visible. In the bottom photo the right mortise is easy
to see while the one on the left is not so visible.
To make sure the chisel is aligned with the layout lines
the end of a small steel square is set against the chisel/bit set and the table
moved in or out until they are aligned.
The side to side adjustment follows the same process except that when
aligned at the ends the stops are locked in place. Once set up you can easily make two or fifty
identical pieces.
Once a test piece is cut and all the measurements check
out there is one last step before cutting the second set of mortises. A filler plug is needed where two of the
mortises will intersect. The plug is
made out of scrap oak sized so it fits snugly in the mortise. The reason the plug is needed is to prevent a
blowout in the first mortise when the second one is cut and punches through the
side of the first one. The top drawing
shows the intersection highlighted in red and the bottom photo shows the filler
plug in place. 

Next Up – Cutting Tenons & Routing


No comments:
Post a Comment