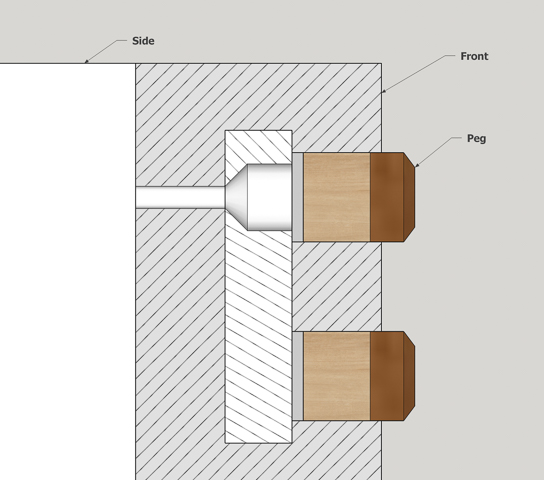
Here is a section drawing showing how the pegs will fit in their holes in the legs. Only ¼” of the exposed end will be stained and finished. The rest is left raw for good glue adhesion.
The blanks are made from leftovers saved during the build
process. They get ripped to about 1/16”
oversize on the table saw then gradually reduced down using the thickness
sander. The mortise machine makes ½”
square holes that are really .497” and to get the pegs installed they need to
be a little undersized. In this case a
little is 2 thousandths of an inch or less than a sheet of typing paper. Anyway, here are what the blanks look like
ready to be turned into pegs.
The process starts by beveling the end of the blank at a
45-degree angle. A disk sander is used
to rough them out. This shows the fence setup
which gives me a consistent angle.
The problem with the disk sander is the disk itself is
pretty coarse, like 60 grit coarse. To
smooth the surface out a 220-grit random orbital sander sheet is set against
the disk. The disk is rotated back and forth by hand
maintaining the angle and smoothing the beveled facets.
Just in case I overshoot the size of the facets making
them too big and need to remove a bit from the end of the blank a temporary
fence is clamped to the disk sander to hold the blank at 90 degrees to the
disk.
Here is what a finished beveled end looks like ready to
be cut to length. Since I have not come
up with a good way to add a stop to control the size of the bevels they are all
done by eye comparing each one to the original master sample.
Cutting the pegs to length is done with a fine-tooth
cutoff blade on the table saw. A stop
block sets the peg length and a backer board minimizes blowout when the blade
exits the cut.
Before staining I need to mask the end of the peg off to
keep it clean. Since there is not a lot
of leeway in where the masking tape goes a line is added for reference using an
adjustable square. If you look closely,
you can see it on the peg.
To help get the peg started in the hole the heel of the
peg has a little taper added by making a pass across some 80-grit sandpaper
clamped to the saw extension and ta-da one peg ready have masking tape applied
then stained. Getting everything set up
to do the 70-piece production run took a while so the first peg took about
three hours to do.
However, once I got into a rhythm working to make groups
of 10 it only took a little over 90 seconds per peg. Here are what all the pegs look like ready to
stain. There are two sizes 1/2" and 3/8", the majority
are the ones that go in the legs and others are for the doors.
The first coat of stain went on pretty quick (top photo),
now I just need to let it dry before adding the gel stain (bottom photo). Because the smaller pegs are so little, I had
to hold them with the needle nose pliers to apply the gel stain then wipe it
off.
Applying the lacquer is next and presents a bit of a
problem. If I lined up the pegs similar
to when they were stained then made a pass with the small airbrush the air
blast would blow them all over the place.
Not exactly conducive to getting a quality finish. To hold them securely in place I plan to set
them in a sacrificial mortise and then spray.
The mortises will be cut in the plywood scraps using the mortising
machine to cut the holes. Here
is what the mortising machine looks like set up.
Here are most of the pieces needed. After I took this photo, I counted the number
of holes and was short about 30 so made some more.
To get ready to spray lacquer on the pegs the blue
masking tape needs to be removed and the pegs pressed into the plywood
holders. The depth is controlled using a
simple spacer then a scrap piece of plywood is used to push the peg flush with
the top of the spacer. The photo below
shows the progression from taped peg to one pressed in ready to be sprayed.
Here is what the setup looks like for spraying with the
small air-brush.
After spraying on 2 coats the pegs look good but I am
going to give them one more coat to provide a little more wearing protection.
After an overnight cure of the last coat of lacquer I
popped the plugs out of the holder. Here
is one of each plus a penny for scale.
Next up – Peg & Glass Installation


No comments:
Post a Comment