Router Plane

Monday, May 23, 2022

Porch Swing/Glider - #11 Foot Pads, Hanger Blocks & Starting the Hangers

Adding the foot pads is next.  They are made from one of the cedar fence planks for rot and insect resistance.  The thickness sander is used to remove the rough sawn surface and bring them down to the required 3/8” thickness.  From there they are ripped to width on the table saw and cut to length on the chop saw.  Routing a roundover on the edges is next.  Here the four pads are getting their ends routed.  Last and not shown is to route the intersecting points on the edges to round them over.  The original plans were not to do this set of edges but after doing the face there were still sharp corners that I wanted to get rid of.

The pads will just get screwed on in case sometime in the future they need to get replaced.  This is the drill press setup used to drill the pilot and counter sink holes.  The fence at the back sets how far the holes are in and a stop on each side sets the side-to-side location.  Depth is controlled with a stop on the drill press quill.

Once the first two holes are drilled the pad is rotated 180 degrees and the last two holes drilled.

The top photo shows what the rough sawn cedar plank and the finished pads look like.  The bottom photo shows one of the pads installed.

The next pieces are the hanger blocks shown in the left drawing that get attached to the base.  The hangers are the pieces that attach to both the swing and glider allowing the swing to well, swing.  The top right photo is a cutoff left over from making the seat/back brace.  It’s a nice clear piece with tight straight grain long enough to make all four blocks.  It does have a little cup that will get taken out with the thickness sander after the crack on the left gets cut off.  In the bottom right photo, the cup has been taken care of and the piece trimmed to width.

Cutting the blank in half is next followed by routing the edges just like the foot pads and last is to cut the blocks to their final size.  Here are the finished blocks with the waste material in the center.

With the hanger blocks sized I did a test fit and to my surprise they did not fit because they were too thick.  That was unexpected and in checking to find out why it was because I had not taken into account the needed hanger offset.  Good news is that since they were too big all that’s needed to cut them down to the proper thickness.  As the blocks are only 2”x3” they are too small to for me to stand them on end and be comfortable running them through the table saw.  Next best is to use the bandsaw.  In the top photo the piece is marked with its final thickness and is held with a clamp to keep my fingers away from the blade.  Since the clamp keeps me from making a full length cut the piece has to be flipped and cut the rest of the way though from the other side.  The bottom photo shows that setup.  To keep the blade from being pinched with the clamp when the bandsaw blade cuts through a little spacer the thickness of the blade kerf is inserted.

Once the waste is cut away the bandsawn edge needs to be sanded smooth on the large disk sander.  That’s being done in the top photo.  The bottom photo shows, from left to right, the original block, one after cutting on the bandsaw and a finish sanded one.

Next is to drill countersink holes so they can be attached to the ends.  That’s done on the drill press the same way as with the foot pads with one small difference.  The countersink part of the drill is just a little small for the screw’s head and needs to be enlarged.  The hand countersink shown will easily enlarge the hole as can be seen on the block where the left hole has been enlarged.

Here are the blocks screwed but not glued in place.  They will get glued in place later after the hangers are made and a test fit is done.  That’s so if there is problem with the blocks they can be removed and reworked.  I don’t anticipate that happening but you never know.

Making the hangers next.  The drawing below shows some of the seat slats and seat/back brace removed to make it easier to see what’s going on.  The x-ray view of the hangers, hanger blocks and long swing support shows how the hanger lag bolts are screwed in.

The layout of the hangers is done with them setting in place then marking the hanger ends and lag bolt location points.   The photos below show the hanger along with my notes at each end.

The hangers will swing on a 5/16” diameter lag bolt 3” long.  Below is the lag bolt and the different bits used to install them.  The bottom bit is used to drill the pilot hole in the glider so the wood does not split when screwed in.  It is the same size as the root diameter of the threads which is the diameter of the lag bolt minus the depth of the threads.  In this case I am using a 7/32” bit.  The next bit is used to bevel the edge of the pilot hole so when the lag bolt’s threads start, they won’t chip out the hole’s edge.  Next up is the lag bolt itself and at the top is the bit used to drill the 11/32” hole in the hanger so it swings freely on the bolts.


To make sure the pilot hole is drilled square with the hanger block the guide shown here at the top left is used.  Once drilled to the proper depth the hole in the hanger block gets its edge beveled.  After the hanger gets its lag bolt clearance hole drilled the bolt with washers on either side of the hanger can be run in.  Last the bolt gets a little candle wax put on its threads for lubrication then run in using an impact driver. 

Next Up – Completing the Hangers, Arms & Runners, Painting and Final Installation

Monday, May 16, 2022

Porch Swing/Glider - #10 End Frame & Runner/Guide Glue-ups, Making End Panels & Patching Pitch Pockets

With the end panels and base stretchers done assembly of the base is almost ready to begin.  The pitch pocket that leaked out in the previous post did not drain out any more so the repair was to clean the pocket out down to solid wood then fill it with epoxy.  With that done the gluing starts on the two end panel frames.  I could have glued up a whole frame at once but as the tenons in them are so big I was a little concerned that by the time I got the glue spread on all the joints the glue might get away from me.  If that happens and the joints seize up halfway put together that’s a problem.  To get around that I glued them in two steps; first the bottom and stiles then later adding the top.  Here is what they look like clamped up.

While they were curing, I worked on the infill panel for the ends.  These will be made out of rough clear cedar.  They come from one of the big box stores as partly air-dried dog-ear fence blanks 5/6” thick and 6’ long.  Most of them have knots and the like but about 1 in 25 are straight grained and clear.  I usually keep four or five around drying so when needed for something they have dried from 25% moisture content down to less than 5%.  After running them through the thickness sander to smooth the plank gets cut in half and a good square straight edge is cut,  They then get edge glued and clamped.  It will set for a while after the glue cures and the clamps come off to make sure it’s stable as other pieces get roughed out.

Next come the runners and their guides.  The runners get attached to the underneath side of the swing and are the free-floating blue parts shown in the drawing.  When installed they will rock between the guides that get installed in the glider frame.

The runners will be made out of oak since they could get some wear.  The top drawing shows the finished shape.  Since they will be painted, they can be assembled from pieces in my scrap box.  The photo is a 3-piece glue-up that will make up both of the upper sections.  It will get cut to shape later and glued to the lower longer part.

Another glue-up is this 5-piece stack that will make two of the four guides.  The other two will come from other solid leftovers.  I should mention that the small vertical pieces are there just for alignment during clamping.  Once the main clamps get tightened down the four small clamps and the vertical pieces get removed.

The next day with the end panels frame's glue cured it’s time to glue and screw the stretchers in place.  After doing a fit-up complete with clamps as a check the two stretchers get glued to one end frame and screwed in place.  I let the glue cure for about 4 hours before gluing and screwing the other end panel frame in place.  Here is what the completed glue-up looks like.

Working on the floating end panels is next.  This drawing shows the panels and associated parts that will allow me to remove them if necessary.

Here in more detail the left drawing shows the panel, the middle drawing is of the top and bottom splines and the right drawing is of pieces that will capture the splines.  In operation the top of the panel gets pushed up onto the top spline.  That’s followed by swinging the bottom across the bottom spline until the panel rabbit hits the spline at which point the panel is dropped down onto the bottom locking it in place.

First step is to take the previously glued up cedar panel and cut it to final length using the chop saw.  Next is to route a rabbit at each end.  The top photo is the setup at the router table and the bottom photo is a closer look at the finished cut.  Since this is a cross grain route the exit side of the cut has some chipping.  In this case that’s not a problem since the panel is wider than needed so the chipping will get cut off when the panel is ripped to width.

Making the splines is done by ripping a scrap to width, length and rough thickness.  The final thickness is achieved using the thickness sander.  Once the splines are glued in place in the end frames the pieces that capture the splines are made.  The rabbits in them are made using the same router setup as the cedar end panel.  Two of them come from the cedar panel cutoffs.  The other two required another glue-up to get the needed cross grain width.  The cross grain is needed to match the grain direction in the cedar panel so there is not a problem with differential expansion as the humidity changes when they get glued and screwed to the cedar panel.  The top photo shows the piece getting counter-sunk pilot holes being drilled.   The bottom photo shows the bit and adjustment collar that drills the pilot hole and counter sink in one pass.  The collar has three setting; the screw flush with the wood surface, slightly countersunk and a deeper countersink.

To provide clearance the bottom capture piece has to be trimmed for an offset.  That setup is shown below.  I could have trimmed it before routing but it’s easier to use the same router table setup to cut all the rabbits then use the panel edge for alignment versus changing the router table setup and then working to get the proper alignment when attaching them.

Last is to sand a slight bevel on the panel’s top and bottom capture piece to provide a little clearance as the panels are swung into place.  The left photo is the top of the panel and the right photo is the bottom. 

The runner guides get installed next.  Here is where they go.  Two are solid material and two are from a block glued up earlier.

When getting ready to cut them to their final size I noticed a small pitch pocket that needed to be cleaned out and filled.  However, what started out as a small task soon ballooned as the pocket was like an iceberg with the vast majority hidden.  By the time it had been cleaned out I had a pretty good-sized hole to fill.  The top photo shows that hole and the plug needed to fill it.  The bottom photo is the finished repair. 

Once the patch was completed the installation of the guides went smoothly.  They are held in place with screws and not glued so if they wear out replacement is easy.  This photo shows them and the end panels in-place.  Note that the screws are not the blue coated ones used to attach the arm supports.  That’s because these are temporary and during final construction the blue weather resistant screws will be used.

Next Up – Foot Pads, Hanger Blocks & Starting the Hangers

Sunday, May 8, 2022

Porch Swing/Glider - #9 Finishing End Rails, End Stiles & Base Stretchers

Finishing up the top and bottom rails consists of ripping them to final height using the table saw and cutting to length with the chop saw.  Next is rounding the ends which after layout gets rough cut on the bandsaw followed by cleanup on the 12” disk sander.

After doing cleanup on the disk sander a pad sander is used to smooth the curve and ease the transition to the flat areas at the end.  Below is a photo showing what the curve looks like at each of the steps.

Routing a radius on the ends and the rounded edge is next.  The bottom rail may get some more rounding after the foot pads are added.  I will have to wait until they go on to make that decision.

After that the screw holes, any knots or other flaws get filled with plastic wood.  When it dries all the surfaces get sanded smooth.  This is what the rails look like at that point.

Up next are the four vertical stiles that connect the end panel upper and lower rails together.  The top drawing below shows where they go.  The bottom drawing shows the tenons that will get cut on the top and bottom to go into the mortises in the rails.  There will also be a through mortise cut for the cross rail.

The tenons get cut with a stacked dado.  The top photo shows the first cut which is the tenon height.  It is just a smidge shorter than the mortise is tall so I have a little wiggle and adjustment room when it comes time to glue up.  The bottom photo shows the face being cut.  In this case they are cut just a couple hundredths wider than the mortise since there is maybe a hundredth of an inch variation in the width of the mortise.  This gives me a little material to fine tune each tenon so I get a snug fit.

The fitting is done with a couple of hand planes.  The one on the left is used to cut a small bevel on the leading end of the tenon to make starting it in the mortise easier.  The right plane is a shoulder plane that does the real fitting.  It is different in that the blade is the same width as the body.  This lets me get right into the corner when using it keeping a nice crisp inside corner.  Since the tenon thickness is cut close the last little fitting does not take long to get a nice snug fit.

Once all the tenons are fitted a test fit is done shown in the top photo to see if there were any problems and fortunately weren’t any.  If you have seen many of my posts you know I am a big believer in making notes to myself on the parts either in chalk or pencil.  The bottom photo shows my notes and numbering for the tenons so there was no question about size or which tenon got fitted in which mortise.

When I went out the next morning to cut the through mortises in the stiles, I had a little surprise and not a good one.  Overnight a little pitch had drained out of the piece.  Most of it scraped off easily enough but there was a bit of residue left.  I don’t know for sure how that will impact the finish stain but it’s probably not good.  For now, it will be left upright to see if it’s all done or if more drains out.

Cutting the mortises will be done with the mortising machine.  The left photo shows mortiser with one of the stiles clamped in place and a stop at the right set so all the other pieces can be aligned at the same position.  The top right photo shows where the mortise will be cut, the mortising chisel and the steel square used to align the right edge of the chisel to the cut line.  With this end located a stop is set.  The same procedure is used to align the back side of the chisel with the back cut line and the left side of the chisel to the left end of the mortise, setting a stop for it too.  The bottom right photo shows the first hole drilled.

The sequence of drilling is to do opposite ends then space out holes leaving less than the width of the chisel.  Full width holes are drilled so the forces on all sides of the chisel are the same.  If one side is open then there is a possibility of the chisel drifting to that side and not drilling a plumb hole.  Last, the in-between webs are drilled out.  Uneven side pressure is not a problem as both sides are open.

After all four stiles are cut with the above setup next is to cut the second row.  The same alignment process as before is used to set the front face of the chisel but the side to side and location of the stile is already set from the previous setup.  The cutting process is the same as the first row.  In the bottom right photo, the remaining thin center strip has been cut away.  It’s easy as a cut on each end frees the center section seen leaning up against the back fence.

The next pieces are the two base stretchers.  The drawing below shows where they go.  In general, they are made the same way as the stiles that go in the base ends with a tenon on each end.  Main difference is they are a lot longer and a bit more awkward to swing around.  In the bottom photo the tenons are being cut and after that the long edges get softened with a routed rounded edge.

One difference from the stiles is the stretchers don’t have a mortise cut in them but they do have a notch for a runner attached to the swing.  Here in the top photo, it is being cut with the stack dado.  The bottom is a close view.  The blue tape is there to reduce the splintering as the blade exits the stretcher and the clamp helps keep the long piece in place.

Last since the tenons extend through the stiles they need to have the exposed ends rounded using the router.  Because they are so long to route them, I need to stand on a step stool to get to them. 

Next Up – End Frame & Runner/Guide Glue-ups, Making End Panels & Patching a Pitch Pocket

Monday, May 2, 2022

Porch Swing/Glider - #8 Painting, Reassembly & Starting End Rails

A waterproofing sealer and solid stain requiring two coats is used for the finish.  Since there was not really a good way to hang all the pieces so all sides could be painted at once only half of each piece gets done at a time.  Giving them overnight to dry between coats means it takes four days to finish all the parts.  Here are all the almost finished pieces for the swing.  There is one end of each slat still unpainted because that’s where their location number is written.  While the slats are all the same except for two the location of mounting holes vary slightly.  With them numbered they can be put back on in their original location.

The slats are added to the seat/back brace in the same order as originally installed.  Here they are all in place ready for the numbered ends to be painted.

After mounting and screwing the long supports to the seat/back braces the numbered ends get two coats of paint.  While the paint dries the front and top rail get screwed on.  Last is to glue and screw the arms on.  Most of the screws used are zinc coated since they are protected and will not get wet except in extreme circumstances.   The arm attachment is different in that the heads of the screws will be exposed to the elements.  To reduce the chance of corrosion or staining of the wood the screws used have multiple anti-corrosion layers .  Fortunately for me I found some that are almost the same color as the swing’s finish.  The red arrows show the installed screws and the inset shows what the screw looks like.

Once the arms are installed the swing is complete and I can start on the base.

The base starts with the top and bottom rails of the two ends.  Those are shown in blue in the drawing below.  They were roughed out some time ago and have been waiting until I was ready to use them.  In checking they are all good except for one that has a tiny bit of a bow that I can work around.

Each part is made from two identical halves glued together.  This is the dimensioned drawing of one of the top and bottom halves will be used to make them.  There is one change from the original plan, the corners are rounded rather than clipped at a 45-degree angle.  I made the change for uniformity in design so the curve of the arms and the seat/back braces is carried throughout the piece.

First is to do the layout of the dados which when the halves are glued together will make up the mortises for the uprights.  Three of the four sets can be cut with the same setup since the blanks are all the same length.  However, the fourth set (in front below) is about an inch shorter than the rest so it will require a different setup.  It would have been nice if they were longer but there was not enough material in the 2x6 they came out of to make that happen.  However, when trimmed to finish length they will all be the same.

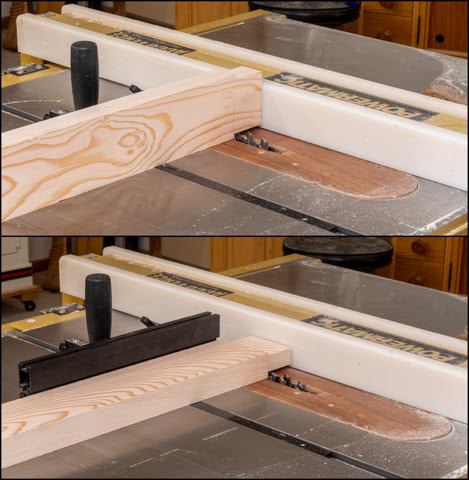
The dados will be cut with a stacked dado.  I choose not to rough them with a bandsaw since they don’t have an open end to cut from like the seat/back braces did.  It would be fiddly work and take more time than it’s worth to do that so I am just going to use the table saw.  In the top photo the rip fence (white) sets the left right distance the dado’s get cut from the ends.  The miter fence (black) keeps the piece square with the blade and is used to push the piece across the blade making the cut.  Also, you can just see the backer board next to the miter fence (red arrow) to prevent splitting when the dado exits the cut.  After the first cut the piece is flipped end for end and the second dado is cut.  The bottom photo has the first pass done.

After all the similar pieces have had their first pass made the rip fence is moved closer to the blade and a second pass is made expanding the dado.  The top photo shows one end with two passes.  The bottom photo shows the finished dados.

After all the dados are cut and the two halves stacked together the mortises are clearly visible.

Next is to route a slot for a spline that the center panel floats on.  The drawings below show the panel and splines along with where the slot gets routed.  Both the top and bottom rails get routed with the bottom rail shown.

Here is a closeup of the router table with the router bit and fence set for the cut.  Note that the right side of the fence is really close to the bit.  That’s to provide support to the wood fibers on the exit side of the cut which reduces the splintering and chipping of the edge.  

Here the top photo shows both halves of the base with the groove for the spline cut clamped together ready to be glued up.  In the bottom photo the pieces are lying flat with the surfaces to be glued up.

Gluing the pieces together is next and this photo shows the fit up in the bench vice.  To make sure the two halves align perfectly side to side there are two blocks sized to just fit in the dados cut and inserted in the assembly.  In addition, to make sure the two halves don’t slide around while gluing and clamping there are three screws run in from the face for alignment.  They will also provide some clamping pressure.  From here everything is taken apart, glue applied and things reassembled in the bench vice.  Afterwards the blocks are knocked out, more clamps are added and any glue squeeze out is wiped away.  The next day the clamps and screws are removed giving me mostly completed top and bottom rails for the glider’s end panels. 

Next Up – Finishing End Rails, End Stiles & Base Stretchers