
Finishing up the top and bottom rails consists of ripping
them to final height using the table saw and cutting to length with the chop
saw. Next is rounding the ends which
after layout gets rough cut on the bandsaw followed by cleanup on the 12” disk
sander.
After doing cleanup on the disk sander a pad sander is
used to smooth the curve and ease the transition to the flat areas at the
end. Below is a photo showing what the
curve looks like at each of the steps.
Routing a radius on the ends and the rounded edge is
next. The bottom rail may get some more
rounding after the foot pads are added.
I will have to wait until they go on to make that decision.
After that the screw holes, any knots or other flaws get
filled with plastic wood. When it dries
all the surfaces get sanded smooth. This
is what the rails look like at that point.
Up next are the four vertical stiles that connect the end
panel upper and lower rails together.
The top drawing below shows where they go. The bottom drawing shows the tenons that will
get cut on the top and bottom to go into the mortises in the rails. There will also be a through mortise cut for
the cross rail.
The tenons get cut with a stacked dado. The top photo shows the first cut which is
the tenon height. It is just a smidge
shorter than the mortise is tall so I have a little wiggle and adjustment room
when it comes time to glue up. The
bottom photo shows the face being cut.
In this case they are cut just a couple hundredths wider than the
mortise since there is maybe a hundredth of an inch variation in the width of
the mortise. This gives me a little
material to fine tune each tenon so I get a snug fit.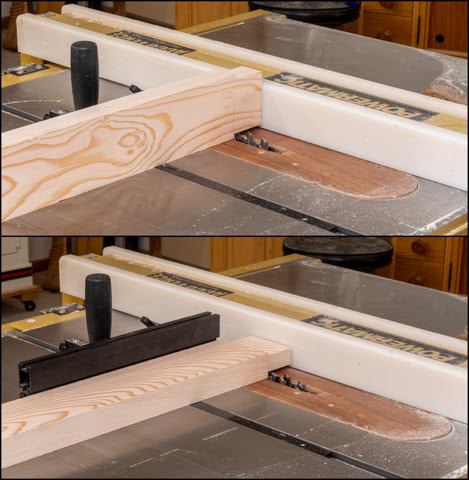
The fitting is done with a couple of hand planes. The one on the left is used to cut a small
bevel on the leading end of the tenon to make starting it in the mortise
easier. The right plane is a shoulder
plane that does the real fitting. It is
different in that the blade is the same width as the body. This lets me get right into the corner when
using it keeping a nice crisp inside corner.
Since the tenon thickness is cut close the last little fitting does
not take long to get a nice snug fit.
Once all the tenons are fitted a test fit is done shown
in the top photo to see if there were any problems and fortunately weren’t
any. If you have seen many of my posts
you know I am a big believer in making notes to myself on the parts either in
chalk or pencil. The bottom photo shows
my notes and numbering for the tenons so there was no question about size or which
tenon got fitted in which mortise.
When I went out the next morning to cut the through
mortises in the stiles, I had a little surprise and not a good one. Overnight a little pitch had drained out of
the piece. Most of it scraped off easily
enough but there was a bit of residue left.
I don’t know for sure how that will impact the finish stain but it’s
probably not good. For now, it will be
left upright to see if it’s all done or if more drains out.
Cutting the mortises will be done with the mortising
machine. The left photo shows mortiser
with one of the stiles clamped in place and a stop at the right set so all the
other pieces can be aligned at the same position. The top right photo shows where the mortise will be
cut, the mortising chisel and the steel square used to align the right edge of
the chisel to the cut line. With this
end located a stop is set. The same
procedure is used to align the back side of the chisel with the back cut line
and the left side of the chisel to the left end of the mortise, setting a stop
for it too. The bottom right photo shows
the first hole drilled.
The sequence of drilling is to do opposite ends then
space out holes leaving less than the width of the chisel. Full width holes are drilled so the
forces on all sides of the chisel are the same.
If one side is open then there is a possibility of the chisel drifting
to that side and not drilling a plumb hole.
Last, the in-between webs are drilled out. Uneven side pressure is not a problem as both
sides are open.
After all four stiles are cut with the above setup next
is to cut the second row. The same
alignment process as before is used to set the front face of the chisel but the
side to side and location of the stile is already set from the previous
setup. The cutting process is the same
as the first row. In the bottom right
photo, the remaining thin center strip has been cut away. It’s easy as a cut on each end frees the
center section seen leaning up against the back fence.
The next pieces are the two base stretchers. The drawing below shows where they go. In general, they are made the same way as the
stiles that go in the base ends with a tenon on each end. Main difference is they are a lot longer and
a bit more awkward to swing around. In
the bottom photo the tenons are being cut and after that the long edges get
softened with a routed rounded edge.
One difference from the stiles is the stretchers don’t
have a mortise cut in them but they do have a notch for a runner attached to
the swing. Here in the top photo, it is being cut with the stack dado. The
bottom is a close view. The blue tape is
there to reduce the splintering as the blade exits the stretcher and the clamp helps keep the long piece in place.
Last since the tenons extend through the stiles they need
to have the exposed ends rounded using the router. Because they are so long to route them, I
need to stand on a step stool to get to them. 
Next Up – End Frame & Runner/Guide Glue-ups, Making End Panels & Patching a Pitch Pocket
No comments:
Post a Comment