
Because the four feature rings are made up of twelve
segments that repeat around the ring, they need to be an exact match both in
overall size and with the angled cherry/maple sections exactly centered in
each block. This means that both the end
distances “A” in the drawing below need to be the same.
Now in a perfect world since all the segment blanks were
made at the same time using the same machine setups they should be
identical. However, I don’t live in a
perfect world and while the blanks are as close as woodworking equipment can
make there is still about 1/64” variation in them. This is not a surprise and when doing the
design allowances were included so minor corrections could be made along the way. The photos below show top and bottom views of
the master blank and a blank showing the maximum difference. The red arrows point to the minor
misalignment where the joints don’t quite align and that needs to be corrected. 
That’s done by shortening up the long end so it matches up
with the “Master” blank. The large disk
sander is used along with a fence set up to keep the end square. It does not take long as there is not much
material to remove but frequent checks are done so too much isn’t removed.
When done the joints line up just fine so that’s 2 done
and 57 to go. However, trimming the end
does create another problem in the trimmed piece is now a little short. Look at the far-right edge to see what I
mean. 
Correcting the difference in length is not hard since all
the pieces are a little long. The final
segment blank length is twice the length of the maple section that had the “X”
on top or “Distance A” in the drawing above plus the horizontal length of the
point-to-point angled section in the center.
Once that dimension is calculated a stop is set on the tablesaw’s miter
fence and the pieces can all be cut to the same finished length. The net result of all this is that the angled
portion is centered in the blank.
Next is to start cutting the 15-degree angles on each
segment. Since there is plenty of places where things can go
wrong when making these cuts, I decided to take a couple of pieces and label
them with which side is up and which end gets cut first. Basically, all the information needed to give
me the best chance of not messing things up.
Below the photo shows the information for the “A” and “B” segments along
with the first ring’s marked stack of segment blanks.
Here in the top photo, you can see the marked up “A”
segment in place face up against a stop on the left side so the right 15-degree
angle can be cut. The bottom photo is a
closer view of the segment and stop after the cut.
After the first cut the piece is flipped top to bottom
and the right stop is used to hold the piece in place while the second cut is
made completing one of the 24 “A” segments needed. I am only going to cut the six “A” segments
needed for the first ring in case a problem comes up and an adjustment needs to
be made. There are some extra blanks in case
of problems but it would be a bad thing to cut all segments and find there is a problem.
Once the first six “A” pieces are done the required six
“B” pieces can be cut. They follow the
same sequence except they start out with the large cherry face up versus face down. Another way to tell is the “A”
pieces first cut is at the cherry end while the “B” piece starts at the maple
end.
Gluing up the twelve segments is next and that starts
with a dry fitted test as shown below. A
couple of things to note here. First,
the only letter face showing is for the “B” pieces since to make sure any out
of squareness in the cut gets cancelled out.
Second is the segments have all been numbered in pencil so I make sure
that they get glued up in the right sequence.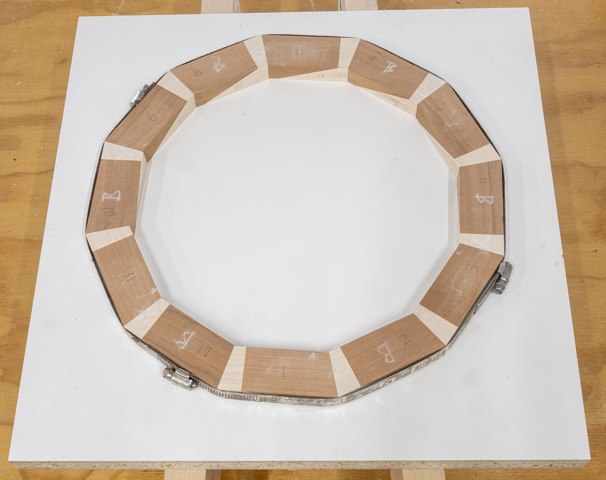
The glue-up is a little different than the other thicker
pieces. To give the ring the best chance
for all the segments to be flush with each other the same process of clamping a
caul on top is used.
After an overnight cure the clamps and caul are taken off
the ring and a straight edge is laid across it.
The photos below show that the ring glued up dead flat with no gaps
under the ruler. Now it’s just going
through the process of cutting and gluing three more rings just like this
together.
One small problem came up when cutting the next set of
segments in that the back of a piece had a crack in it. It might be close enough to the edge that
when doing the turning it might get removed but not wanting to take any chances
one of the extra pieces got cut and used as a replacement. 
While the main feature rings are gluing work gets started
on the small feature ring near the top of the bowl. That’s shown in the left drawing while the
right drawing shows an individual segment of that ring. It consists of two outer cherry pieces and a
center maple piece.
Similar, to the main feature ring a blank needs to be
assembled with contrasting maple and cherry pieces. The top photo below shows the test fitting of
how they will be glued up. The bottom
drawing is how the 12 segments are laid out.
This is how the pieces are clamped together so all the
pieces are squeezed tightly and held flat to the workbench while the glue
cures. A layer of polyethylene is
between the bench and the glued-up blank so it doesn’t stick to the bench. There is also a layer of polyethylene between
the caul that’s held in place with the red clamp and the blank so they don’t
get glued together. The caul acts to
help keep the seven pieces flat while gluing.
After the glue cures the blank is run though the
thickness sander and the segments get laid out as shown in the left photo. The right image shows how three segments will
get cut from the first strip but for now the blank is going to be set aside for
bit.
Next Up – Feature Ring Install, Secondary Feature Ring Build
No comments:
Post a Comment