
Cutting the fixed and adjustable backer pieces are
next. They get made out of a piece of ¾”
oak plywood I have on hand. Before
cutting them the tablesaw blade needs to be changed from the rip blade on there
that’s used to work on the “L” bracket glue-up. Below the top left Glue Line Rip blade is
what I use for cutting along the grain of the wood. An edge view of it is the left blade in the inset photo. To keep the plywood
veneer from splintering during cutting the tooth profile and count is quite a
bit different from the rip blade. It’s
the Precision Crosscut lower left blade and its edge view is the inset’s right
blade. A compromise between the two is
the top right “Combination” blade whose edge view is the center blade. Most of the time the Combination blade is on
the saw unless there is a lot of ripping to be done. The Precision Crosscut gets used only on
veneered plywood or when crosscutting solid wood.
For the adjustable backer part, a piece of oak plywood
gets cut to rough width and final length then a stopped groove is cut.
The groove is 5/16” wide and a tad over ¼” deep. It’s cut using a ¼” diameter bit in the
router table by making two passes adjusting the fence between them. These photos show the first pass completed. The first cut does not meet the line closest to the
fence because it’s just a rough reference line.
The actual accurate cut location is set using a scrap piece and dial
calipers.

Cutting the tongue on the piece of oak that has already
been laminated so it fits in the stopped dado is next. This part is shown in the drawing below.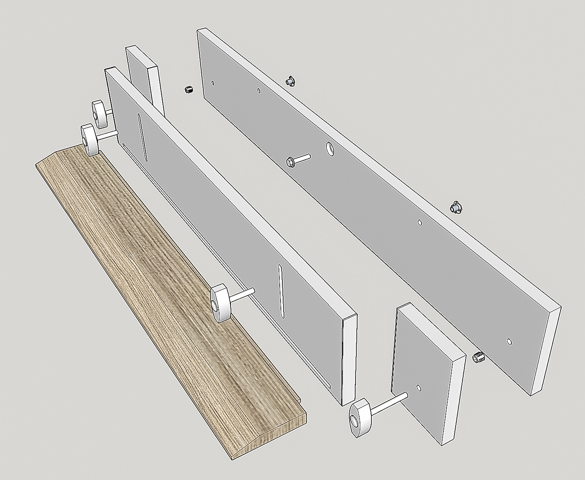

The router bit gets changed from the straight ¼” diameter
bit used to the bit shown below. This
bit uses different guide bearings shown on the left and right of the bit to
make various fixed width cuts from 1/8” to ½”.
Since I wanted a ¼” width cut all I had to do was pick the appropriate
bearing. 
This photo shows after a single pass has been made on
both the top and the bottom. Additional
passes will be made on the bottom until the height of the cut equals the
distance the stopped dado is set back from the edge. Once that’s done the piece will be flipped
over and additional passes on the top will be cut until the tongue fits in the
stopped dado.
Here the tongue has been cut to its final size. The piece of masking tape on the part is
because the blank is about .002” thicker at one end. Because the tongue is cut referencing the
faces it has that tiny .002” taper from end to end. The fix is to add the strip of masking tape
on the thin end then raise the router bit .002” and make another pass across
the router bit. The result is a .002”
cut which tapers to nothing at the taped end making a perfect fit. This photo also shows where the last inch of
the tongue has been removed so it fits in the stopped dado.
These two photos show different views of the stopped dado
in the plywood part and the tongue on the laminated oak part.
These photos show the table saw set to cut the beveled
edge on the laminated oak part. Here the
straddling assembly is attached to the table saw rip fence to add a little
height providing additional support when the laminated oak part gets
beveled. The yellow magnetic fence is set to
apply a little pressure to the oak piece to help keep it tight to the rip
fence.
Once the bevel is cut the two pieces are put together for
a test fit which looks like this.
Next is using the router to cut slots in the adjustable
backer. These will allow for the
vertical adjustment of the backer and laminate oak piece. In the drawing below the red arrows point to
those slots.
To make the slots a ¼” diameter router bit is used. Once the router fence distance from the edge
of the backer to slot is set left and right stops are clamped to the fence and
the first shallow cut is made. In the
photo you can see the right stop.
Because the slot is off center one end needs to be cut from the front
and the other end needs to be cut from the back so they match. Unfortunately, I cut the first pass on one of
the faces from the wrong side so the slot ends were reversed from what’s
needed. Fortunately, the fix is pretty
simple because the first cut was quite shallow.
A thin piece of oak gets cut to fit, glued in place then trimmed flush
with the face. The red arrow in the
photo points to the completed fix. If
you look just above the slot, you can see where I added, “cut this side out” to
prevent a repeat. Since the slot needs
to be 5/16” wide and the router bit is ¼” the fence gets moved away from the
bit so the slot can be cut wider. It is
important to move the fence away from the bit so the piece needs to pushed
toward the bit to make the cut. That way
the rotation of the bit does not pull the piece toward the bit. If the fence is pushed toward the bit, then
the rotation of the bit will pull the work toward the bit which can grab the
piece and rapidly pull it into the bit. If
that happens then the process can get away from your control and before you
have a chance to react things go bad in a hurry.
Here the adjustable backer’s slots are done and the “L”
fence is set into the stopped dado.
Next Up – #3 Plastic Laminate, Guide Blocks &
Starting Knobs
No comments:
Post a Comment