
The actual installation of the slats starts with one at
the front of the seat plus one where the seat and back come together. After that the second one down from the top
gets screwed on. These three will tie
the seat/back braces together square and plumb.
This photo shows the third slat from the top of the back screwed in
place at its ends with the center still free to move. As you can see the slat has a bow that needs
to be taken care of. The bottom left
photo is before straightening and the bottom right is where a wedge has been
used to take the bow out. 
With the wedge holding the slat straight a screw is
driven in to hold it there. Here is the
slat straightened. The process continues
adding one slat at a time straightening as needed.
There are two short slats where the support for the arm
and the arm itself get attached to the seat/back braces. This drawing shows those two slats in blue
with the left arm and support removed.
The bottom left photo shows the back slat to be shortened. It was selected for this location so the knot
could be cut off. The right photo is
after it was cut to length. The short
seat slat also had a knot that got cut off.
Work on the top cap is shown in blue in the drawing is
next. 
The blank for the cap had flaws on the front left and, on
the back, right. Below the top two
photos show the front left before and after cutting the front bevel which got
rid of that flaw. The bottom two photos
show the back right before and after where when trimmed to final width the flaw
got cut away.
While screwing the slats onto the seat/back braces I
noticed that in three places the slats had some knots that ran across the slat
and were large enough there was not a lot of material left to provide solid
structural support. Since all the dried
material is spoken for and I don’t want to wait several months for more to dry
the next option is to take some cutoffs and attach them to the underneath side
of the slats to provide for reinforcing and strengthening.
Here are two of them glued with waterproof glue and screwed in place.
With all the slats in place this is what the seat part
looks like so far.
With most of the seat done it’s time to layout the rest
of the parts and cut them into oversize blanks working around the knots, cracks
and so forth. That took the better part
of an afternoon but the real pain was with the twist most of the lumber had
developed as it dried. Some are minor
but a couple of pieces took a fair amount of work to flatten. For me straightening a twisted board is the
most time-consuming aggravating problem to take care of.
Doing that, surfacing them to thickness and straightening the edges took
the better part of two days. However, at
last all the major part blanks are roughed out.
I hope that the blanks stay flat.
If not, more work will be required.
The next step is to make the arms and their
supports. To verify the measurements a
scrap is clamped to the back and a digital level is used to level it.
Laying out the arms is next and the top photo shows
that. As usual there are knots to work
around but the layout puts the big one at the top in the waste. The small one near the right end will go down
and not be visible in the finished product.
In the bottom photo the corners and offset area have been rough cut on
the bandsaw. Here a straight edge is
clamped to the sander that acts as a guide so I end up with a true edge.
Below the arm is clamped in place with the red arrow pointing to then end point of
the round-over.
There is a similar mark on the underside of the arm. The inset is a closer view of where the
round-over ends, everything to the right gets a small radius routed on the
edge.
Here is the arm clamped to the workbench along with the
router to be used to round-over the edge.
After routing the arms get clamped in place so I can work on their
vertical supports. 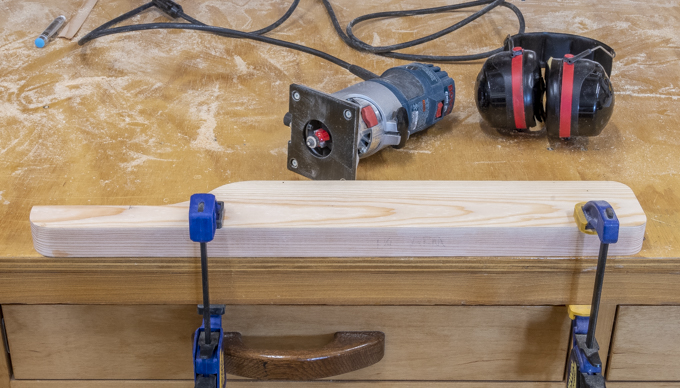
Once the vertical support is laid out there is a pretty good
size chunk to remove. The material could
be removed with a dado blade but that turns a lot of wood into chips. An easier way is to start by roughing the waste
out on the bandsaw. That goes quick but
leaves a rough irregular surface. To
clean it up the table saw blade is set at the finished cut depth and the rip
fence (white fence) set at the notches’ correct width. Last, a miter fence (black fence) is used to
hold the part square to the blade. To
smooth the part is slid left and right across the saw blade then moved forward a
little and the left/right pass is repeated.
The process of incremental advancing and side to side movement gives a
smooth, true face.
It would be nice if the supports just dropped in place
but of course that didn’t happen. The slat the
support abuts to is at an angle so there is a gap at one end. The bottom photo shows that along with a line
parallel to the slat so you can see how much the cut needs to be tapered. 
To cut the taper it’s back to the table saw (top photo)
without changing anything except for adding a spacer, in this case some playing
cards to move that end of the support out creating an angled cut. The cards are added one at time until the cut
angle matches the slat angle shown in the bottom photo. I think it took 8 cards to get the right
angle shown in the bottom photo.

Next Up – Installing the Arms, Testing Seat Height & Disassembly
No comments:
Post a Comment