It is now early December and at my wife’s suggestion I
find that I need to make some Christmas ornaments for gifts soon. As a result, the Dining/Game table work is on
hiatus for a week or so.
The ornaments are going to be turned on the lathe and are
not huge. For material, I went through
my scraps and came up with three pieces.
First is a split cutoff from one of the rough sawn oak planks I am using
to make the table top. Second is a
cherry remnant from the Maloof Rocking Chair that had a crack in the center and
last is a cutoff from a cherry/cocobolo laminated piece I had glued up for the
neck of an acoustic guitar I made some years back.
The cracked cherry was easiest as I just cut square blanks
working from the outside in discarding most of the cracked area. The cherry/cocobolo laminated piece was the
next easiest. I worked from the existing two flat
square faces in until I got a square blank with the cocobolo centered. The oak took a little longer, first I
flattened the rough sawn faces but at 1 3/8” thick it was a little thin so I
laminated two pieces together. When
done, I had enough blanks for probably three times the number of ornaments I am
going to make. That’s not a problem I
will just put them away until I need them for something else later.
The process for doing these turnings are a bit different
than most of the things I do. There is
no real detailed plan, I will at best have a rough sketch to work from or just
an idea. That’s the case of the pieces
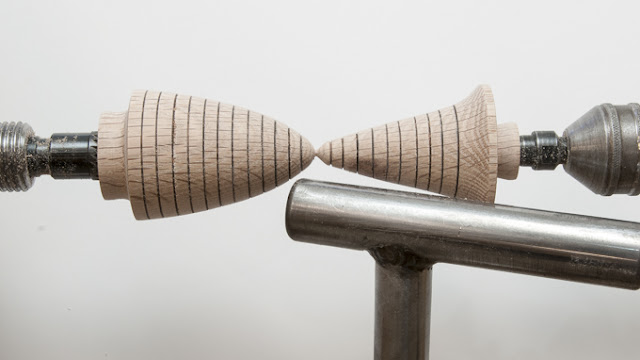
in the photo below, no drawn-up plan at all, not even a sketch. I used the long oak blank for a pair of
Christmas trees one convex and one concave tuning them until they looked right.
What’s shown is just before I cut them apart. The dark lines are made by making a small
groove then friction burning it by holding a wire in the groove with the lathe
turning.
After the Christmas trees, I made a few ornaments out of
the solid cherry blanks then finished up with two out of half of the
cherry/cocobolo laminated blank. I did
end up making a template for the oval shaped piece on the left. I wanted a constant symmetrical curve and
thought it would help.
For the hangers I took a regular wire ornament hanger,
straightened it, cut it in half, bent it around a drill and used a pair of
pliers to twist the ends together. Using
cyanoacrylate (super) glue I glued them in a 1/16” hole I had drilled in the
ornaments while they were still on the lathe.
Some of the pieces ended up pretty close to the sketch
and some, well, not really close at all.
When finished, I had 8 ornaments of various designs. Here they are along with my air-brush setup
ready to finish.
Using the air-brush I sprayed a couple coats of lacquer
on the ornaments let them set overnight and finally lightly wet sanded them
with a 4,800 grit pad.
All done and just in time too. Now it’s back to working on the table top.
Next Up – The Top,
Biscuits, Glue-up & a Change


No comments:
Post a Comment