Router Plane

Monday, September 9, 2019

FLW Cabinet - #16 Making the Side Spacers, More Stain & Front Frame Glue-up

Once the decision to use a radius on the side spacers, legs and rails work could progress on completing those items.  I decided to work on the side spacers first.  Previously they were flattened using 100 grit sandpaper on the thickness sander.  Now using 220 grit sandpaper they are run through it again to get a good smooth surface.

Since there are three different patterns between the 16 pieces needed making templates is first.  I followed a similar procedure as done with the rails in Post #13.  A one ended pattern is used to drawn matching profiles on one of the spacer blanks.  

With the profile drawn on the template cutting can begin.  Since the straight cuts for most of the spacers are on the ends, they can be cut on the table saw.  Here is the setup; the fence is set to cut the correct width and a stop block is set to keep from cutting too far into the blank. 

Note that the blade is a lot higher than normal.  That’s so when the stopped cut is made the end of the cut is closer to 90 degrees.  In the two renderings below the bottom one shows what I am after.

The curves on these pieces are quite a bit smaller than on the bottom cabinet rails so to improve the quality when rough cutting them out I changed the bandsaw blade.  Typically, I keep a ½” wide, 3 tooth per inch blade on it but here changed it to one that’s ¼” wide with 16 teeth per inch.  The ¼” blade will allow for tighter turning of the blade.

After rough cutting the curves the blank looks like this. 

From there it’s smoothed out on the oscillating drum sander followed by hand sanding all the edges.  This is one of the two templates I will make.  Earlier I said that there are three patterns which is correct but only two templates are needed since one pattern a partial of this one.

The actual production of the side spacer pieces is:
  1. Tracing the template on a blank.
  2. Cutting the straight sections on the table saw, and the curved sections on the bandsaw. 
  3. Clean up bandsawn curves on oscillating drum sander to prevent grabbing with router bit.
  4. Using double faced tape affix template to roughed out blank.
  5. With a bottom bearing template cutting bit in the router table trim the blank to match template.
  6. Hand sand all edges.
Below the top image shows the template, blank and the bottom bearing bit ready to go.  The bottom photo is after routing.  One down and 14 to go.

Here in the top photo are the stacks of the three types of side spacers all cut, sanded and ready to have the small radius put on the appropriate edges.  It took a day and a half to take them from a blank to this point.  There was a lot of time spent hand sanding to get a smooth flowing surface on the curved edges.  The top spacers get only the bottom edge radiused while all the others get both top and bottom edges radiused.  The bottom photo has the edges marked for the legs and rails that will need to be radiused.

On the side spacers and the front/back rails the radius will be put on with a 1/16” radius bit in the router table.  Here is the setup and a before-after photo of the completed edge.

To apply the radius to the legs a 1/16” radius bit in a hand held router is used.  Trying to route the long legs on the router table is awkward and a lot easier using the small hand held router.  This is what that setup looks like.  It’s using a little bit different equipment but gets the same radiused edge result.

Finally, at long last the legs and rails finished.  The side spacers just need a final trim to length and they will be done too.  Here they are set aside for a little bit but first I want revisit the stain color.

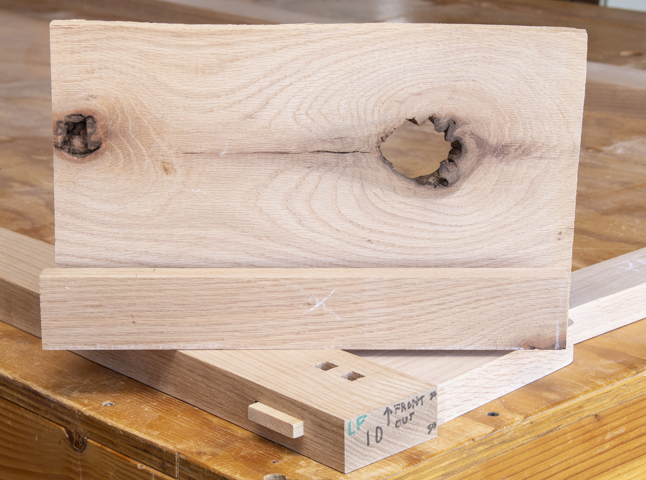
In looking at the selected stained oak sample (bottom pieces with pegs) I thought it might look better slightly darker and with a little more definition in the grain pores.  First, I tried rubbing in some walnut gel stain after the clear topcoat had been applied and that did a little to the pores but nothing to the rest of the sample.  Next I tried applying the gel stain after the first coat of stain and before any clear finish had been applied (top pieces).  I like that a lot better so it’s the stain mix I will be using.  

At this point the majority of the parts for the case have been cut.  The side spacers need a trim to their final length plus there are some hinge mounts to make along with, shelf edging, fitting the tops, handles to make and a whole lot of pegs needed so not everything is done but enough to start thinking about the order the case is going together.  Now is the part where the instructions say, “Some assembly required.”

I am going to start by gluing up the front legs and rails.  That will give me some practice before I do the back legs and rails as they have a plywood insert added to the mix.  Here is the test clamp checking one last time to make sure everything fits as it should and that any adjustments to make it square are not a problem.

The glue-up ended up less of a frantic rush as I thought it would be which is always a good thing.  Everything went together just fine and in a timely fashion.  I did have to tweak things a little bit to make the frame absolutely square.  The adjustments are done by clamping the base rail down to the workbench using the two orange “F” clamps as shown below so it’s locked in place.

At the top the bar clamp with the red ends is set so the right side is up against the bench while the left side pushes against the leg.  This allows me to apply a very controlled amount of pressure to rack the assembly until the measuring stick drops into place indicating that the diagonals are identical and things are square. 

The diagonal measuring stick is set during the test fit.  After making the adjustment I check the opposing diagonal to make sure they match, just in case anything slipped between the test and final glue-up.  With everything square and glued up it’s left to set overnight.

Next up – Faux Tenons, Staining Back & Leg/Rail/Back Glue-up

Monday, September 2, 2019

FLW Cabinet - #15 Stain Samples, Cutting ¾”- 4’x8’ Plywood Sheets & Testing

Before I can glue up the backs, I want to stain the oak plywood panel.  That’s so if the legs or rails shrink after a few years here in the desert or the panel shifts there won’t be any unstained slivers of the plywood peeking out.  I have a drawer with a number of different stain/finish combinations on different woods so deciding to start there seemed an obvious choice.  Going through them produced this handful of options set in the room where the cabinets will go.  Now it’s a matter of looking at them in various types of light during the day and evening to see which one looks the best.

While looking at the assembled back and the proportions of the cabinet I decided it would look a little better by adding some depth.  In the end a half inch got added to the depth.  Not a big change but it did require dimension changes to the sides, side spacers, shelves, bottom and top.  Also, since the side spacers and the top blanks had already been made, they needed to be checked to see if they were big enough.  Fortunately, they were.  However, it generated this revised cut sheet for the ¾” oak plywood.

With that decision made I started to break down the ¾” oak plywood sheets into more manageable pieces.  Since I work alone swinging around a 4’x8’ sheet weighing 65 pounds without banging the faces or damaging the edges is not the easiest thing.  Also, 40 years ago it was a lot easier 😊.  For these cabinets the plan is to cut to length plus a couple of inches then rip that in half and then cut to final size.  First some 2x4 sleepers are laid down out in the driveway.
The plywood is then carefully set on the 2x sleepers.  Measuring and marking the oversized piece length is next followed by clamping my cutting jig down aligning with the measured marks.  A final check to make sure the length is correct and I am ready to go.  A circular saw with a high-quality carbide tipped plywood finish blade is used to make the cut.  This gives me a smooth cut with minimal chipping of the thin oak veneer.  One thing this photo shows is the sliced face grain of the plywood.  I like using plywood with this kind of face.  The effect it gives is that of a series of book matched solid boards glued edge to edge versus that rotary cut veneer that looks like regular plywood.

Once cut to rough length the piece is ripped roughly in half to make two blanks.  One blank is again ripped about in half to the side’s final width using the cut edge against the fence.  The remainder is ripped to remove the dinged-up factory edge and cut to final width.  The other blank is ripped to the bottom’s final width and an oversize shelf.  The remainder is for two more shelves to be cut to final width and length later.  Here is the setup for all that ripping.

Unfortunately, after cutting the sides to size the pieces developed a bit of a bow.  Not a lot and something that can be worked around when I assemble but it would be nice if they were a little flatter.  With that in mind I stacked them on risers with the bow up.  Clamps applied pressure to reverse the bow.  I will let them set for a day to see if that does any good in flattening them out.

While some of the plywood pieces are clamped, I marked the other plywood blanks for the shelves and cabinet bottoms.  Here is one, in the center just below the “X” is a place where the edge got chipped and part of the oak veneer got ripped off.  There are a few instances where the veneer near the edges got damaged but they can be cut away so it’s not a problem.  I just had to carefully do the initial cutting layout to make sure they did end up in places that were waste.  Once the layout is verified it’s a simple matter to cut the pieces to final length and a little long.  Final length will come a bit later.

Well, it took three days of the plywood pieces being clamped but they are now pretty flat.  That doesn’t mean they will stay that way.  I will give them a couple more days to see if they are stable.

Each door and cabinet frame have some 40 square pegs in them that hide places where screws will be installed.  The original rendering shows what I mean.  In it the pegs have been ebonized so they are black.  As the project has progressed, I am not so sure that’s a good idea.  For instance, the pegs in the tapered legs represent the double tenon of the side spacer.  Now since the spacer is oak the exposed tenons should be too.  Another consideration is the focus of the cabinet is the stained-glass window in the door and not the contrasting pegs.

To see how things would look I decided to make a sample.  By now I had looked at the various stain samples and made a selection.  Taking a scrap of the oak I cut a couple of square peg holes, stained it with the selected stain then set an ebonized and stained peg in place.  That was followed by a couple coats of finish which gave me this.  Based on how it looks I will change the leg pegs to stained oak.  Still not sure about the ones in the door as they are independent pegs.

Since I was in the testing mode one other item needed a decision.  The edge treatment of the side spacers and legs has been up in the air all during the design between a bevel and a radius.  Even the rendering has one side drawn with a bevel and the other side with a radius.  Looking to past furniture did not provide any guidance as I have done it both ways.  To resolve this, I made a test piece out of MDF and set in place.  The left photo below shows the beveled edge and the right a radiused.

A closer look at the options are below with the top being the bevel and the bottom being the radius.  After looking at them along with the existing furniture made each way the decision is to go with the radius on these pieces along with the legs, top and bottom rail, doors and shelves.

Next up – Making the Side Spacers, More Stain & Front Frame Glue-up

Monday, August 26, 2019

FLW Cabinet - #14 Faux Tenons, Side Spacers & the Back

With the top blanks set aside to see if they are stable, I decided to work on the faux through tenons.   These pieces will fit in the open side of the through mortise in the legs.  The cutaway below shows how the top and bottom rail’s tenons will fit in the leg mortise along with the faux tenon.  I could have tried to make a single piece long tenon on the rails but the odds of getting a gap free fit where the tenon exits the leg are slim and none.  This way I can fit them separately so I end up with a nice tight joint where the tenon exits the leg.

Going through the leftover cutoffs I came across these two that could be cut down and made into the parts.  Process for making the blanks is to rip these two cutoffs into 4 pieces about 2” wide or just slightly wider than the widest tenon.  Next is to rip the thickness to 7/16” on the bandsaw then run them through the thickness sander until they were just a few thousands of an inch too thick to go in the mortise.  Near the bottom of the photo you can see the pine test piece made into faux tenon.  It’s left over from the spacers I used when cutting the square peg hole. 

Using a rasp, file and chisels I smoothed the inner faces of the mortise until the tenon blank fit snugly.  Then after it was cut to length on the chop saw I labeled the hidden end to match the leg. 

I could stop here but thought that the sharp corner of the tenon is right at toe level and it would only be a matter of time before somebody whacked their big toe on it, probably me.  The corner also presents a place that could be easily chipped.  To get around both problems I decided to add a small ¼” radius to the corners.  Below is the template I made for layout and the two different size faux tenons that need to be made.  I took the time to make the template as there are 16 tenons to make.  One interesting thing about the template is the radiuses on it are 1/32” larger than the finished radius.  That’s to take care of the offset introduced due to the thickness of the .5mm mechanical pencil I use.

Here is what the assembled leg, bottom rail and faux tenon look like. 

The next set of parts I am going to start on are the side spacers.  They are the pieces that when applied to the plywood sides will give the impression of a frame and panel assembly. 

Back in post 5 Bandsawing, a Revision & Work on Doors I made the blanks and left them to set to see if they were stable.  Because the pieces were all flatsawn I thought that they would probably cup at least a little as they adjust to their new thickness.  Well, they did not disappoint me as nearly all of them had developed a little bit of cup.  They were flattened by running them through the thickness sander then set aside once more while I worked on the templates. 

There are 16 total spacers in three different layouts so I needed to make some templates.  As half of the two patterns needed would fit on a regular sheet of paper, I did not have to redraw them on the template but simply printed them out full scale and using spray adhesive glued them to the base.  Once cut out with the bandsaw and cleaned up using the drum sander I had my templates.

Cutting the oak plywood back is next but first I needed to print out the cut list.  Here it is showing both the ¼” and ¾” thick pieces.  The large piece on the left is the ¼” back.  The rest are ¾” thick; the long ones in the center are the sides, the group of three on the right are the shelves and the single one in the lower right is the bottom.

I start by rough cutting the back about 1” wide.  This is the setup, note that I added the 8’ level to give me a longer edge to register the sheet of plywood against.  To hold up the sheet and help steady it I put a couple of roller stands underneath.

Here it is after making the cut.  You can see the stands that provided the support.  They are set wide enough apart that I could walk through them while making the cut.  With one edge cut I rotated the piece end for end and made a second cut to the final width which removed that edges dings and dents.

Cutting to length is more involved that ripping to width.  The maximum width I can set my table saw fence for is 50”.  Seeing as I need a piece just over 72” long that’s a problem.  What I can do move the fence to the left of the blade and cut off the waste.  That works except that I can’t cut more than about 12” off with the straight edge attached.  As one of the plywood sheets had a split in the veneer on the “B” side near each end it was not such a big deal since I needed to trim some off each end anyway.  My setup included moving the roller stands to the side positioning them so at least one was supporting the end at all times.  I also changed my straight edge from the 8’ level to a 4’ level since the shorter level is narrower and I could pick up another inch or so in cut width. 

The last consideration in setting the fence is to measure to the outside of the blade rather than measuring to the inside.  That’s because what we want is the piece being cutoff and the thickness of the blade has to be taken into account.  With these two cuts and I had the back to size.

The last work on the plywood back piece is to bevel the edges to help me ease the panel into the grooves in the legs and rails.   That’s easily done with a small block plane.   The top photo is before and bottom one shows the beveled edge.

Once that was done, I did a test assembly to see if all the measuring and careful work paid off.  Well everything just fit together fine and the assemblies look great.  After just clamping things together I checked the diagonals to see if the panels were square and they were less than 1/16” off.  That’s good news as they should be right on when I do the final assembly and glue-up.

Next up – Stain Samples, Cutting ¾” - 4’x8’ Plywood Sheets & Testing

Monday, August 19, 2019

FLW Cabinet - #13 Finishing the Top Glue-up & Sharpening a Scraper

The next day I glued the third board to the stack then set it aside so the glue could cure.  The second top is next and the process is the same as with the first.  Below you can see the three-board glue up in the background and the current two-board glue up in the front.

After letting the glue cure overnight, I added the third board to the second top and was ready to flatten the first top.  To hold it in place it is edge clamped in my workbench.  As a result of the careful glue-up there was not much to do.  The actual glue removal and nearly all the work is done with a card scraper.  That’s the rectangular tool in the center left of the photo.  I know it looks just like a flat piece of steel and that’s because it is.  What makes it work is a tiny little razor-sharp burr on the edge.  With that burr I can take off paper thin shavings cleaning up the surface in just a few minutes. 

When I am done with the scraper some sanding is done so the surface matches the rest of the pieces.  Last is to trim the long edges so they are parallel then crosscut the ends to even them and make them square with the long edges.  The next day the clamps come off the second top then I go through the same flattening, sanding and squaring process as with the first top.

In other projects I have talked about using a scraper and how useful it is.  What I don’t ever remember is showing how to put a burr on a scraper.  That’s the catch as without that sharp burr it does not make the thin shavings, it just makes sawdust.   With that in mind here is the process I use to get the burr.

The initial step is to create a square corner between the face and the edge of the scraper like in the top example.  Depending on if it is a new scraper or one that just needs a lot of help to get a new burr you could have something that looks like the bottom image.  Neither of its right edges are square.
In either case you need to flatten the faces.  To do this I put the scraper face down on a flat granite slab then grab some 220-grit wet/dry sandpaper and a spray bottle with water in it.  Using a flat block, I apply firm pressure then sand back and forth until a band at the edge of the face is flat. 

You can tell when your done as you will get an even scratch pattern where you have been sanding.  When you get there move to a finer grit paper like 400 and repeat the process.  Going finer to 600 or 800 grit will just improve the quality of the burr.  If you are recreating a burr you only have to use the fine paper as a touchup.  In this case I was starting with a new scraper.  Here is what that looks like when it’s done.

Next is to work on the edge.  I clamp a fine file to the workbench then use a block of wood and spacer to hold the card square to the file. 

With that setup run the scraper back and forth along the file until when you look at the edge it is flat with a smooth surface.  In truth if you get out a magnifying glass the edge will look anything but smooth.  Here is what I mean.   Now it may look a really rough in the photo but remember the scraper is just over 2 hundredths of an inch thick so it’s relatively thin in real life.

To get a smoother edge replace the file with 220 grip paper, sand then replace with 400-grit paper and sand.  After that lightly hone the faces with the 400-grit paper to get rid of any little bits of steel that may have been created while you were working on the edge.  If it’s done right when you run your finger nail 90 degrees to the face/edge corner you won’t feel any raised lip.  Remember to check by using your finger nail at 90 degrees to the edge because if you run the fleshy part of your finger parallel to the edge you could very well need a bandage.

With a good 90-degree edge between the face and the edge it’s time to create the burr.  The burr is made by using a hardened steel rod or burnisher.  Here is what mine looks like.

Now it’s time to form the burr by rolling a little bit of the steel out so it points toward the face.  First step is to hold the burnisher square to the scraper and sweep it across the edge pushing a burr towards the face.  Second step is to hold the scraper at a just a little bit of an angle like this and sweep it across the edge pushing the burr down and towards the face.

I like to put the scraper in a vise and hold the burnisher in both hands so I have better control over both the burnisher angle and sweep.  Once again it does not take a lot of pressure maybe 10 pounds to roll the burr.  You are not trying to crush it but roll it over.  To little is better than too much. 

When done you probably can’t see the burr but you should be able to feel it.  To give you an idea of the size the photo below shows the burr as a very thin bright line right at the edge.  The penny provides some scale.  If when you test the scraper it’s not working try holding it at a different angle.  If that does not work make a couple more light passes with the burnisher on the edge.

Eventually the scraper will get dull and just make sawdust, not like these thin wispy shavings.  When that happens it’s time to go back and use the 400-grit sandpaper on the face and edge to get rid of the burr and create the 90-degree corner.  Pull the burr as before and you are ready to go.  After doing this a number of times the steel right at the edge will get work hardened and you will need to use the file to get rid of the brittle hardened steel there.  You don’t have to take off a lot of material, just filing it down until you can see the file marks on the entire edge is enough.  Don’t be discouraged if you can’t get it right away.  Between squaring the edge and pulling then rolling the burr there are a lot of places where it can go wrong.  Take your time, use a light touch with the burnisher and it will come.  It’s all worth the effort to get it right.


Since the title of this blog is Dave’s Projects & Things the following certainly falls into the “Things” category.  Here in New Mexico in mid-August the chile peppers ripen and become available for roasting.  It’s a regional thing where every grocery store sells them in bulk and includes the roasting.  Late last week I bought a 25-pound box of hot long green chiles and had them roasted.  The commercial roasters have an open grate rotating drum with a series of huge burners at the back that in just a few minutes blisters the chiles skin and cooks them.  Here is what a typical unit looks like with a 25-pound load.

When the roasting is completed the chiles are dumped into a big plastic bag put back in the box and they are ready to take home.  An interesting byproduct of them setting in the trunk on the way home is for a couple of weeks the car smells like roasted chiles.  After roasting they need to steam for at least 15 minutes before bagging and freezing.  What you ask do I put them on?  Well, I have been accused of putting them on everything which is almost true but they are great on about anything off the grill plus in stews, pasta and rice dishes.  Really, just about anything that where some spicy smoky heat is needed including pizza.  Here are the 25 pounds bagged, frozen and ready to use which will last me right at a year.

Next up – Faux Tenons, Side Spacers & the Back