Router Plane

Monday, June 8, 2015

Maloof Rocker - Final Sanding & Flaw Repair

My poor fingers, I think they will never, ever talk to me again.  My thumb and forefinger were so tender that it was difficult to button my shirt.  I just had to let them rest for a few days after working on the transitions between the rockers and the legs.  Because there are just not too many flat surfaces on this piece that can be machine sanded this means that most of the sanding is done by hand.  

Fortunately for my fingers due to the type of finish I will use on the test piece it does not require any additional sanding.  However, the cherry still has quite a bit of work left.  I started by setting the chair upside down on the work bench and began with the bottom of the rockers working my way from 120 grit sandpaper to 150 and ending up with 220.  I will stop there until just before finishing then go over the whole chair one more time using 320 grit.  If I had gone with a coarser more open grained wood like oak I would probably stop with 220 grit.   However, my experience with cherry is that stopping at 220 grit still allows very fine scratches to show up through the finish.  One of the things that showed up as I moved to the finer grits was the occasional scratch that did not sand out.  The fix is go back to the previous coarser grit, sand that spot then go on to the finer grit, sand and see if it is gone.  If so, you’re good, if not repeat.  While upside down I examined the leg to seat joints and had to back up a bit.  What I thought was fine at the time ends up being not as good as it could be.  I think the experience of sculpting has taught me as I did more of it.  Anyway, I needed to refine the joints with a small file before doing the finish sanding. 
Finished Front Seat to Leg Joint
Rear Leg to Seat Joint - Not Quite Done
 As I was sanding the legs another wrinkle popped up.  The plugs covering up the screws are made out of katalox which is a lot harder than cherry as a matter of fact its Janka hardness is nearly 4 times that of cherry.  In addition I installed the plugs so the exposed part is end grain which is even harder.   The result is when I did the sanding the cherry being a lot softer sanded away quicker than the katalox.  This gave me a slightly raised plug rather than one dead on flush.  The fix is to use to use sandpaper backed by a hard surface to sand smooth.  Not really hard to fix but it did take some time.

With the underside of the chair done I flipped it over and started on the top side of the rockers and those infernal leg to rocker transitions.  From there I worked my way up to the seat and ended up with the top of the seat.  Not many photos here because the only thing more boring than shots of sanding is watching paint dry.  At this point I have only two things to do before applying a finish.  First is to fix the thorn in my side better known as the flaw in the side of the seat and second is to go over the chair with 320 grit sandpaper just before I put the finish on.  Have I mentioned that there is a lot of hand sanding on this project?

At this point I have two chairs nearly ready to finish.  The one made out of cherry and then the test one made out of 2x4 and 2x6 construction lumber.  They are nearly identical with these differences:
  1. The construction lumber pieces are thinner at just under 1½” thick while the cherry is a fat 1¾”.
  2. The construction lumber rocker has 5 back slats versus the cherry one having 7.  There are two reasons for that.  First is the splay angle for the rear legs on the test chair is less than the cherry resulting is less width at the headrest.  Second, I just did not want to make 7 slats for the both so the construction lumber chair has slightly wider slats but 2 less.
  3. The construction lumber chair’s back is a few inches shorter because the lumber I had was not long enough to make the back legs the same length as the cherry.  It’s a test piece remember, and at first all I was going to do was test out the sculpting process for the seat.

Since I was still undecided on how to fix the flaw in the side of the seat I thought I would do some sample fixes and see if one stood out.  I took a leftover piece of cherry and drilled four ¼” holes (roughly the same size as the flaw) in it about the same depth as the flaw.  I then filled them using 4 different methods:

  A.  Super glue and fine cherry sawdust.
  B.  Translucent tan epoxy.
  C.  Same tan epoxy and 50% fine cherry sawdust.
  D.  Black epoxy.

I let everything cure overnight then sanded them flush and worked through the various sandpaper grits to 400.  When that was done I put the sample against the flaw and made an evaluation.  At this point "C" the translucent tan epoxy and 50% fine cherry sawdust looked the best. 


Next was to give the test piece a quick coat of lacquer to see how it looked against the dampened flaw.  I dampened the flaw to simulate the color after the finish is applied.  With these changes the fix that looked the best was "B" the translucent tan epoxy.  Since this epoxy is translucent it lets the structure of the flaw show through albeit softened but provides a smooth surface.  

With the decision made I mixed up a small amount of the epoxy, packed it in the flaw, let it set overnight to harden then carefully filed it down flush with the wood and sanded it up through 800 grit sandpaper. 
Finished Patch of Seat Flaw

With that done I started on the FINAL sanding with 320 sandpaper in preparation for finishing.   To reduce the darkening of end grain when I finish I hit those areas with 400 grit.  One good thing about the finer grits is they don’t sand the skin off my fingers quite so fast and my poor abused finger tips really appreciate that. 
Chair Sanded and Ready to Finish

After the sanding was done I thoroughly cleaned up the shop dusting off all the equipment, sweeping the floor and while I was at it dumping both dust collectors.  Since I will be doing the finishing in the shop I wanted to get as much dust cleaned up as possible.  Last steps are to vacuum the floor, blow any residual dust off the chairs then set the air cleaner to run for 6 hours and call it a day.

Shop all Cleaned Up and Ready for Finishing
Next up, the final step – Finishing

Monday, June 1, 2015

Maloof Rocker - Shaping the Rocker Ends & Leg Transitions

After spending a few minutes rocking it was time to get back at it.  First off is to work on the front or the nose of the rockers grinding both of them to the same distance from the front of the front leg.
Nose of Rocker Ground to Length
There is quite a bit of shaping on the front of the rocker that starts with grinding the bandsawn arc into a more finished form.
Top of Rocker Nose Rough Ground to Shape

The inside and outside faces are shaped next.  I made a paper pattern so I had a better chance that both would match albeit mirror images.
Next is to grind a smooth arc on the underneath of the rocker and transition the existing radius on the rocker bottom up the just ground arc.

Last is to grind a radius on the top outside edge, transition the hard inside edge up to the leg and clean up the rough surfaces.

With the front of the rockers done it’s time to move to the back.  They are simpler to do than the front ones.  First is to mark and cut them to length.

The inside face is then marked and ground flat to make a curved taper that flairs out toward the end.

Next a similar surface is ground on the top of the rocker.

Lastly, the inside hard edge where these two grinds come together is ground to continue the existing soft radius on the rocker.
Once the ends of the rockers are done that only leaves the transitions between the rocker and the legs.  The connection angles and leg shapes are different from front to back but the process is the same for all four.  I start with my trusty French curve to layout the transition, use the angle grinder to rough out, knock off the rough edges with the pneumatic grinder, clean-up with rasps and files then finally finish shaping with the 80 grit sand paper.  The end result looks so simple and obvious yet the time and effort to get to there really adds up.
Transitions from Legs to Rockers Completed

With that done I can move on to the final sanding and finishing, or maybe not.  There are two items that still need to be dealt with.  First, as I sat in the rocker testing it out I found that the arc at the front edge of the seat was a little sharp and needed softening.  I could not just leave it so I drew some guide lines and started in with the usual implements of destruction; pneumatic grinder, rasps, 80 and 120 grit sandpaper.   I am happy to say the front edge is now easier on the back of my legs and I can get on with the final sanding of that area. 

Second, is that #!@% flaw in the seat that I am going to have to address.  However, I still do not know what I am going to do with it.  Perhaps as I do the finish sanding I will have a moment of enlightenment.  Still at this point I am happy with what I have done so far.


Next up – Final Sanding & Flaw Repair

Monday, May 25, 2015

Maloof Rocker - Installing the Rockers

Now that the rockers are laminated and rough fitted to the legs next is to check and see if the two rockers are balanced.  That is making sure the arc of both rockers match up.  Since the rockers are not a perfect part circle but more of a slight ellipse if the left and right legs are not in the same location on the rockers as you rock the chair will have a tendency to gradually rotate.  The process it to measure from the back of the back legs 24” down the rocker then measure how far off the floor that point is.  If both rockers match up you’re done.  In my case they were within an 1/8”, close but not close enough.  The fix is to move the leg up or down the rocker and re-measure until both sides match. 

The rockers are attached to the legs using ½” dowels similar to the ones used to attach the arms only longer.  I pulled out the square blanks I made earlier when I needed the arm dowels and headed over to the lathe.  The sequence is a little different this time because the dowels are held in place with epoxy and not regular yellow carpenters glue.  The epoxy is thicker than the yellow carpenters glue and because of that the dowels need to be little loose.  When I fitted the slats into the headrest they were fitted snug and that cause a little bit of a problem in that the excess epoxy had difficulty escaping out of the joint.  A slightly looser fit should solve that problem.  Since I am shooting for a dowel diameter of about 1/32” undersize I do not have to drive them through the die to get that exact fit.  A few thousands won’t make a difference.

Once I have the dowels in hand I can go about marking and drilling the holes in the rockers.  Marking the location of the hole in the rocker follows the same method as when I marked the location of the hole in the arm.  I start by putting my trusty dowel center finder in the hole in the front leg, set it in place on the rocker, pressed the leg down on the rocker and the center of the hole is marked.   
Because the leg is not square with the rocker I have to establish the angle that the dowel will intersect the rocker with.   That is done by sliding a snug fitting dowel into the leg putting it against the rocker and marking the angle.
Once that’s done its over to the drill press and using a clamp to hold the rocker at the correct angle drilling the mounting hole.  Notice the precision use of masking tape to set drilling depth.  Now all I have to do is cut one of the dowels to the proper length, slide it in place and I can go through the same process for the rear leg. 
This process worked well for three of the four holes.  If you remember from earlier on I had a problem when I drilled the hole in the back left leg.  For some reason the drill drifted slightly off the leg axis.  If it had just been off center that would have been easy to deal with but no such luck.  While the hole is slightly off-center the real problem is that the hole is angled about 7 degrees off square to one side.  That means for the dowel to align properly I have to match the angle of the hole in the leg when I drill the hole in the rocker.  It did take a bit of measuring and setting up a jig on the drill press but in the end it all fit together fine with the bottom of the rocker resting flat on the floor.


Now that the leg to rocker location is fixed it’s time to do the final fitting.  To do this I flip the chair over, put the rocker on with the rear dowel in place and then check the front leg to see what adjustments are needed.  With a file and 80 grit sandpaper the high spots are removed until the joint fits tight.


Using the bottom of the glue bottle as a template I laid out the rough transition curve between the secondary laminations on the rocker and the legs then used the bandsaw to rough them out.

The easy way to build the rockers would be to leave them the way they are now or rectangular.  However, I think one of the design criteria for the chair was to not have any rectangular pieces.  The rockers have a radius cut on all four corners resulting in a nearly circular rocker.  Because of the stresses introduced in the laminating of the rockers I was a little concerned with chips or even blowing out a piece of the rocker similar to the concern I had with the back of the slats.  So I went with the same method I used with the slats, “climb cutting” or cutting with the rotation of the router bit.  Only this time I clamped the rockers to the workbench and ran the router along the edge rather than using the router table and moving the pieces along the router bit.
I have to confess when doing the routing on the test chair out of habit I started the final finish pass normally and sure enough the bit caught and blew out a piece about 2” long.  Fortunately it’s on the practice piece and far enough back you would not actually rock on it.  That said I certainly paid close attention when I did the actual pieces and had no problems.

Before gluing the rockers in place I spent a little time doing some rough sanding to smooth out the transitions where the router bit cut ended.  It’s easier to clamp and swing the rockers around for sanding before they are attached to the rest of the chair.  Once that was done I could epoxy the rockers in place.

One good thing about the epoxy I am using is that I have about an hour working time although with the long working time it takes a long time to cure so I have to let it set at least overnight.  A couple of clamps provide the pressure to assure tight joints and hold each rocker in place.  Since I had a little extra epoxy I mixed in some fine cherry sanding dust and used that to fill the blowout in the practice rocker.

The next morning I pulled the clamps off, set the chair on the floor and to gave it a test run.  The chair came out really well balanced, one gentle push and it rocks for a long time.  It felt comfortable to sit in and I have to say all the work on the slats were worth it, they really support your back.


Next up – Shaping the Rocker Ends & Leg Transitions

Monday, May 18, 2015

Maloof Rocker - Making the Rockers & Sanding

The rockers are not cut from a solid piece but for strength are made from thin strips that are laminated together against a form.  Each rocker has 9 layers of cherry and one layer of katalox.

The rockers represent the last major pieces that have to be built.  So to start I pulled out the last piece of cherry reserved for the rockers and checked it for flat and square which, good news, it only had a minor bit of cup.  A few passes through the thickness sander took care of that.

The katalox however was in no way straight or flat.  It had a nice combination of cup, a gentle bend along the long edge with a dog-leg near the end along with a few waves thrown in plus just a tad amount of twist.  In that one board there was just about every kind of contortion you could imagine.  Fortunately I only need 2 strips 1¾” wide, just over an eighth of an inch thick and about 54” long plus a couple more 8” long.  To clean up this mess I started with a long straight edge to give me my rough long dimension of the 54”.   With a straight pencil line to start I used the bandsaw to make my first cut.  Next, I used the power hand plane clean up the bandsawn edge to give me a true straight edge.  That left me with some cup, the twist and waves.  The thickness sander took care of the cup and waves.  The twist is not great and when I laminate it up because the finished piece is thin and flexible it will get flattened.  However, because of the twist I had to cut the strips with the bandsaw rather than the table saw.  To give me a little buffer I cut them a little thick and will finish up with thickness sander.
There are a couple of ways to cut the multiple strips of cherry needed.  One is to set the rip fence at the desired width and cut away.  This works good most of the time but as the pieces needed get thinner your fingers get closer and closer to the blade.  I have a push block that will allow me to cut pieces as thin as ¼” with no problem.  However, these pieces are just .17” wide which rules out using the push block I have.  I could make a special push block but am a little leery of having a piece this thin between the blade and the rip fence with such a big fairly heavy piece on what is normally the waste side.  The cherry blank is 9” wide, almost 2” thick, 55” long and weighs about 25 pounds. 

The other way takes a little more time but works well.  Its advantage is that the thin layer is on the outside or what would normally be the waste side of the blade.  This means that it cannot get trapped between the blade and the fence.  The disadvantage is the after every cut you have to reset the fence and it can be difficult to get pieces of a consistent thickness.  The solution to getting a consistent thickness is a simple jig that sets in the miter slot.  A screw on the end is run in or out to set the piece thickness.  


To use, the rip fence is adjusted so that the main board just touches the screw head then the jig is removed and the cut is made.   The process is repeated over and over until you get the needed number of strips.  In my case that is 18 plus a couple of extras or 20. 
The pieces are rough cut at .17” but the final dimension is just over 1/8”.  The extra is 45 thousandths of an inch is so I can run the cut pieces through the thickness sander to remove the inevitable saw marks and make sure the surfaces are parallel.

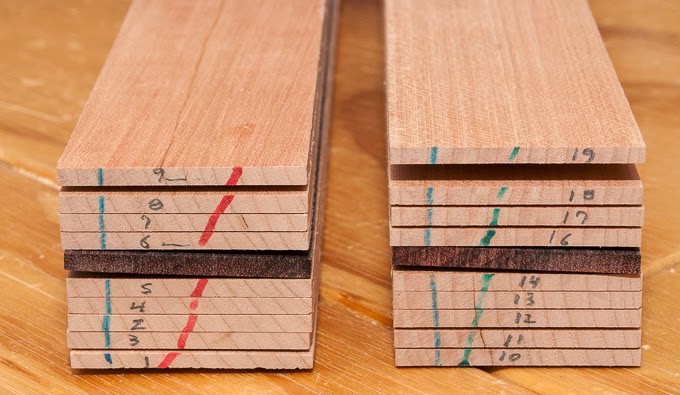
I keep the layers in the same order as they are cut.  This assures that when the strips are laminated back together in the rocker form the grain will be consistent across the finished piece.  In order to be able to put them back in their original order I number and mark the end of each board and group in sets.  Red for one and green for the other.  These are the stacks with the katalox inserted where it goes.

When I glue up the 10 pieces in the form it is controlled chaos.  Because of the limited working time I have with the glue.  I only have about 10 minutes from the time I start spreading the glue to when I need to have the 21 clamps tightened down.  This means everything needs to be laid out and ready to go before I start applying the glue.  

The glue goes on first, I have about 6 square feet to cover and it needs to be applied with no missing or thin spots.  Next is to stack the layers up, quickly wipe excess glue off the joints and set the stack in the form.  Starting in the middle I work toward one end keeping the layers flush and aligned then do the other half.  Once everything is tightened down I wipe the glue squeeze-out off and let it sit overnight.  Then next morning I will pull off all the clamps, inspect the form for damage and go through the process for the other rocker.  Using one form for both rockers assures that they will be identical.


Once out of the form I mostly flatten one face on the rocker with the power hand plane checking with a square to make sure the adjacent faces are square with each other.  I will use this face as a reference for adding a secondary lamination.


Under each of the four chair legs where they are attached to the rocker is a secondary stack of 7 laminations made up of 3 cherry layers, 1 katalox and then 3 more cherry.  This will provide the material for the transition from the leg to the rocker.  To locate I set the chair on the rocker roughly where it goes and mark a line about three inches either side of the leg.


The laminations are then cut, glued in place on each of the rockers and allowed to cure overnight.  I probably could machine them after about four hours in the clamps but since they are bent and under some stress I wanted to give them overnight to cure.


Once this secondary set of laminations has cured I have two choices in milling them to the correct width, either the planer or the thickness sander.  I chose the thickness sander because there are lots of grain directions and curves going on here and I am just a little paranoid about the planer ripping a big chip out of the rocker or leaving me a big snipe on the end.  Neither is a concern with the thickness sander – it just takes little longer to get there.


After getting the rockers to the right width I set the chair on them and checked to see if the legs sat tight on the rockers.  No real surprise here, they didn’t fit tight.  To get a tight joint I took a compass set just slightly wider than the gap and used that to scribe a line around the leg. 

Grinding to that line with the disk sander will not provide a final tight fit but gives me a working setup for continuing.  The joint will need to be fine-tuned once the dowels are fitted in place that tie the chair to the rockers.

I mentioned in the last post that I would be doing the 99% final sanding and I have been working on that, at least from the seat up.  It was not quite as bad as I thought it was going to be.  Although I swear I have completely sanded away any and all of my fingerprints.  I had taken everything to 80 grit so the next step was 120.  This took me about 3 hours to go over all the chair’s surfaces.  The next step is 150 followed by 220 where I quit until all the woodworking is done.  Just before finishing I will hand sand with 320. 


One problem that showed up early on when I cut the seat to shape was a knot on the seat’s left side.  As the project progressed final shaping did not remove the defect although on closer inspection it is not a knot but more like a bark inclusion. 
As it will still be there when I am done I have to do something with it.  Right now I have cleaned out the loose material and have come up with three options.  First, completely remove the defect and fit in a cherry patch.  Second, fill the hole with black epoxy and third fill the hole with a mix of turquoise granules set in a clear epoxy.

Next up – Installing the Rockers

Monday, May 11, 2015

Maloof Rocker - Final Headrest Shaping

The headrest as installed is a fairly heavy blocky chunk of cherry.  There are a few steps and a lot of material to be removed to transform it to the lighter more graceful piece I need to end up with.  

The bottom of the headrest has an arc that carries on into the leg and that is where I started the integration of the headrest by drawing in the guidelines. 
Headrest and Leg Before any Shaping
With those in place I used the pneumatic grinder and carbide burr to rough in the arc.  Using sanding drums and some hand sanding I ended up with a seamless transition between the headrest and the leg.
Bottom of  Headrest and Leg Transition Done

With that connection done I moved on to the front of the headrest and the leg joint.  All this requires is for the leg to be ground down flush with the headrest. 
Front of Headrest and Leg Prior to Shaping


This is done fairly simply using the angle grinder with the 50 grit sanding disk installed.

Front of Headrest and Legs Shaped
The back of the headrest is not quite so simple.  First is to draw in the guidelines for the reveal that will be ground into the leg.  As shown here the headrest starts out nearly ¾” thicker than the leg and  has to be ground down to the bottom of the reveal via a smooth taper.
Back of Headrest and Leg Before Shaping  (Note top of headrest is at bottom of photo)


Because there is a fair amount of material to remove here I started with the coarse carbide disk then switched to the 50 grit sanding disk.  Once I had established the rough outline I used a round rasp to refine the reveal following that with hand sanding.  With one leg done I duplicated it on the other leg. 
Initial Shaping to Form Leg Reveal


At this point nearly all the headrest is still 1¾” thick, a long, long way from where it needs to be.  The next phase of sculpting falls into two flows. 

First, is to smooth out the initial taper I had done to form the reveal working toward the center of the backrest leaving it the thickest at the center.  Second is to reduce the top of the headrest down to about approximately a ¼” thick.

The starting point for all this is where I left the rounding over of the bottom of the headrest done before installing the slats.  From that existing arc it’s a smooth curve ending up at the ¼” thick top edge.  To help me out I added a handful of reference lines.  Because this sculpting has even more material to remove than the initial taper the coarse carbide disk is an obvious choice to start with.  As with the other sculpting the progression once the major material removal is done is to use 50 grit disk sander, rasps, the pad sander, and lastly hand sanding.  After using the rasp to smooth out the curves I needed to check for high and low spots.  To do this I used a piece of chalk to coat the back.
Headrest with Bulk of Rough Shaping Done

I then lightly filed the surface which left chalk only in the low spots giving me a clear indication of where I still needed to so some work.
Chalked Headrest Showing High and Low Spots

Headrest and Right Leg Sculpting Nearly Done
With the majority of the back shaped and smoothed I could work on the very top corner of the reveal and its transition.  Using the 50 grit grinder, sanding drums, rasps, and hand sanding I created a smooth transition between all the surfaces. Once that transition is done I can finish running the radius I had routed a long time ago on the outside edge of the leg on up to the top.

The last bit of shaping involves softening the inside bottom arc of the headrest/leg.  With the sculpting of the back done and sanding completed to 120 grit here is what the headrest looks like.  A far cry from the big square block it started from.  Nothing like taking $8 worth of 8/4 cherry and turning it into sawdust. 
Headrest to Leg Sculpting Done Except for Sanding

Final process is sanding.  Since the basic woodworking on the chair from the seat up is done I can now go back and sand up to a 99% finished surface.  I need to remove any machine, rasp, file, sanding drum, scratches, humps, bumps or other irregularities starting with 80 grit and ending with 220 grit.   Because of all the curves the vast majority of the sanding is done by hand.  However, rather than do all that sanding at once and completely remove all the skin from my fingers I am going to intersperse it with the work on the rockers.

Next up – Making the Rockers & Sanding