I am going to let the body set for a bit while I think about how to proceed with cutting it apart to make the two halves and then shaping those pieces. I want to make sure that I have thought out in what sequence the different operations need to be done. I don’t want to get partway through and find out that something should have been done earlier and now I can’t do it.
In the meantime, I am going to do some work on the bases. The rendering on the left is the current version of the project and the top right shows a closer view of the finished base. In the bottom right is the blank that goes in the lathe that the bases will be cut from. The cherry pieces on the top and bottom of the blank are what’s needed while the white center part is just filler. 
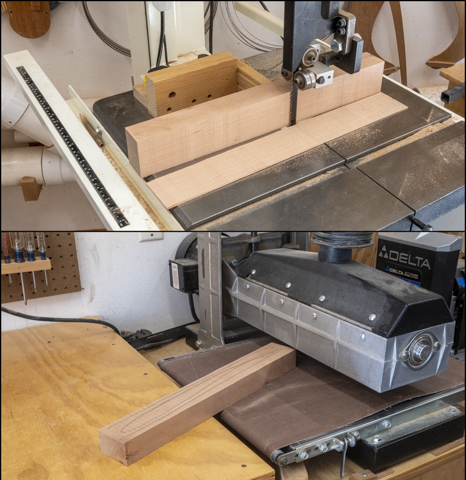
Making the cherry parts are first. That start by roughing the needed pieces out oversize on the bandsaw then using the thickness sander to smooth and flatten the bandsawn face. I will probably save the thin cherry cutoffs for another project.
Here the cherry pieces have been roughed out and are ready to glued up to get the size needed. The filler is made out of scrap construction lumber sized and ready to be glued up. All the pieces are a bit oversize so once glued together they can be trimmed to the final size.
Here is the first round of gluing pieces together. The cherry pieces are in the left two clamp sets and right two are for the filler.
After an overnight cure the clamps are removed, the parts have their faces flattened and edges cut square as needed. The cherry parts are set aside for a bit while the two pieces that make up the center waste section get glued together. However, before they actually get glued up, I carefully align the edges then run a couple of screws in to keep them that way. This is shown in the top photo and done because parts can slip around during clamping and I didn’t want that to happen. The bottom photo shows the pieces glued and clamped up.
While those pieces were gluing, I went back to work on the main body. I had been concerned about doing the future machining operations on it without marring the black dyed center oak insert. This is because the rounded bead on the oak insert is the high point so it will be the main point of contact on the equipment. The pieces are going to be run the through the bandsaw multiple times, cleaning up and shaping the various cuts on the disk and drum sander etc. All of these tools have cast iron tops the wood is going to be rubbing against and while the tops are pretty smooth, I am not convinced they won’t blemish or damage India Ink on the bead. To prevent this one of the plywood disks that was used as a buffer when gluing gets screwed to the waste part of the main body. The top photo below shows the main body where the red highlighted area identifies the area the screws will be run into. The ridge just outside this area is the same height as the top of the bead. In the bottom photo the disk is set up in the drill press getting four counter sunk holes drilled. There are four holes so the disk stays attached in place when the body is cut in half.
Here the photos show the disk partly screwed in place. The center screw goes in first to center the disk on the reference hole and the others follow. Once the outer four screws are in the center one will be removed before the body is cut in half. This is because the saw cut will go right through where the screw is.
Cutting the main body disk in half is next and I was a little apprehensive about it since if the bottom plywood disk did not provide enough support the cut could go haywire in a hurry and I could damage both halves. The top photo shows the setup ready to go and is straight on facing the blade (red arrow) which is not easy from this angle to see since it’s so thin. Fortunately, everything went smoothly with the bottom photo taken after the cut has been made.
Looking at an edge on view of the just cut body here in the top photo shows all the various empty spaces in the piece which will get cut away later. The bottom face view shows what the half body looks like now and the white line where the center cutout will be.
Sanding the bandsawn edge smooth is next which is done using the large disk sander. The top photo shows that work in progress and the bottom photo shows it all smoothed out. 
Next the top edge gets its taper. The rendering shows the 6-degree taper that gets cut off the top edge of the half body which is this case works out to be 3/8” at the rim. The bottom photo shows the taper marked and all set up ready to cut on the bandsaw. 
These two photos show the closer view of the marked out taper before and after it has been cut. Once cut the bandsawn face is smoothed out with the disk sander just like when the body was cut in half and those edges sanded smooth.
Next Up – Cutting Center from Body & Starting Base

No comments:
Post a Comment