Router Plane

Monday, June 24, 2024

Game Piece Holder – #9 Adding the Turquoise Band to the Oak Bowls

The oak bowls are the last set to make.  When I turned the small blank round and got it down to the correct sized cylinder I noticed two substantial cracks.  One was near the bottom that might get cut away when the bowl got turned to shape.  However, the other one ended up right near the top edge and looked deep enough that it would go all the way through to the bowl’s inside.  I was worried that the crack being that close to the top and going all the way through would make the top edge really fragile.  In the photo the top red arrow points to where the rim will be and bottom arrow identifies the crack.  After some thought this blank gets rejected and I have to start over by making another one.

Because I was concerned that the resin used to set the turquoise in place might stain the oak they got a coat of finish just like the walnut ones before any work began.  While the decision had been made to add a turquoise band the details as to exact size and location were still undecided.  The top photos below show two options for the medium bowl.  The one on the left has a 3/8” wide turquoise band centered on a line that matches the center line of the other bowls feature ring.  The right bowl has a 5/16” band whose center is just slightly below the feature ring center line.  After some discussion it was agreed that the band on the left was a bit too wide and the space between its top and the top of bowl was too small.  In the end we decided to use tentatively use the 5/16” band centered on the other bowls feature ring which makes the oak band at the top real close to 5/16” also.  The bottom photo shows the groove cut into the bowl that gets filled with the turquoise.  As I was sneaking up on the width of the groove and its exact location what ended up looking right was a 9/32” wide band 9/23” from the top of the bowl.  If the distance from the top of the installed turquoise band to the top of the bowl doesn’t look quite right then I do have a bit of wiggle room when the top edge is cut.  Just have to wait and see how it looks when done.

Adding the turquoise band is next.  It consists of an ultraviolet cured resin used as a carrier for the fine turquoise granules.  Process is to mix the turquoise with the resin at about four parts resin to 1 part turquoise then carefully put it in the groove.  Now to keep it from running out only an inch or so at the top of the bowl (red arrow) is level enough for the mix to stay put.  With the mix in place a UV light is used to set the resin so it’s solid enough to continue which only takes about 30 seconds.  Here the last bit still has to be done but to see it clearly the bowl is rotated toward the camera.  It will get rotated back so it faces up before filling.

Once the groove is filled the UV light is set close to the bowl, turned on and the lathe set to run at its lowest speed for about 10 minutes to fully cure.  Well, that’s what I thought was going to happen based on testing I had done with a clear sample.  What actually happened was the turquoise granules blocked the UV light so it couldn’t penetrate as fast and far so it ended up taking a lot longer to harden the resin all the way through.  On the next bowl I will make the band in more than one layer.

When the resin was finally cured it gets turned off flush with the bowl and sanded up to a very fine 2,000 grit sandpaper.  Next is to hollow out the bowl and round the top following the same process as the others.

Turning the small bowl is next and we went through the same process discussing the width and distance of it from the top as with the other bowl.  Decision was to decrease the width of the turquoise band a little (1/32”) and center it on the same line as the other small bowls feature bands.  Coincidently the width of the turquoise band and the distance between the top of the band and the top of the bowl ended up being the same. 

Last bowl to turn is the large oak one which has a couple of cracks that are not as significant as was on the small bowl.  The red arrows in the photo on the left show the cut channel where the turquoise will get laid in and the ellipse shows the aforementioned cracks.  The right photo is a closer view of the cracks.  They are fairly small and not too deep so the plan is rather than try and hide them with filler I am going to celebrate the natural flaws in the wood and fill them with turquoise.  The bottom photo shows the completed turquoise inlay.

At this point both the walnut and oak bowls are ready to have their sacrificial bases cut off and the bottom finished.  I waited to get both groups done before doing this step because I have to switch out the jaws that are on the 4-jaw chuck to the jumbo jaws to finish the bottom of the bowl and it takes some time to make the change.  OK really, I am too lazy to keep swapping the chuck’s jaws back and forth.

Next Up – Final Turning and Lacquer Application

Monday, June 17, 2024

Game Piece Holder – #8 Adding Copper Band to Walnut Bowls & Spraying Lacquer

The next set of bowls will be the walnut with the copper band at the top.  Most of the procedure for turning this group is the same as the previous bowls but there are some differences. 

First is the way the outside profile of the blank is initially turned.  The top photo shows the typical turning with its sacrificial base just slightly larger than the actual bowl’s base.  This differs from the walnut one in the bottom photo whose sacrificial base is the same size as the top of the bowl.  I will go into the reason why a little later.

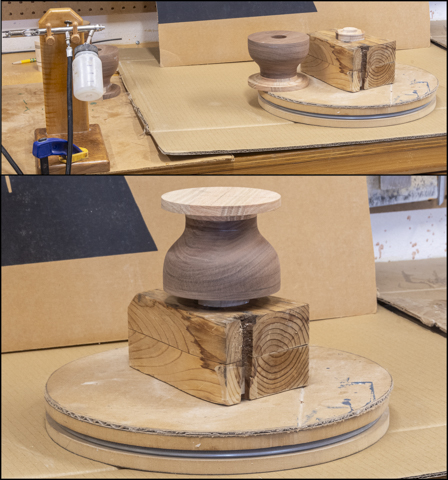
Applying a coat of lacquer to the walnut bowls is next.  The reason for putting on a coat of finish is to seal the walnut before the copper band gets glued in.  Because cyanoacrylate or super glue will be used to glue the copper in place, I am concerned that it might get absorbed onto the walnut then when the final lacquer finish is applied there might be a difference between the two materials.  Applying a coat of lacquer now should prevent the super glue from being absorbed where I don’t want it to be.  The top photo shows the setup with the air brush on the left, the bowl to be finished and the lazy Susan on the right which makes applying the lacquer to the bowl easier.  The bottom photo shows the bowl on the lazy-susan ready for finishing. 

After the lacquer cures overnight, a slot is cut into the bowl for the 12-gauge copper wire.  By coincidence my narrow parting tool is .078” thick and the wire is .08”.  This gives me a .002” interference fit which with the super glue should hold it in place.  The slot is cut to about .05” deep leaving the wire proud of the surface when installed.

Installation of the wire starts by squaring one end then applying some glue in the slot about a 1½” back of where the wire’s end will be.  The wire is then hammered down in place and that area sprayed with accelerator which almost instantaneously cures the glue locking the wire in the slot.  The process of hammering the wire in place and gluing is repeated until I get to within about 1½” of the start.  The top photo shows most of the wire glued in place with just the final fitting to do.  The final fitting is done with a small file until the ends fit tight and square when pressed into the slot.  The bottom photo is what the ends look like fitted and ready to be glued in place.  Earlier I talked about leaving the base the same size as the top of the bowl.  This is where that comes into play.  With the base the same size as the top of the bowl the whole piece is stabilized acting like a cylinder which makes the wire installation a lot easier.  Without a full size base it I would be trying to install the wire on a cone which would be a lot less stable.

The last bit of the wire ends get clamped to hold them in place for gluing in.  When that’s done glue is applied all along the joint between the copper and the walnut.  Because the glue is very thin capillary action pulls it into any voids between the two materials.  The top left photo shows that done with the bowl mounted in the lathe.  Next with the lathe on a slow speed a metal file is used to cut away the copper that is above the bowls surface.  The top right photo shows where about half of the copper has been removed.  This continues until the copper is flush with the bowl shown in the bottom left photo.  Sanding the bowl and polishing the copper is next using finer and finer grits ending up with 800 grit paper.  That’s been completed in the lower right photo that also has a red circle around the joint where the ends come together.

Here is what the small bowl looks like ready to have the base resized and hollowed out.  You can also see the pencil lines where it will be cut for the top and bottom.

Once hollowed out and the top rounded the bowl can be parted off like the others.  Here are all three of the walnut bowls ready to have their sacrificial bases cut off.

With three of the four sets ready to finish I decided to start applying the required four coats of lacquer to both the inside and out.  If the bowls were set on a flat surface and sprayed, they probably would get stuck to that surface.  Also, I have found that if there is space for free air flow around the piece being sprayed I get a better finish.  To get that simple cardboard stands are built to set the bowls on for spraying.  They are set on a lazy-susan which makes them easy to spray.  The top photo shows the one for the small bowl.  For stability cutoffs from when the initial square blocks were cut round get stapled to the cardboard.  The bottom photo shows the maple and cherry bowls with one coat of finish on the outside.

The setup for spraying the inside of the bowls is similar to the outside in that they are elevated up off the lazy-susan for spraying.  After the first coat the bowls are wet sanded with a 1,500 grit sanding pad to remove any dust and irregularities in the surface.  A photo does not show the difference after sanding but you sure can feel it.   Going forward my plan is to spray lacquer in the morning when it’s calm then do some wood turning in the afternoon after the lacquer has dried dust free ending the day with some cleanup so the spraying can continue the next morning.

Next Up – Adding the Turquoise Band to the Oak Bowls

Monday, June 10, 2024

Game Piece Holder – #7 Hollowing Out the Bowl, Competing the Base & a Problem

Hollowing the bowl out begins by trimming the top of the bowl almost to its final location.  I had left a little extra on both the top and bottom to give myself some room for error during the outside turning.  Once that’s done the ¼” wall thickness gets marked in pencil and the actual hollowing can begin.  Shown here is early on with only about half an inch in depth removed and the wall thickness just a shade thick.  You can still see just the tiniest bit of the pencil line on the inside of the rim.  As I near the bottom of the center hole it gets drilled ½” or so deeper and the hollowing process continues with me checking the wall thickness frequently. 

Progress continues until the desired depth is reached all the while frequently checking the wall thickness with an outside caliper.  When done the inside surface of the bowl needs to be free of any ribs or humps, just a smooth continuous curve from rim to bottom.  With that done the rim gets rounded then both the inside and outside are finish sanded up through 320 grit sandpaper.

Last bit of work at this stage is to cut off the bowl from the sacrificial base and that’s done in two steps.  First is using the parting tool a cut is made until there is only about a 1” diameter piece between the bowl and the sacrificial base.  This is then cut off using the back saw shown while the lathe turns at a slow speed.  The red arrow points to the 1” piece that was mentioned earlier.

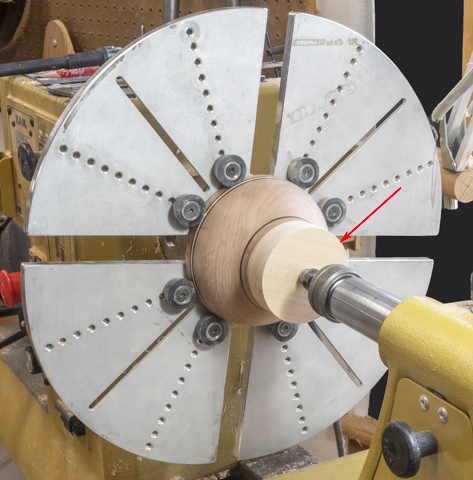
Last is to clean up the just cut base.  To do that the 4-jaw chuck gets a different set of jaws installed.  These are pretty large and imaginatively called jumbo jaws.  They have adjustable rubber bumpers to hold different size bowls in place and as you can see it is capable of holding much larger bowls.  Now there a restriction and some precautions to be taken when using this jaw set.  First, the instructions list a not to exceed speed of 600 RPM’s which is about half the speed I have been turning the bowls at.  Second, is to remember that this set of jaws uses rubber bumpers to hold the bowl in place rather than a set of steel jaws so the grip is going to be a lot less.  Last is when tightening these jaws down because the walls on the bowl are only ¼” thick and while I have not tried it, I do have a concern that too tight could crack the bowl.  To work around these constraints, I use freshly sharpened tools, a slower speed and a light touch with the end result shown.

Here in the top photo, you can see the small, medium and large maple bowls.  The bottom photo shows them stacked.  That’s three down and nine to go.  From here on my plans are to only show any differences in turning or when doing the feature elements of the bowls.

The next set to work on is the cherry.  One interesting aspect of this set is when hollowing out the bowl I cut through the layers that make up the feature ring and got these results part way through the three layers of the top feature.

All went well with the cherry set until I checked the depth of the large bowl I had hollowed out because I want to see how much there was for me to smooth out and cup the bottom after the sacrificial foot got cut off.  Much to my surprise and chagrin the bowl depth was about ½” too shallow.  Not a small error that I could let go and a potential disaster.  With the sacrificial food cut off there is no way to mount the bowl in the lathe to turn the inside of the bowl to its proper depth.  After an appropriate number of bad words I decided to make a new sacrificial foot then glue it on (red arrow).  Gluing the new foot in place using the lathe tailstock to center it should keep the bowl and new foot’s center lines aligned.  This way I can cut a new tenon concentric to the bowl, remount it in the 4-jaw chuck and finish the hollowing.  Fortunately, when cutting the old foot off I had left the bowl about 1/16” in long at the base.  This means that when the time comes, I should be able to cut off the new sacrificial foot and finish up with the bottom ending where planned.

Below the top left photo is after I cut the tenon that will go into the 4-jaw chuck so I can deepen the bowl’s interior.  The bottom left photo shows the jaws changed on the chuck with the piece flipped around and mounted in the chuck.  The open end is now ready for me to cut it down to its proper depth.  Once that’s done the bowl is parted off shown in the bottom right photo.  From this point on the bottom is finished just like the previous bowls.

Here are the finished cherry bowls.  In the photo you can see how the use of layers allows the feature ring to be seen inside and outside the bowl.

With half of the bowls turned and ready to finish I decided to clean the lathe area up a bit.  Here is the pile of shavings from the first six bowls.  It filled more than one 13-gallon kitchen garbage bag.

Starting on the next group I decided to try a different method of aligning the turning block with lathe’s central axis.  Where before I had used the corners as an alignment method this time, I used a dial indicator using it to make sure the face of the turning block is 90 degrees to the lathe’s axis.  Process is to eyeball block square then measure to see how much wobble is in the face.  Corrections are made until the wobble is down to a couple of thousandths.  The point of the live center in the tail stock is then run up against the block giving me a set point so the block can easily be reset to be in line with the lathe’s centerline and the turning can begin as before.

Next Up – Adding Copper Band to Walnut Bowls & Spraying Lacquer

Monday, June 3, 2024

Game Piece Holder – #6 Turning Reference Stick & Making Black Feature Lines

Next is to make the small maple bowl where I will show how the black lines are made.  Most of the process for turning the bowl is the same except for some changes to help speed up and improve accuracy of the layout.  This starts with me making a layout guide for the reference cuts for each sized bowl.  Since this is the small bowl the small layout guide is used.  In the photo below each graduated step is laid out with its corresponding cut depth.

Before I used a fractional caliper to frequently measure the depth of the cut until it got to the required depth which works OK.  However, this method can be prone to error since the measurements are almost all in 1/32” increments and the dial is only labeled every 1/8”.  This means every time a measurement was taken which is often as I got close to the final depth, I had to be careful to double check the reading.  While no errors were made it sure would have been easy to make one and with 12 of these bowls to make the odds of making an error are pretty good.  My solution is to switch from a fractional caliper to a digital caliper set to read in thousands of an inch.  One other change simplified me knowing how close I was to the final depth.  Rather than measure the depth of the cut then mentally subtract that number from the desired depth to get how much deeper the cut needed to be the caliper gets set to the desired depth then the readout is zeroed.  That’s been shown in the top photo.  The red arrow shows the line I will cut to and its depth now shows up on the caliper as a negative .656 inches.  Now when the cut is measured it will show how much deeper I have to go rather than how deep the cut is.  When it reaches zero it’s perfect but in practice, I will stop a few thousands short as a cushion.  You can always remove material but once it’s gone, it’s gone and that’s a problem.  The bottom photo shows the completed cut.  From here I work to the left cutting each step to the depth listed.  Process is a lot faster and easily more accurate with less chance of error.  Once all the slots are cut it’s the same process to blend and fair the outside profile.

Once the profile is done the feature black lines can be added.  That starts by measuring down from the where the finished top will be to the center line.  With that as a reference one line is added to either side.  Scoring the far left or top line is next shown in the top photo.  The scoring needs to be really accurate so there is virtually no room for error.  To help me out I put on my jeweler’s magnifying headset.  The right line gets scored next as shown in the bottom left photo.  Last is to cut the center one.  It’s done last so if either the left or right line scoring is slightly out of place then the center line can be adjusted so it looks centered.  If all is well the lines get cut deeper as shown in the bottom right photo.  If the spacing isn’t quite right some small adjustment can be done by nudging the cutting tool to the left or right to even the spacing out.

Making the just cut grooves black requires no special skill or exotic equipment.  The top photo shows what I use, a wire wrapped around a piece of wood and held at the other end with a pair of locking pliers.  To use the lathe is set at about 1,000 RPM’s depending on the diameter of the bowl.  The wire is then held in the groove and friction does the rest burning the groove black.  It may take a little practice to get evenly made lines but that’s all there is to it.  The bottom left photo shows the first line done and the right shows all three done.  Now there is a little yellowing on either side of the lines due to heat discoloration but that will get sanded away later in preparation for finishing.

Here are the medium and small maple bowls with the lines burned in.  The bottom line follows the same procedure as the top three with one exception.  When cutting the bottom line, the parting tool needs to be held at 90 degrees to the inside curve it is cutting into.  If you try and cut 90 degrees to the bowl’s center axis then the tool will skate down toward the bottom of bowl giving you a nice spiral cut.  With the lines cut there is still a lot to do starting with hollowing out the bowl but for now I am going to go ahead and turn the large maple bowl next so I have all three done.

After the large bowl’s profile is cut the next step is to start hollowing out the inside of the bowls.  This starts with turning a 2” diameter tenon (red arrow) on the bottom of the bowl.  The bowl shown is the large maple bowl but this process will be the same on all.

I don’t think that I have included much detail on the 4-jaw chuck used on the lathe so will give a brief bit now.  Up to now the small jaws have been used shown in the left photo.  In this case they go inside a hole in the top of the blank and are expanded to grip the inside of the hole.  When hollowing the bowl out the outside of the just cut tenon will be gripped by the medium set of jaws shown in the right photo.

Here is what the bowl with its tenon looks like held in place with the 4-jaw chuck.  Process is to lightly clamp the bowl in place then bring the live center that’s in the tail stock up to the center of the hole drilled in the top so the bowl’s axis is aligned with the lathe’s axis.

Next Up – Hollowing Out the Bowl, Competing the Base & a Problem