After the front piece is cut the long back brace piece is
next. It’s cut to height and longer than
needed since I don’t know yet where the right end of the collector will end
up. The vertical attachment point is
also made although for now it’s just roughly clamped in place. The final location shown here gets set once
the collector is completed.
Next the two sides of the collector’s dust chute on the
far right are cut out of ¼” plywood and screwed in place. These are a couple of pieces that got cut more
than once before I got everything square, aligned correctly and tight. Once they get fitted the left end piece is
made from ¾” plywood and screwed in place.
Here the top photo shows the back spacer with a hole in
it where the vacuum hose will get connected.
The spacer just adds some thickness to make the hose’s friction fit more
stable. It is glued and screwed on the
long back brace. Now, when initially
installed the long back brace did not have a hole. Once the glue cured a hole is drilled through
the spacer and the underlying long back piece.
Because I don’t have a bit the same size as the hose the closest smaller
bit got used followed by enlarging it with the oscillating drum sander. Also shown is a filler piece better shown in
the bottom photo which it taken with the collector upside down. The bevel on the left side of it goes up
against the rounded rotating part of the saw’s mechanism.
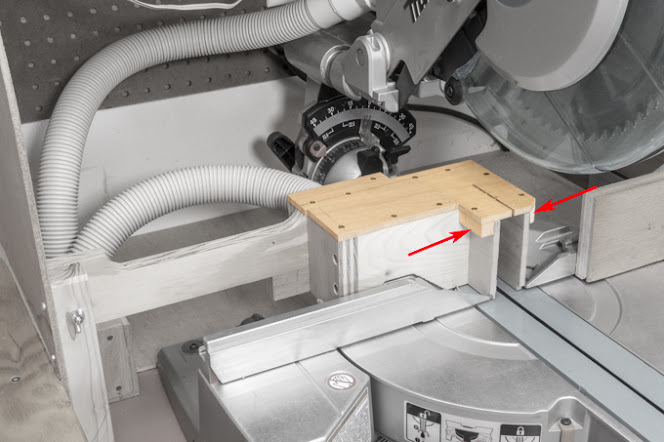
At this point the collector is mostly built except for a
couple of small braces that get glued to the left and right sides of the
collector’s dust chute (red arrows) plus the top which is screwed but not glued
in place.
Next, is a simple manifold built for the two hoses that
come off the chop saw. It also includes
a hole in its bottom and a connector for the HEPA vacuum hose. Speaking of the hoses, the ones that connect
the saw to the manifold came from an old hand-held vacuum that we hadn’t used
in years.
These two photos show how the vacuum is attached to the
PVC connector that comes out the bottom of the above manifold. In the center of the right photo there is an
electrical cord plugged into the vacuum.
That’s the power cord for the chop saw.
When the chop saw is started the vacuums senses that then turns itself
on. When the saw is stopped the vacuum runs
for another 15 seconds to clear the hoses of dust then shuts off.
Next is to make a connecter to go between the top dust
port and the hose. This is done using a
short section of PVC pipe turned down using the lathe so it fits inside the
dust port on the saw. The setup for
turning the piece on the lathe is shown in the top photo. The bottom photo shows it (red arrow) in
place along with a 45-degree PVC fitting and the hose all connected. On the back side of the saw there is a screw
that holds the PVC connector in place.
Last before final testing is to locate and attach the
vertical attachment point then add a bolt and wing nut that will hold
everything in place yet allow the dust collector to be easily removed when
rotating or tilting the saw.
With that done everything is all together and ready for
final testing. The first thing to do is
to make the blade relief cut through the top of the collector by bringing the
fully retracted saw down to make a full depth cut. The red arrow points to the completed cut in
the collector. 
Next is to start making test cuts to see if and how
everything works. The good news is that
most of the dust gets captured and sucked into the vacuum under the saw. I say most because there were some places
where the collector did not fit tight enough against the rotating part of the
saw and some sawdust was escaping out some pretty small gaps. Once identified those spaces get blocked with
some foam weatherstripping I had on hand.
The top photos below show views of the left and right sides of the
collector while the bottom one shows the underneath side of the collector. 
Once in place they blocked off the escaping sawdust and
the whole collector/vacuum assembly works really well. Depending on the cut the dust collection is
not 100% but I think better than 95% of it gets captured and am happy with
that. The photo below shows the finished
collector system done and in place with the left-hand adjustable fence removed
for clarity. I will say that having the
vacuum come on with the saw then run after for a bit is really nice since I
don’t have to remember to turn the vacuum on before making a cut.

No comments:
Post a Comment