
The three seat/back braces are made from 2x6 material
that starts by rough cutting them to length using the chop saw and a stop block
on the left so they are all the same size.
Care is taken during the layout to work around knots or any other
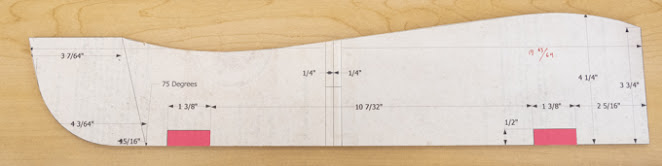
flaws. Since the finished pieces are 4¼” and
3” wide so there is some room for adjustment.

Running the blanks through the planer is next to remove
any cupping, clean up the rough construction lumber surface and bring them to
the desired 1 3/8” final thickness. All
told only about 1/16” is removed from each face. Here is the planer and vacuum setup. The planer makes a LOT of chips so using the
vacuum to collect them really helps keep the mess down.

From the planer the blanks are run through the table saw
to clean up and make parallel edges plus giving me my working width. Here’s the blanks along with the patterns
ready to go.

Next is to cut the half lap joints used to join the seat
and back braces together. That involves
cutting half way through the areas shown in red on the drawing below at a
75-degree angle to the straight base.

The miter fence is set to cut the 75-degree angle using
an adjustable triangle from my drafting days.
A stacked dado blade will be used to make the cut but the fence angle is
set with the regular saw blade in place since it gives me a bigger reference surface than the smaller dado blade.

This photo shows the cutting in progress. The 5/8” wide stacked dado is in place along
with a longer temporary fence and a stop block.

All of the parts got cut with no problems except
one. Here in the top photo, you can see
after the dado had been cut a hidden crack was exposed. Not at all what I wanted to see. In some cases where the part is hidden or
lightly stressed, I probably would not have been too concerned. However, this is a critical joint where the
seat and back come together so it’s a problem that had to be addressed. My solution is to fill the crack with 2-part
epoxy which is shown in the bottom photo.

There is one last little bit of work to do on the just
cut dados. They are not as smooth as I
would like for a structural joint like these that get glued together. You can see what I mean in the top board’s
dado cut joint. That can be easily
resolved so the surface looks like the bottom board. The fix is to use the dado blade to cut
sideways removing the roughness.

To do that the board is set so the high point of the
blade is in line with the face of the cut as shown below. The saw is turned on and the board is slid
toward the stop block and back. The
board is advanced forward a little and another pass is made. This process is repeated with the fence
moving forward a little at a time until the whole joint has been surfaced
smooth.

Once the epoxy in the cracked board had cured overnight
the same process cleaned up the epoxy leaving a nice smooth surface ready for
gluing.

With both halves of the half lap joint smoothed it’s time
for a test fit and as shown here everything matches up. The joints are tight on both sides and the
angle is dead on.

Before the seat/back braces get assembled two dados need
to be cut in the seat brace for the cross supports. They are shown here on the pattern
highlighted in red.
To get their exact width I need to cut two 2x4’s down to
the rough length and straighten them since they both had a bit of a bow. Last to get rid of a tiny cup plus clean up
the faces by running them through the planer. Actual process is to cut to rough length then using an 8’ level is used
as a reference edge create a straight edge.
The new edge is then set against the level and the first edge cut
straight. The important thing to
remember is to cut the crown of the bow first. With that done they can be run through the planer until the faces are flat followed by measuring their thickness and using that for the dado width. That ended up being about 1/32” over the 1
3/8” planned.

The dados are cut with a 5/8” wide stacked dado blade in
three passes, here is the setup with the first cut made near the right end of
the piece. Clamped to the table saw rip
fence is a stop block that controls the location of the cut. The seat brace with a backer board prevents the dado blade from chipping the backside of the brace when it exits the cut
are clamped to the saws miter fence. In
use a cut is made through each of the seat braces then the rip fence is
adjusted to take another cut widening the dado to just under 1¼”. The third and last cut is a bit of trial and
error so the dado just fits the cross support.

Shaping the curved sections of the braces are next. This is the top of the back brace after using
the band saw to cut about 1/16” wide of the line.

To bring the cut down to the line and finish the curve a
pattern cutting bit is used in the router table. The key to making this work is a router bit
that has a bearing at its top that follows the pattern cutting a finished
surface that perfectly matches the pattern.
After the pattern is attached to the rough-cut back brace with double
faced tape the brace’s bandsawn edge gets routed giving the surface shown.

Next Up – Assembling Seat/Back Braces & Seat Slat Preparation
No comments:
Post a Comment