
Making the drawer is next and here I decided to make a
change in the plans. Originally the
drawer was to have ridden on the guides I had just finished. That version is shown in the drawing below.
However, in thinking about the amount of use it would get
I changed the wooden guides to full extension steel guides. The revised drawing is below and the only
change is the drawer is an inch narrower to allow for the slides. Other than the dovetail joint where the front
and the sides come together the construction is pretty straightforward. I am using dovetails at the front for a
couple of reasons. Since the front to
side joint gets the most stress when the drawer is opened and closed a strong
joint is needed. Because of the way a
dovetail joint is shaped it has a mechanical strength and does not rely on glue
alone to hold it together. The other
reason is I like the way they look.
Since the back to side joint is not really stressed it will be a simple
dado.
Selecting the wood is next. The selection got narrowed down to three choices. In the photo below the left two pieces are red oak and the right one is maple. The maple got eliminated as this is a pretty good size board and I wanted to save it for something larger than a single drawer. That left the two oak pieces. I decided on the far-left piece since it is the lighter of the two and I wanted the drawer to be light in color.

The process starts by cutting the front, back and sides
to rough length and width. From there
the pieces are run through the thickness sander to remove planer scallops,
flatten and get a smooth working face.
Here one of the pieces has just come out of the sander ready for the
next step.
Since the drawer frame is ½” thick and the oak is 13/16”
thick it has to be brought down. There
are three possible ways to do that.
Running it through the planer or sander converts over ¼” of the boards
to chips and in my opinion is just a waste.
I prefer to cut close to final thickness and save the thinner pieces for
something else. Here is the bandsaw
setup used to rip the oak down to about 3/32” oversize.
After ripping it's back to the thickness sander now loaded
with 36 grit paper. This photo shows the
bandsawn faces ready to be smoothed out in the sander. A couple of passes with the 36 grit gets rid
of 90% of the roughness. 
Finer grits are used to quickly smooth the pieces ending
up with ½” thick blanks. The ½” is not
absolutely critical but having it accurate will make things simpler when sizing
the length and width of the drawer. As
you can see there are six pieces of wood here.
Four oak pieces for the drawer frame plus two others the same thicknessbut
are pine. They will be used as test
subjects when I do machine setups. Last,
the pieces are ripped to width. Cutting
to length comes a bit later after the first set of dovetails are made.
This is the jig I use to cut dovetails. The thing that sold me on this jig is the
spacing of the dovetails is variable.
They can be adjusted for just about any height drawer and their spacing
can vary within the joint’s width. On
the left set vertically into the jig is the test drawer side. 
Using this jig produces really good results but it does
take some time to set up and adjust to make good fitting tight joints. I will hit the high points of the setup to
give an idea of how it operates. Because
of the close tolerances when making the joint the router bits need to be dead
center in the router's bushing. The bushing is
centered using a steel rod which is ¼” on one end and ½” on the other with a
taper where the two meet. The router
base is loosened the rod mounted in the router collet and the base adjusted so
the taper is snug against the brass bushing centering it in line with the
router shaft. The base is tightened down
and the rod removed. The left photo
shows the whole router and the right one shows a close-up of the centering rod.
The correct sized dovetail bit is installed in the router
followed by setting the router on the jig between its guide fingers. The depth of cut is adjusted to just remove a
line that’s the thickness of the drawer frame plus just a smidge, here that’s a
fat ½”.
Here the router is set on the jig, the test side piece
clamped in place with everything ready to cut the dovetail tails.
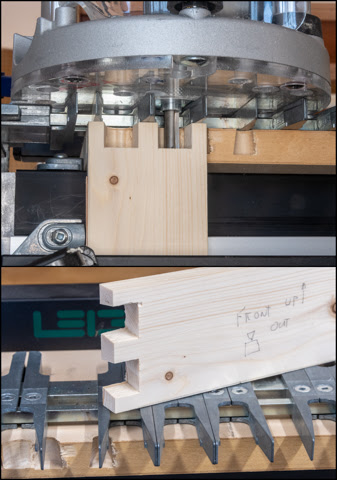
This is a close-up of after the tails have been cut and
the test side removed from the jig to show how the tails look. Their depth is checked to see that they are
just a little deep and adjusted as necessary.
That little extra allows for the tails to be sanded flush with the front
since it’s easier to sand the tails down to the front versus sanding the whole
front down to the tails.

Making the pins starts the same as the tails by centering
the base on the router and installing the appropriate bit. In my case it’s in a second router so if
adjustments need to be made, I can make them independent of each other without
having to go through the whole setup process.
Below is the setup for the second cut or the pins.
After a few tiny adjustments to the jig position and
cutter depth here is what the finished assembled joint looks like. A nice snug fit with the board ends just
barely long. The time required to do the
setup to make just two joints for the front of the drawer is not a really
efficient use of time. If I were doing a
whole set of drawers then that would be a different story as once it is set up
the actual cutting goes really quick.
However, I made the joints with the jig because the results are better
than if I hand cut them and I have plenty of time to work on the project.
Next Up – Drawer Part 2
No comments:
Post a Comment