Router Plane

Monday, February 15, 2016

Shaker Oval Box – #3 Cutting Tails, Tapering, Anvil & Soaking Pan

Now that I had the band cut to width I could start on cutting the tails.  I started by clamping the band and template to the workbench then using my “drill” I marked where all the tacks would go.  It’s pretty simple, clamp the drill using locking pliers, insert in tack hole and tap with a hammer to mark. 
Marking Tack Locations

The first time I made the body band I went from marking the holes to cutting out the tails to drilling the holes on the drill press.  There was a problem with this sequence since the holes are not drilled but the nail makes a hole into the wood by spreading the wood fibers versus a drill removing material to make a hole.  That process worked on all the holes except for the ones at the very end of the tails.  The wood is so narrow there that my home made drill acted like a wedge and split each one when I drilled it.  I was not happy but could fix it with some waterproof glue.  I had to use waterproof glue since these pieces are going to be soaked in hot water in preparation for bending.  Adjusting the sequence to marking the holes, drilling them and then cutting the tails worked just fine.

Drilling Tack Pilot Holes

Since the band is only 1/16” thick can cut them using a utility knife with a sharp blade.  Borrowing a practice used in the kitchen to keep a keen edge I use a sharpening steel in this case the tool I use to put a hook on my scraper.  Honing the blade frequently while making the cuts really helps keep a good edge.

I had thought about using the template to draw the outline then follow the line freehand but a better process is to use the template as a guide for my knife.  Here a shot of me carefully using the template to guide the knife. 

Starting Cut for Tails

A light first pass sets the cut in it’s proper place.  Several more passes are made each one gradually cutting deeper until the piece pops free.  Some light sanding to clean up the cut edge and this end is ready.
Cut Tails, Template & Waste

With the tails cut I sanded the faces smooth.  Even though I had changed the sandpaper in the thickness sander to 220 grit for the final pass there was still some sanding grooves that needed to be removed by hand sanding.  Here is a before and after shot of the band for the lid.  For scale just remember the holes in the band are less than 5 hundredths of an inch across.
Before & After Final Sanding

On the other end I need to add a taper over a distance equal to the length between the first row of tacks and the end of the tails.  This taper provides a smooth transition on the inside of the box and lid.  
Setup for Making Taper

The easiest way to make the taper is on a belt sander or it would be if I had one, unfortunately I do not.  I tried my disk sander and that turned out awful.  From there I then went on to try a variety of tools including different hand planes and a spokeshave none of which worked.   The piece of cherry I was working with had the grain was running the wrong direction to plane so no luck there. 
Tools That Did Not Work


I finally ended up using a rasp for the bulk of the material removal followed up with sandpaper.  The sandpaper is from my random orbital sander which uses a hook and loop (Velcro) for attachment.  I took a piece of MDF the same size as the sander then applied the self-stick hook half to make a sanding block.  This way I had a nice flat fairly hard surface to use for sanding.
Items Used to Make Taper

Here is a side shot of the piece marked and clamped in place ready for me to taper.  For this size box, a number 4 the taper will go from zero at the end to the full 1/16“ over the 2¾“ length.
Edge View of Area to be Tapered

Process is to start with the rasp to take off most of the material.  As I get fairly close to being done I will chalk the surface so that I can easily see how far my cut has progress along the taper length.  Keeping an eye on the taper distance and the end thickness I can make adjustments to my cutting as needed.  

When I get close to being done I switch to the sanding block and a fairly coarse paper to remove the rasp marks then working through finer grits ending up with 220 grit to finish the taper.
Completed Taper

The boxes are held together with copper tacks that for added holding ability are clinched on the backside.  To make this work I needed to put together a simple anvil that will bend and clinch the tacks as they are driven in.   The solution is to take a length of plywood then bolt a 9” long by 1” diameter piece of galvanized pipe to it and screw that on a length of plywood so I can clamp the whole assembly to the workbench.

Anvil for Clinching Tacks

By now you would think I have everything to actually build the body of the box:
  • A form to wrap the body around
  • Plugs to keep the body’s shape right
  • A drill to bore the holes for the tacks
  • Templates for the tails on the end of the pieces
  • Copper tacks and the anvil for clinching them
  • Cherry 1/16” thick for the body the right length and width with tails cut and holes on one end for the tacks with a taper on the other end.

Well there is one more thing I need and that’s a pan to hold the boiling water so I can soak the cherry bands so they will be flexible enough to wrap around the form without splitting.  I don’t know about most people but we have a distinct lack of available pans 4” wide, 30” long and 2” deep for that purpose.  Even if we did I suspect that my wife would take a dim view of me using a kitchen pan to soak wood.  You can buy a copper pan for $140 or a galvanized steel one for $48 but as I said before I don’t plan on going into production of these boxes.  As such I did not want to invest in specialized equipment unless absolutely necessary so I needed to look for another solution. 


Next Up – Soaking Box, Bending, Tacking & Fitting Bottom

Monday, February 8, 2016

Shaker Oval Box – #2 Making Templates and a “Drill”

Tail Pattern with Tack Locations

With the banding blanks made I needed to make two templates for each size box.  One for the body band and one for the lid band.  From the drawing I did in SketchUp I printed out a full scale sheet showing just the ends.

Next was to glue them to some thin plywood, cut them to proper width and start cutting curves with a fine tooth coping saw.  I tried gluing the paper to the plywood precut to the exact width needed and found that it’s pretty easy for the pattern to shift a bit.  For me it ended up easier to glue the pattern onto a slightly oversize piece of plywood then cut it to the final width.

Coping Saw Used for Cutting Tails & Files Used for Shaping

The outside arcs are easy to smooth out and take down to the line, I just used the oscillating drum sander.


However, the interior arcs are not near as easy.  They required all sorts of different size and shape files plus sandpaper to smooth out the cut and bring the edge right down to the line.  Once I was all done I traced the pattern onto a sheet of paper, flipped the pattern over and traced the pattern a second time over the first pass.  If everything is symmetrical the tracings will line up if not, then some work needs to be done.  I was lucky and the pattern only needed a little cleanup to match.

Completed Pattern #4 Box

With the patterns cut out I just needed one more step to complete them.  I had to drill holes where the copper tacks go.  These tacks, not glue are what hold the body and lid together.  They are really quite small, right at 3/16” long with a head only about 1/16” across.  I am afraid that when it comes time to put them in the finger shown here could be in for some mashing.
Copper Tacks Used to Fasten Boxes Together

Because the tacks are fairly small the pilot hole for them is only about 3/64”.  I don’t have a drill bit that small and if I did I could not put it in my drill because the smallest bit the chuck can hold is 1/16”.  I could get that size bit for my Dremel tool but it comes in a set that duplicates what I already have except for two bits plus I would have to buy a chuck for the Dremel tool to hold the bit since I do not have one.   

Because the material is so thin and the hole so small I chose to approach the problem from a slightly different perspective.  Since I am not going into production building these boxes I decided to make a substitute for the bit starting with a nail that was large enough I could mount it in the chuck I had.  Here is what I ended up with and the nail I started with.
"Drill" & Nail Blank

It’s a relatively simple process to make the “bit” although on a small scale.  I take the nail in this case a hardened panel nail cut off the head and put it in a chuck mounted in the lathe.


With the nail securely mounted I took a fine file and started working the diameter down from about 1/16” to my goal of .046” measuring with the digital caliper as I go.
Completed "Drill"

Drilling Locating Holes with Drill Press
With my “bit” done I chucked it up in the drill press and drilled the locating holes in the templates.  I have to say the holes are not really drilled but more like the nail spins a hole into the wood spreading the wood fibers versus a drill that removes material to make a hole.

Now it’s back to working on the thin wood pieces for the body and the top.  The blanks had set for a few days and there was no sign of warping, twisting, or cupping so I was good to proceed.  I changed the belt in the thickness sander from the 120 grit I used to flatten the pieces to 220 grit for a smoother surface then ran them through removing just enough to get them down to the final thickness of just a smidge over 1/16”.

Measuring Body Blank for Thickness

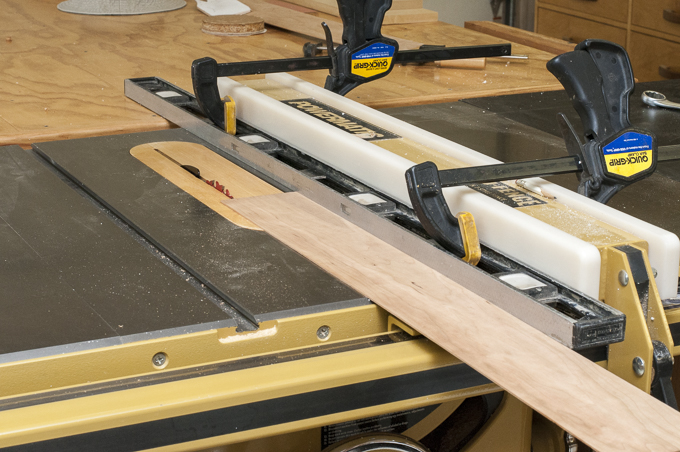
The next step is to cut the pieces to width on the table saw.  I use a narrow kerf rip blade for sawing to reduce the cutting force on the pieces.  I was concerned that with them being so thin if I used a regular width blade I might have a problem with chip out or worse.   Because there is a slight gap between the bottom of the rip fence and the table saw top the thin blank could slide under the fence.  To get around this I need to add a secondary fence that fits tight to the table top.  My solution is to clamp a four-foot level to the fence.  With that in place I could safely rip the pieces to the final desired width.

Table Saw Setup for Ripping Pieces to Width


Next Up – Cutting Tails, Tapering, Anvil & the Soaking Box

Monday, February 1, 2016

Shaker Oval Box - #1 The Start

With the drum project complete I took a more detailed look at what would be required to build one of these small boxes and decided to try my hand at building one.  It’s small, does not use a lot of material and will give me some more experience in bending wood.  I hope to end up with something similar to this.

Oval Shaker Box
First, a little history on The United Society of Believers in Christ’s Second Appearing better known as  the Shakers.  They were a religious group that peaked in the mid 1800’s.  Their guiding principles of honesty, utility, and simplicity found expression in various crafts: furniture, boxes. and textiles.  These items are well-known for their minimalist design and meticulous quality.  Rejecting excessive ornament because it encouraged the sin of pride, Shaker furniture makers focused on overall form and proportions, developing solutions such as asymmetrical drawer arrangements and multipurpose forms to add visual interest without resorting to pure decoration.  Put another way, “Don’t make something unless it is both necessary and useful; but if it is both necessary and useful, don’t hesitate to make it beautiful.”

My first step is to open SketchUp and draw up the two sizes of boxes I plan on making, number 3 and 4 size boxes.  The number 3 box is roughly 4 ½” by 7” and 2 ½” deep while the number 4 box is roughly 5 ½” by 8 ¼” and 3 1/16” deep.
Plans for Boxes

With the drawing done I printed out a full scale plot of the box body and glued it to a blank I had laminated up out of scrap construction lumber.  This will be the form used to wrap the body of the box around.
#4 Box Body Form Ready to Cut on Bandsaw

Next is to cut that blank out on the bandsaw to a close rough shape then use the disk sander to take it down to the finished size.
Cleaning up Bandsaw cut on Disk Sander

With the form complete I can move onto the plugs.  These are tapered forms slightly larger than the body form and are used to hold the body in the oval shape while allowing air circulation during the time required for drying.  I trace the body form onto a couple pieces of plywood then cut them out on the bandsaw.  So they will act as a plug I put a 10-degree taper on the edges using the disk sander.
Tapering Edges of Plugs

When done I have a pair of plugs one for the bottom and one for the top.
Completed Top and Bottom Plugs

With the body form and the two plugs done I can go on to cutting the thin pieces that will form the sides of the box and its lid.  From my research it seems like the two primary woods the Shakers used for the boxes are maple and cherry.  Based on that I went into my stash of wood to see what I had in the right width and length in those two species.   As luck would have it I came across a piece of cherry that was the right width and only a couple of inches longer that what I needed.

After checking to make sure the piece was straight and flat I used my marking gauge make a cut line 1/8” from the edge.  This takes into account the saw kerf and the required extra thickness for flattening the cut surface in the thickness sander.  When I am done the pieces will end up right at 1/16”.

Using Marking Gauge to Layout Cuts
Here I have set up the bandsaw and am ready to make the cut.  The yellow and black gizmo on the right is a magnetic tool whose purpose is to apply constant pressure against the board holding it tight and square to the fence.

Once cut I smooth the bandsawn face and take the pieces down to just slightly thicker than the 1/16” I want them to end up using the thickness sander.  I will let them set for a few days to see if they stay flat or if there is any warpage. 


Out of the ¾“ thick piece I started with I ended up with 5 blanks.


Next Up – Making templates and a “Drill”

Monday, January 11, 2016

Snare Drum – Segment Cutoff & Pen

As I cut the segments from the blanks I ended up with a short piece just over a couple inches long that got tossed in the scrap pile.  Along toward the end of the project it occurred to me that it might just be long enough to make into a pen.  Something that looked like this.
Example of Wood Body Fountain Pen


A quick measurement confirmed that there was enough material for it to work out just right.  To start, I marked where the piece would be needed to be cut in half to give me the top and bottom parts of the pen. 
Pen Blank Marked for Cutting

I used a bandsaw to cut to make the cut for a couple of reasons.  First, the piece was not wide enough to take into account the saw kerf using a table saw, even with a narrow kerf blade.   Second the piece is only a couple inches long and as far as I am concerned that’s pushing it for a safe length to cut on the table saw.  A bandsaw has a narrower cut and I could easily use a clamp to keep my keep my fingers away from the blade.

Using Bandsaw to Cut Blanks to Width

With the piece cut I could move on to drilling the holes lengthwise down through each of the two pieces that will make up the pen body.  The holes need to be drilled pretty much down the center axis of the blank so for me that eliminates drilling them by hand.  You can use a guide or in my case the drill press.  I set the blank square in a clamp and drill the hole.  

If everything is set up square and if the bit does not wander off on its own you end up with the hole centered in the blank.  The photos below show the top and bottom of the blank with the hole pretty well centered.
Drill Press Setup for  Drilling & Completed Blank

I set aside the blanks for just a bit to prepare the brass tubes that will get glued inside the blanks.  To insure a good glue bond I use some steel wool and buff them to remove any oxidation.  With the tubes cleaned I mixed up some epoxy and glue them inside the blanks. 

Brass Tubes After & Before Removing Oxidized Surface Plus Tube Glued in Blank

After the epoxy has set up I use a small trimming tool to cut a smooth surface square with the tube axis.  I need this flat true surface for turning.
Trimmer and Trimmed Blank

With the ends cut true I can mount the blanks on a mandrel along with the sizing bushings, put that in the lathe and start turning the blanks to a cylinder.
Left Side Partially Turned & Right Side Unturned

More turning, some finish sanding and I am almost ready to apply the finish.  
Both Halves Turned

For the finish I decided to use the same gloss lacquer I used for the drum.  There are other ways to finish pens but in this case I wanted the finish on the pen to exactly match the drum.  Why will become clear later.  I hauled out the repaired air-brush and gave the pieces several coats of lacquer.  After letting them cure for a week I buffed them out the same way as I did the drum and was ready to put all the pieces together.

Finishing of Blanks in Progress
Here are the blanks still mounted on the mandrel with the pen parts laid out in the order they will be when the pen is assembled.  Note the right blank has a small section of the wood removed down to the brass tube.  This last bit of turning was done after the finish was applied.
Ready to Assemble

The assembly consists of mostly press fit or interference connections.  This is where the piece being installed is a teeny bit larger than the hole it’s going in.  To get the pieces to go together requires some force.  I suppose you could line up the two parts and give one a good whack with a hammer to drive it in place.  However, when putting these small pieces together I doubt the results would be as desired.  My preference is to use a hand clamp, in this case the same one that I used to hold the blank while bandsawing it in half. 
Setup for  Assembling Press Fit

With the clamp I can take my time to line everything up and gradually, in a controlled manner apply just enough pressure to push the parts together.

Completed Press Fit


Once all the parts are in place you end up with a screw-on top fountain pen.  Unknown to the client when the drum was packed up for shipping I put the pen in along with it as a little extra surprise when he unpacks the box.  Now you know the reason I wanted the finish to match.
Completed Pen
With this project all done I will take a closer look at the Shaker Oval Box from Fine Woodworking to see if it is something I want to pursue.


Monday, January 4, 2016

Snare Drum – Finishing & Another Problem

Now that I had the woodworking done I could start on the finishing.  Since I was going to use gloss instrument grade nitrocellulose lacquer for a finish I had two choices for application.  My small air brush and the larger HVLP setup.  With the HVLP gun I could probably put down a layer of lacquer on the whole drum inside and out in about 15 seconds or less.  What I was concerned about was the lack of access in spraying the inside.  I was afraid that because the finish goes on so quick I would have a high likelihood of uneven coverage and runs.  Also, cleaning the HVLP gun takes way more thinner and time than the airbrush.  In the end I thought a little extra time in application was a good trade-off for control and ease of cleanup.  However, before I could start spraying I needed to clean up the sawdust in the shop and build a rig to hold the drum for spraying.  This is what I ended up with, plenty of space to move around and a couple task lights so I could see what I was doing.

Rig for Spraying
 I started with two coats of vinyl sanding sealer formulated for the lacquer I was using.  Process is to spray the inside first off the finishing rig with the shell on edge rotating as I spray.  With the lights set just right I can easily see the wet edge of where I have applied finish.  When the inside is done I hang the drum in the finishing rig, reset the lights and apply a coat of finish to the outside. 
 
Shell with 1 Coat of Sanding Sealer
With both sealer coats applied and wet sanded to remove any dust nibs or other debris that may have gotten into the finish I was ready to start applying the gloss lacquer. 

Shell Ready for Gloss Lacquer

After 4 coats of gloss lacquer the finish has good build some depth and a good gloss.  I have one more build coat then a flash coat that is 20% lacquer and 80% thinner.  You can see the airbrush below the shell in the lower left background.

Shell with 4 Build Coats


While I was spraying the last build coat on the interior about 2” from being done I noticed some drops on the surface I had yet to spray.  Thinking they were some stray water drops I had missed from when I wet sanded I wiped them off.  Much to my surprise and chagrin they were lacquer and wiping them off had created a major problem with the finish.  The solvent in the drops had softened nearly all the previous coats I had so carefully applied and when I wiped them up off came 3 of the 6 coats of finish.  Later I found that what had happened was a gasket on the airbrush had broken which allowed a small leak that dripped those half a dozen drops across the surface.  I was so honked off I tried to fix the problem right away and of course only made it worse.  Now I had pits in the finish like craters in the moon, well it seemed that way to me.  In reality they were all confined to about an inch square and were only a few thousands of an inch deep.  That said, I was highly teed off.  At this point the best thing to do is quit for a while, so I did.  The next day when the finish had cured some I cleaned up the area with a hand scraper then used a pipette to add about 6 layers of finish to the divots bringing them a little proud of the surrounding surface.
Finish Repair in Progress
When they had cured I cut them down so they were smooth with the neighboring surface and applied a blending coat of finish.  A little more sanding to merge the repair and another blending coat fixed the problem.  All said and done the repair took the better part of a day and is invisible.  Though, at the time it happened there were some heated bad words directed at my airbrush.
Completed Finish Repair

With the repair done I continued on and gave the outside and inside the final flash coat.  The flash coat is a lacquer/thinner mix using much more thinner than normal.  The mix is about 80% thinner and 20% lacquer.  Checking the next day there were a few of the inevitable dust nibs in the surface.  Rather than try and get them out now I decided to wait and let the lacquer harden for 5 days before I did anything.

After waiting for the lacquer to cure I started the finishing the finish process by using 12,000 grit wet sand paper to very gently rub out the few dust nibs.  The next step is to mount a buffing wheel on the lathe and using a very fine polish work the surface until it is just glass smooth.  Last step is to change the wheel and use it to apply Carnauba wax. 
Buffing Wheel on Lathe

One thing that I learned some time ago when I first started doing the buffing process is that a piece of dry lacquered wood held against a rapidly rotating cloth wheel in a dry climate produces a whole LOT of static electricity.  Can you say Van de Graaff generator?  Nothing like getting blasted by a good sized static electrical charge every 10 seconds.  To keep this from happening I found the easiest way to keep the charge from building up was to ground myself.   Pretty simple in the summer, use the buffing wheels barefooted.  However, in December it’s a little too cool for that so just keeping some bare skin against an unpainted surface on the lathe does the trick.  Not high-tech but effective.


With the shell done I signed the piece and got all the hardware out ready for final assembly.
All the Drum Parts Ready For Assembly

Putting all the pieces on took maybe 45 minutes and when done here was the result.  I did not go through the tuning and head setup process but just tightened down the heads finger tight plus half a turn.  Even then it sounded pretty good to me.  Final conditioning of the heads, setup and tuning will be done by the client to suit his style and needs.
 
Completed Drum
My total time on this project was about 10 hours for design, 63 hours for woodworking and another 12 hours for finishing.  Not included are any of the teleconferencing discussions with the client.  This has been a great project; a bit different, challenging, learning something I did not know a lot about and ending up with a piece I was really happy with.  
Leopardwood Scrap

As to what’s next, there are two things.  First, I have a leftover scrap cutoff from one of the Leopardwood blanks that is just the right length to use in making the body for a fountain pen so I think I will do that.  Second, I saw an article in Fine Woodworking on Oval Shaker Boxes that looks interesting…. 


Next Up – Segment Cutoff & Pen