This project is certainly going to fall under the category of “& Things” in my blog and covers the method I used to refurbish our oldest car's front plastic headlight assembly lenses. Before working on them they looked more like frosted glass than a clear lens. First some background, the car the work will be done to is a 2007 Toyota Camry that we got in the fall of 2006 which at the time of writing this is coming up on 18 years old and has about 112,000 miles on it.
Since replacing the lens is costly, I looked at various different kits for the work and most of them that looked to be effective used the same basic process of sanding the lens and then applying a coat of UV blocker over the refurbished lens. Some of the kits had only two grits a coarse and fine while others had 3-5 grits. One kit had just 320 grit and 2,000 grit. Now I have done enough sanding on wood for preparation to applying a finish like lacquer or polyurethane and on the buffing of the final coat that making a jump in grits like that is a bad idea. To me it seems like an awful lot of time would be spent removing the initial scratches from the 320 grit paper with the 2,000 grit. You are either going to spend forever with the fine grit or give up before the lens looks really clear and not scratched. To do the work efficiently and end up with good results I think it’s going to take a lot more intermediate sanding grits to get a clear lens.
Now I just happen to have a wide variety of wet/dry sandpaper and sanding pads ranging from 100 grit to 12,000 so my plan is to use them to see what kind of results are obtained. If the results give me a nice clear lens then I will get some UV blocker to finish them off.
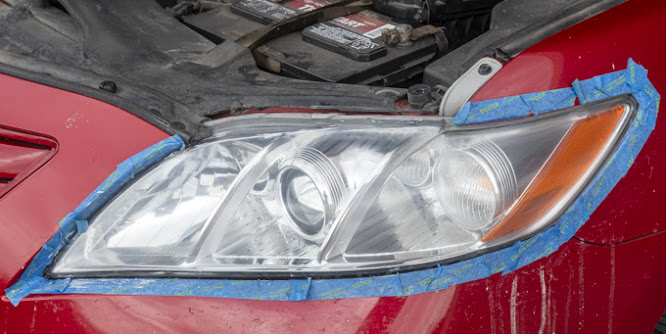
Here is what the lens looked like before I started with
the edges masked off. The masking is
done so when I am sanding and invariably sand a little beyond the lens the body
paint will not get scratched.
The first and coarsest grit is used to get rid of all the
degraded plastic on the lens, clean the surface and establish a base scratch
pattern. All of the sanding is done
using water as a lubricant and to keep the paper from loading up with
plastic. Given the lens condition I
decided to start the wet sanding with a silicon-carbide 320 grit
sandpaper. If the lenses had been in a
little worse condition, I would have started with 220 grit. This is what the lens looks like when
done. It ended up taking about 15
minutes which was the longest of any of the papers. Note that the scratch pattern from sanding
runs left to right. This will come into
play when I sand with the next grit.
Using a finer 400 grit paper I sanded up and down until
all the horizontal scratches from the 320 sanding were gone. The bottom left photo shows the 320 grit
scratch pattern and the right photo has been vertically sanded with 400. The vertical scratch pattern does not show in
the photo as well as it did in real life but you get the idea. 
The process gets repeated with 600, 800, 1200, 1500 and
1800 which is the finest of my silicon sheet sand paper. Going through all these grits didn’t take too
long, probably less than two minutes each which includes drying the lens and
checking the scratch patterns plus touching up any missed spots to make sure
all the previous grit’s pattern had been removed. At this point the lens while cloudy is a lot
clearer than after the initial 320 grit.
Switching from sheets to foam backed pad grits starts
with 2400 grit. I use these pads when
sanding film finishes like lacquer or polyurethane between coats. The same process of wet sanding is used for
3200, 3600 and 4000 with the 4000 grit shown below.
This is right at the end of where the lens looks cloudy. As I move on to finer grits the lens becomes
increasingly clear.
After 4000 grit comes 6000, 8000 and the last sanding pad
of 12000 shown below with each step making the lens noticeably clearer.
The last step before spraying on the UV blocker is to use
a very fine plastic polish. A small
amount is put on the lens then a soft cotton cloth is used to rub out the
remaining fine scratches which really improves the lens’s clarity. At this point I removed the masking around
the lens because it got beat up during the sanding process and I was waiting
for the UB blocker to arrive.
Once the UV blocker arrived the headlight lens gets
masked off. A much larger area gets
masked this time because I did not want to have any overspray of the UV blocker
onto the car’s paint.
The UV blocker I used requires two coats which besides
adding UV protection also made a noticeable improvement in the clarity of the
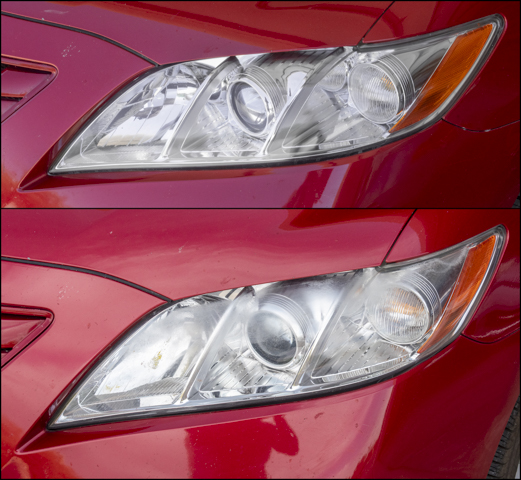
lens. The top photo shows the completed
process while the bottom photo is the “before” photo. Total time spent sanding and polishing each
of the lenses was about 40-50 minutes.
For spraying the UV blocker it took longer to mask of the headlight than
to spray.
While the lenses look 99% brand new the question is how long will they stay that way? Only time will tell and my plan is to add a comment in about 6 months with an update on how they look.
January 6, 2025 Update
About 6 months after completing the work I can see no sign of of any hazing and the lenses look just the way they did when I finished the work


