Router Plane

Friday, December 22, 2017

Wood Balls, Mallet & Overlapping Circles - #5a Christmas Gifts

I know in the last post I said that this post is supposed to be Finishing the Mallets but as often happens things change.  It’s getting close to Christmas and my wife said we need some gifts for friends.  After thinking a bit I decided to make some refrigerator magnets.  It is something that appears to be in universal use.

I really wanted to use something a little different that a plain block of wood and in looking around came across a cutoff from the Maloof rocker I made a few years ago.  It was from the rocker runner itself and is a curved laminated piece made out of 5 layers of cherry, a layer of katlox then 4 more layers of cherry.  Just to make it more interesting I decided to make a couple of them with the laminations running at a 45-degree angle. 

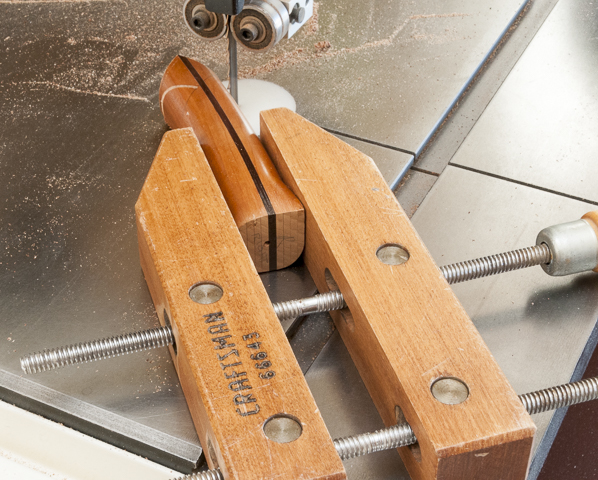
Because the runner is curved and rounded I wanted to clamp it in place to keep my fingers away from the bandsaw blade.  The top photo below shows the setup to cut a 45-degree angle to form the base of the blank.  The bottom photo shows the blank flipped over and set for the second 45-degree cut which will give me a 90-degree corner.

Changing to a hand screw clamp to get better access I made two more 45-degree cuts to give me my blank ready to turn. 


This is the blank with the rough outline of the base in pencil.  You can see the laminations running diagonally through the blank.


Next is to drill a pilot hole in the center of the blank.  The green tape acts as my depth gauge.  I have a set of stops I can attach to drill bits but seldom use them.  They are for a handful of sizes and I seem to always use sizes not in the set.

After the pilot hole is drilled I change bits to a Fostner bit.  This type of bit gives me a flat bottom hole.  I need that for the magnet to sit in.  Speaking of magnets, I really don’t like the refrigerator magnets that have a hard time holding up anything heavier than a single sheet of paper.  To solve that I use a ½” rare earth magnet set in a steel cup to focus the magnetic field.  Also, when drilling the hole, I go just a hair deep so when the cup and magnet are set in place they are below the edge of the wood.  That’s to provide a buffer space so the magnet or steel cup won’t scratch the refrigerator.  The inset shows what the rare earth magnet and its cup look like.

The blank can now be mounted on the lathe.  To mount I made a fixture that gets mounted in the scroll chuck, this is a section drawing.  It’s just a piece of wood turned round with a deep countersink and a pilot hole that a round head screw goes through.  For correct registration to the jaws the piece has numbers that match the jaw number. 

Here the blank in place on the fixture mounted in the lathe ready to turn.  I know the shape of the blank looks a little funny but that's because it is cut on the diagonal, partially round in one axis and more or less square in the other two.


Using a detail gouge, I shaped the blank until I got a form I liked.  No hard edges and narrowed waist to give your finger someplace to grab.  Below is the gouge I used, a closeup of the cutting end, an intermediate shot during the turning and the final shape ready for finish.

Things went well and I turned 6 pieces with no problem.  However, I had a small piece of cocobolo that was the last piece to turn and as I was running the screw into the blank it split.  Evidently the pilot hole was a little too small.

When I gave one side a little nudge the whole thing split right in half.  Looking at the two pieces the split faces looked like they might fit back together and I could continue.  A liberal application of dark colored glue, overnight clamping, drilling the pilot hole a size larger and I was read to have at it again.


The turning went smoothly until I had a small catch that broke my fixture sending the blank flying by my right ear.  Not the preferred method of turning but it happens.  As they say, "Sometimes you're the hammer and sometimes you're the nail.".  Retrieving the blank, it was just fine no problem with the glue joint.  However, the fixture did not fare so good.  The left photo shows the fixture and the blank with part of the fixture still attached.  Rather than make a new fixture I thought I would try and repair it.  I turned the broken face of the fixture flat and glued a scrap of cherry to it as shown in the right photo.  


Putting the fixture back into the scroll chuck I turned the patch round and drilled a new pilot hole.  After that I mounted the offending blank back onto the chuck and very carefully finished turning it.


Finishing was next and to make spraying easier I mounted the turned pieces on some scraps using some long screws. 


I applied four coats of lacquer, let them set for a few days and wet sanded with 6,000 grit sandpaper.  Here are the finished pieces after installing the magnets.  My wife declared the cocobolo piece in the center hers and we will send the others out.


Next Up – Finishing the Mallets, I promise


Monday, December 18, 2017

Wood Balls, Mallet & Overlapping Circles - #4 Making the Handles

With the head pretty much done I started on the handle.  The piece of mesquite I had left had quite a few cracks in it that I had to work around.  Here is a photo of the end and you can see how the handle blank just fit between the cracks and the sapwood.


With the handle laid out I cut the waste away on the table saw ending up with a nice square blank.  Next is to cut the tenon that will go into the tapered mortise in the head.  Here I have set the stack dado blade to the right height and am ready to cut the rest of the waste away.
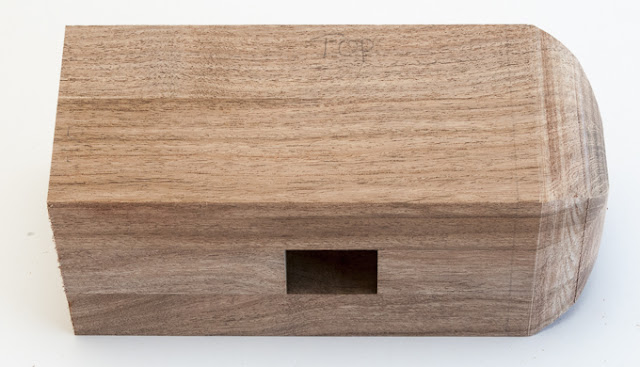
After cutting the tenon I mounted the handle blank in the lathe and started turning it round.  I always turn using a dust mask and frequently use the face shield.  I probably should use the face shield more.

Once I had the handle round I wanted to turn a slight arc or taper the handle from the ends toward the center.  To do that I marked out evenly space pencil lines then using a parting tool cut into the handle at gradually increasing depths toward the center.  This gave me my reference points for the bottom of the curve.  All I had to do was remove the material above that imaginary arc.  Also, if you look on the left edge of the photo you can see how the finished tenon looks.

The next step is to turn the round, tapered handle to an oval keeping the center taper.  To get an oval requires offset turning.  By that I mean the lathe mounting points in the handle will be moved off center.  Here is an over view of the handle ready to be turned in the first of the two setups required.

This is a closeup of the tail.  You can see how the live center in the tail stock is offset from the original center point used to turn the blank round.  The white line at the top is a reference line that will be the high point of the oval.  There is a matching one on the opposite side of the piece.  The chalk will be used as a visual guide while I remove material.  It will also come into play when I do the second setup to make sure the offset turning is matched.  More on that later.

Here is the headstock setup.  In this case I had to use a different method to get the offset than the tailstock.  Because the tenon is smaller than the rest of the handle if I tried to offset the drive center like I did on the tailstock it would be right at the edge of the tenon.  That would not work so I had to use a different method.  Switching to the scroll chuck I added the shim shown to provide the same offset as on the other end at the tailstock.

Because the piece is off center I have to be careful of how fast I have the lathe turning.  As the lathe speeds up the vibration increases.  Too fast and even the lathe I have which weighs over 800 pounds will start to shake.  Also, the piece being turned could fly off and that would truly ruin your day.  Anyway, here you can see how the chalk gives me a nice clear line showing the demarcation of where I have removed material.  At this point I have one side of the handle turned to an oval.  I can now remount it for the second offset.  It is set up just like the first except to the opposite side.

With the second setup made I can start turning the second half of the oval.  Here is where the chalk and center lines I made earlier come into play.  To get a symmetrical oval I need to remove the same amount of material from both sides.  To do that I stop the lathe frequently and check to see if the chalk is a mirror image about the center line.  In the top photo below, you can see the center line and how the chalked area matches on both sides.  The bottom photo is a side view and shows the same symmetry.  All that remains is to smooth the transition between the cuts and round the heel of the handle.


Here is the finished mesquite handle with the slots cut for the wedges that will lock the handle in place.  The slots were cut with the bandsaw.


The handle for the white oak mallet is a lot simpler as it is based on a rectangular section versus an oval.  To lay out the taper I marked three points; the beginning, end and amount of offset in the center.  To mark it I took a long clamp, set a thin piece of oak between the jaws and slowly tightened them until I got the arc I was looking for a shown below. 


Its then pretty straightforward to cut the arcs with the bandsaw and smooth using rasps, files and sandpaper.  Last step is to round over the corners using a router to start and finishing with files and sandpaper.  This is the handle except for the tenon which is out of frame.  It has the slots cut in it for the wedges also and looks just like the mesquite one.


Next Up – Finishing the Mallets

Monday, December 11, 2017

Wood Balls, Mallet & Overlapping Circles - #3 Starting the Mallet

I have a couple of mallets I use in the shop on a fairly regular basis.  One I mostly use where I need to give things a good whack like setting lath centers.  It is a good-sized round headed one made out of hedge or Osage Orange.  I made it probably 30 plus years ago out of an old fence post.  Hedge is extremely rot resistant and very hard.  One measure of hardness is the Janka scale.  This test measures the amount of force required to embed a steel ball half way in the wood sample.  On this scale Red Oak has a hardness of 1,220 pounds while Osage Orange comes in at 2,760 pounds or more than twice as hard.  I know that may be more than you really wanted to know but I thought it was interesting.  The other mallet is a smaller, lighter more delicate one that I use for finer work that I inherited from my father-in-law many years ago.  My goal is to replace the hedge mallet with something having a little more mass and better balance than the existing one.

I came across a plan for one that with a few modifications looked to fit my needs.  As I usually do I started with making a 3D drawing.  One of the things that appealed to me was the tapered, wedged mortise that the handle fits in.  Below is the assembled piece and an exploded view.

I decided to make two of the mallets as long as I was doing it.  The only real difference between the two is going to be the handle shape and the material.  I want to make one oval handle and one more rectangular.  For the material, one is out of White Oak (Janka hardness 1,335) and the other out of Mesquite (Janka hardness 2,345).  The oak one is from some leftovers I had from a Craftsman futon I made about 10 years ago.  The source of the mesquite is a little different.  Probably three years ago I was given a split half of a log.  To turn it into workable pieces I used my bandsaw.  I started out by screwing the flattest side to a piece of MDF which will act like a sled.  Here you can see what that looks like. The straight edge of the MDF at the top of the photo will be held tight up against the fence on the bandsaw to guide the log through to get a fairly straight cut face. 

Here you can see the result with the cut off scraps and my good cut edge.  It really came out pretty good.

With a good flat face to work with I unscrewed the MDF sled, relocated it to the just cut flat face and screwed it to that face.  The straight edge of the MDF extends beyond the log just like in the first cut. When held tight against the bandsaw fence I made my second cut.  This gave me a 90-degree square edge with two adjacent flat faces.   I could now use that 90-degree edge and the flat faces to square off two more sides giving me a piece of wood pretty close to square with four flat faces.  From there its just a matter of setting the fence and slabbing off pieces.   The photo below shows both the slabs and what’s left of my original log.

After running the band sawn slabs through the thickness sander, I had smooth flat pieces that I could layout the mallet parts on.  This is the layout for the outside faces.  I paid attention to the grain and worked around the cracks in the wood.


The handle will be set in a tapered mortise.  However, rather than glue up a big block of wood for the mallet head and then try to cut a tapered mortise in it I decided to take a little different approach.  I put the head together in four pieces.  There are the two outer faces and then two pieces that make up the center layer.  It’s pretty easy to use the chop saw to cut a 2-degree angle on the center pieces to give me my tapered mortise.  Here is what one face and the two center pieces look like ready to get glued up. 


Here is the first glue-up for the head clamped in place.  I decided to do it in steps as trying to get all four pieces clamped up in good alignment sure sounded like a recipe for disaster.  The left glue-up is the mesquite and the right is the white oak.  The black ring on the left side of the white oak piece is where I left an iron “C” clamp on while the glue set up.  Its black because the iron reacts with the glue and the tannins in the oak leaving a black stain.  That’s not a problem here as that edge will get trimmed but if it were a finished face I would need to put a non-reactive barrier between the clamp and the oak.


Once the glue cures I can glue and clamp the second face in place.

After the glue cured overnight I removed the clamps and squared up the blank using the table and chop saw.  Next is to mark the 2-degree cut I will make on the left end.  The slight angle on the face will help counteract the fact that when striking something ones arm is not at a 90-degree angle to the item being struck.  I also laid out the curved end on the right side.  I use the band saw to rough the curve out.  The photo below shows the cutting in progress.  After I cut two of the faces I needed to tape one of the cutoffs back on so I could see where to make the last two cuts.


Here you can see the rough cut rounded end and the 2-degree cut on the other.  The next step is to smooth out the rounded end.  To accomplish that I used the disk sander, rasps, files, the power hand sander and finished with some hand sanding.


Next Up – Making the Handles

Monday, December 4, 2017

Wood Balls, Mallet & Overlapping Circles - #2 Turning & Finishing the Balls

With the jigs done I removed them from the lathe took off the scroll chuck, put the drive center back in, changed out the live center to a different style and mounted one of the test ball blanks between the drive and live centers.  Next is to mark a line centered on the cylinder and then lines to the left and right of that equal to the radius of the cylinder.  What you end up with is the outside edges of the ball centered on the cylinder.  Take a look at the photo below, it probably makes more sense than my description.


Now the actual turning of the ball can begin.  First step is to cut down the area beyond the ball diameter on both ends.  That completed I can start to cut an arc that sort of matches the radius of the ball to be.


To help me out in getting the right shape I cut a paper template with a radius about 1/16” larger than the ball’s finished diameter.  More turning gets me closer to the shape I am looking after.  As I get closer to the final size I am also turning the stems on either side down.

Here is the end of the first part of the turning.  The ball is pretty close albeit oversized by a bit.  Note how small the stems are now.  They are cut off fairly close to the ball with a fine-toothed saw.  I use a thin Japanese pull saw.


Now is when the jigs I made in Post #1 come into play.  Think of a line through the stems on the ball as the X axis.  When I put the ball in the jigs I set it so that axis is 90 degrees to a line that runs between the head and tail stock.  You can see the cutoff end of the stem centered between the jigs.  When I start turning they will get removed. 

As I turn I will be looking for those shadowy areas along the edge of the ball indicating the piece is out of round.  It is similar to what I was talking about when I was rounding the ball blanks to a cylinder in Post #1.  There is not a lot of material to be removed so a light touch and sharp tools are needed.  When done with this step the stems are gone and the ball is closer to being a sphere.   It is critical at this step not to remove the existing pencil center line reference.  If that is done then the overall size of the ball is reduced in this axis and you will have to go back to the original axis setup and bring the overall diameter down.  Not shown here is the marking of the center line with this setup.  I did it after the photo was taken.  It will align with the balls glue joint.

Next is to rotate the ball once again 90 degrees to it’s Z axis and go through the same process of gently removing material until the shadowy areas are gone or nearly so but not removing the two pencil center lines.  It may be necessary to go back through all three clamping setups with the jigs to touch up the X, Y and Z axis’s to get a round ball.  Just remember you are not making ball bearings so they don’t have to be round within a gnat’s whisker.  When done turning its time to start sanding.  Work your way through the grits starting with an appropriately coarse grit sanding on one axis then rotating the ball then sanding on another axis until you have gone through all three of the axis’s.  Move to a finer grit and go through the process of sanding, rotating the ball, sanding, rotating, etc. until you end with a grit fine enough to remove visible scratches.  


The sanding can be done by hand or using some power assistance.  I have done it both ways.  Here I am using a drill with an attachment that has a soft pad on the end and uses a hook & loop sandpaper mounting system to hold the sandpaper in place.


When done sanding the last step is finishing.  For these balls I used a friction applied wax finish. 
 
The application method is to get the ball spinning and then rub the wax stick against it using the friction to melt some wax onto the ball.  I then pressed a folded piece of an old clean white cotton tee shirt against the ball with the lathe spinning at about 1,200 rpm’s.  The friction between the cloth and the piece melts the wax into the ball giving a nice smooth finish.  I will turn the cloth to a fresh surface and buff the ball to a final polish.  Once again just like the turning and sanding the ball will need to be rotated so the wax can be applied on each of the X, Y and Z axis to give an even finish.  This is the ball with the completed wax finish and the cloth I used to buff it out.


Here is the ball finished and out of the jigs.  It looks and feels perfectly round but to tell the truth if you were to put a micrometer on it there are very subtle variations in the diameter.  However, like I said before these are not precision ball bearings!

Once I finished the first couple of test ball I decided to make some more using different woods.  The next one made from mahogany was going to be a lot larger than the test pieces.  However, as I started turning I uncovered a big crack hidden inside.  By the time I got rid of it the big ball had turned into two smaller ones.


Anyway, I ended up turning 7 balls of different sizes and materials.  I made them out of construction lumber (the test pieces) mahogany, oak, cherry and hard maple. 

One additional thing that I did learn was when doing the finishing is it helps to add a bit of paper towel between the ball and the jig.  Doing that does a couple of things.  First, it provides a little bit a friction between the ball and the jig.  In more than one instance while I was doing the buffing and was pressing the cloth against the ball to generate some heat to melt the wax the friction between the ball and the cloth exceeded that between the ball and the jig.  The result was the ball stopped, the jig did not and the I ended up with a ring where the jig burnished the ball.  In one case it was bad enough I had to go back and re-sand the ball to get rid of it.  Second, it provides a little bit of cushion between the ball and the jig.  That’s not really a problem with hard woods but with the softer ones the jig would actually dent the balls if I tightened the tailstock too much when trying to keep the ball from stopping while doing the buffing.


Next Up – Starting on the Mallet