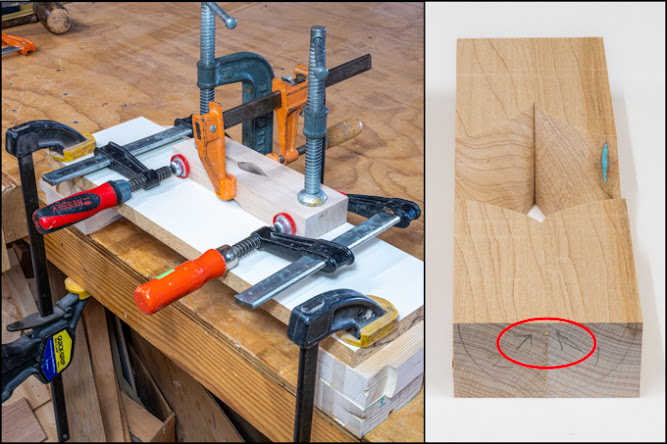
At the end of the last post a bark inclusion showed up right at the bottom of the turned part of the blank which was an unwelcome surprise. The top photo shows a closer look at the problem. There are four repair options that I considered:
- Ignore the flaw and go ahead with the project since this is going to be inside the ornament and not very visible. This is an option but it’s not an acceptable level of craftsmanship.
- Fill the flaw with wood putty. Going to pass on this since it would look like a cheap patch plus I am not sure how the putty will turn. I also don’t know if the flaw might show up later on the outside.
- Fill the flaw with black epoxy. A viable option but I would like something that is more of a decorative feature versus just creating a black spot.
- Fill the flaw with the turquoise/resin mix. I will go with this as I like the little bit of color it will bring to the piece particularly if the flaw shows up on the outside as the turning progresses. The bottom photo shows what this patch looks like.
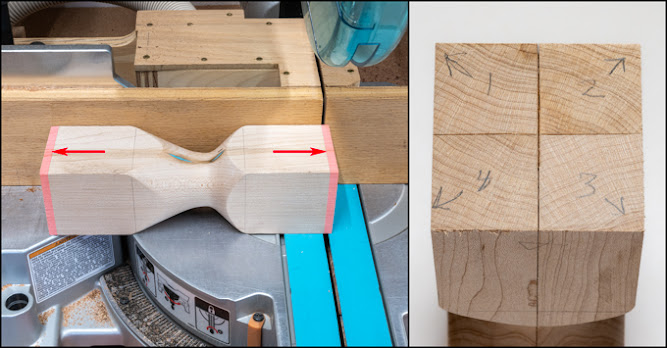
Next step is to split the turning apart into its four pieces. Before that though ¼” gets cut off each end shown by the red arrows and the red shaded areas. Since the glue holding the pieces together was applied in a ¼” band cutting that amount off should help the splitting apart go easier. The right photo shows the numbered quarters along with an arrow pointing toward the outside corner. When reassembled that arrow will point toward the center of the blank.
On the left is two of the four pieces being glued together just like the prototype. The right photo shows after gluing where you can see the arrows pointing toward the center.
Once glued back together the blank is mounted in the lathe so the outside can be turned. The photo shows the 4-jaw chuck gripping the left end of the piece and a live center at the right end. The chuck is used so I can part off the right side with the chuck still holding the piece in the lathe. When I get to parting off the right end it should make more sense.
The two photos below show the in-progress turning to take the square blank to a round ornament. The blue areas indicate what’s left of the original flat faces of the square blank. As the turning progresses that flat area will get less and eventually disappear. The top photo is early on in the turning process and the bottom photo is much farther on which is why the blue areas are a lot smaller.
In the top photo the turning is done except for the ends of the ornament. They are thicker than what the finished ends will be but have been left that way for strength. The bottom photo shows the turning done on the right end with just the tiniest little bit holding the far-right part of the blank on. The inset gives a closer view of that. That end is cut off using a very fine saw. With it gone the bottom of the ornament can be sanded smooth. This is possible if the 4-jaw chuck is used rather than using a drive center like earlier since the chuck is still holding the ornament in place. From here the left end is turned down to a thin end then cut off with the saw. It’s then trimmed by hand with a sharp knife and finished sanded.
With the ends trimmed here is what the piece looks like in three different rotational views. The individual ribs ended up pretty thin at only ¼” thick. Overall, the piece is 5 ¾” tall and 2 ¼” in diameter weighing 1 3/8 ounces. The blank before turning weighed 14 ounces so there was a lot of material turned into chips.
When the maple blank was made there was also one made out of cherry since I didn’t know if the turning process was going to work. They are both the same length but the cherry is made from 1 1/8” square pieces while the maple was made from 1 ¼” square pieces. The sequence for the cherry one is the same as the maple one except I decided to make a couple of design changes. First, the initial turned area is symmetrical versus the maple’s asymmetrical turned shape. To make sure the turned area is symmetrical I used a contour or profile gauge shown in the photo set so it matched the curve then flipped it 180 degrees and made turning adjustments as necessary until curves matched. Second, while I liked the competed maple ornament, I thought that it could be made lighter looking with thinner ribs by cutting the initial turning a little deeper. The down side is the thinner the ribs, the more fragile the piece gets. The maple’s center turned diameter is just under ¾” so instead of stopping there I cut deeper stopping at just under 5/8” for the center diameter.
Now that does not sound like much but it made the remaining ribs a lot thinner and much, much narrower. That meant with the piece mounted in the lathe and spun up to about 1,300 RPM’s the area in the center of the piece where the ribs are thinnest, narrowest and most fragile they almost completely disappear. This made the turning more than a little nerve wracking since I couldn’t really see the surface I was working on. The final shaping got done mostly by the sound and feel through the cutting tool. I was also really concerned about the ribs strength and worried if I got a catch like with the prototype piece the result would be the same but more spectacular. Fortunately, all went well and the ornament turned out fine with the ribs final thickness at only 1/8” thick. Here’s three rotational views like the maple photos.
Making hangers is easy by wrapping a thin wire around a Phillips screwdriver then twisting the ends together. It will be inserted into the small hole drilled at the top of the ornament and held in place with a little super glue. 
Next Up – Small Box, Part 1


No comments:
Post a Comment